Two-factor authentication and passkeys
Two-factor authentication and passkeys
Applies to: anota, all plans Roles required: any signed-in user (each person sets up their own) Regulatory references: none
Overview
Two-factor authentication (2FA) and passkeys are two ways to make logging in to anota safer than a password alone. 2FA adds a short-lived code from an authenticator app on your phone. A passkey replaces the password with a check on your own device (fingerprint, face, PIN or security key). Both are personal: each person sets up their own, whatever their role on the team.
This page follows Mariana Ortega, owner of the Café Aurora workspace, as she turns on 2FA, logs in with a code and with a recovery code, manages her recovery codes and turns 2FA off again, and then adds, uses, renames and deletes a passkey. Each step shows the screen you should see, with the button or field to use outlined in green. In these screenshots the authenticator key, its QR code and the recovery codes are blurred; on your screen they appear in full.
Key concepts
| Term | Meaning |
|---|---|
| Two-factor authentication (2FA) | A second check after your password: a code from an authenticator app. |
| Authenticator app | An app such as Microsoft Authenticator or Google Authenticator that generates the codes. |
| Key | The secret you type into your authenticator app once, to link it to your anota account. |
| Verification code / Authenticator code | The 6-digit code the authenticator app shows. It changes every 30 seconds. |
| Recovery codes | 10 single-use codes that let you log in if you lose access to your authenticator app. |
| Remembered browser | A browser where you ticked Remember this machine; it doesn't ask for the code again. |
| Passkey | A credential stored on your device (fingerprint, face, PIN or security key) that replaces your password at log-in. |
Task 1 — Turn on two-factor authentication
Prerequisites
- An authenticator app on your phone, such as Microsoft Authenticator or Google Authenticator (Android and iOS).
- You have accepted anota's privacy and cookie policy. If you haven't, the Two-factor authentication section shows "Privacy and cookie policy have not been accepted." and no 2FA actions are available.
Step-by-step
Open Account settings (click your avatar in the top bar) and click Two-factor authentication in the account menu. Status shows Disabled. In the Authenticator app card, click Add authenticator app.
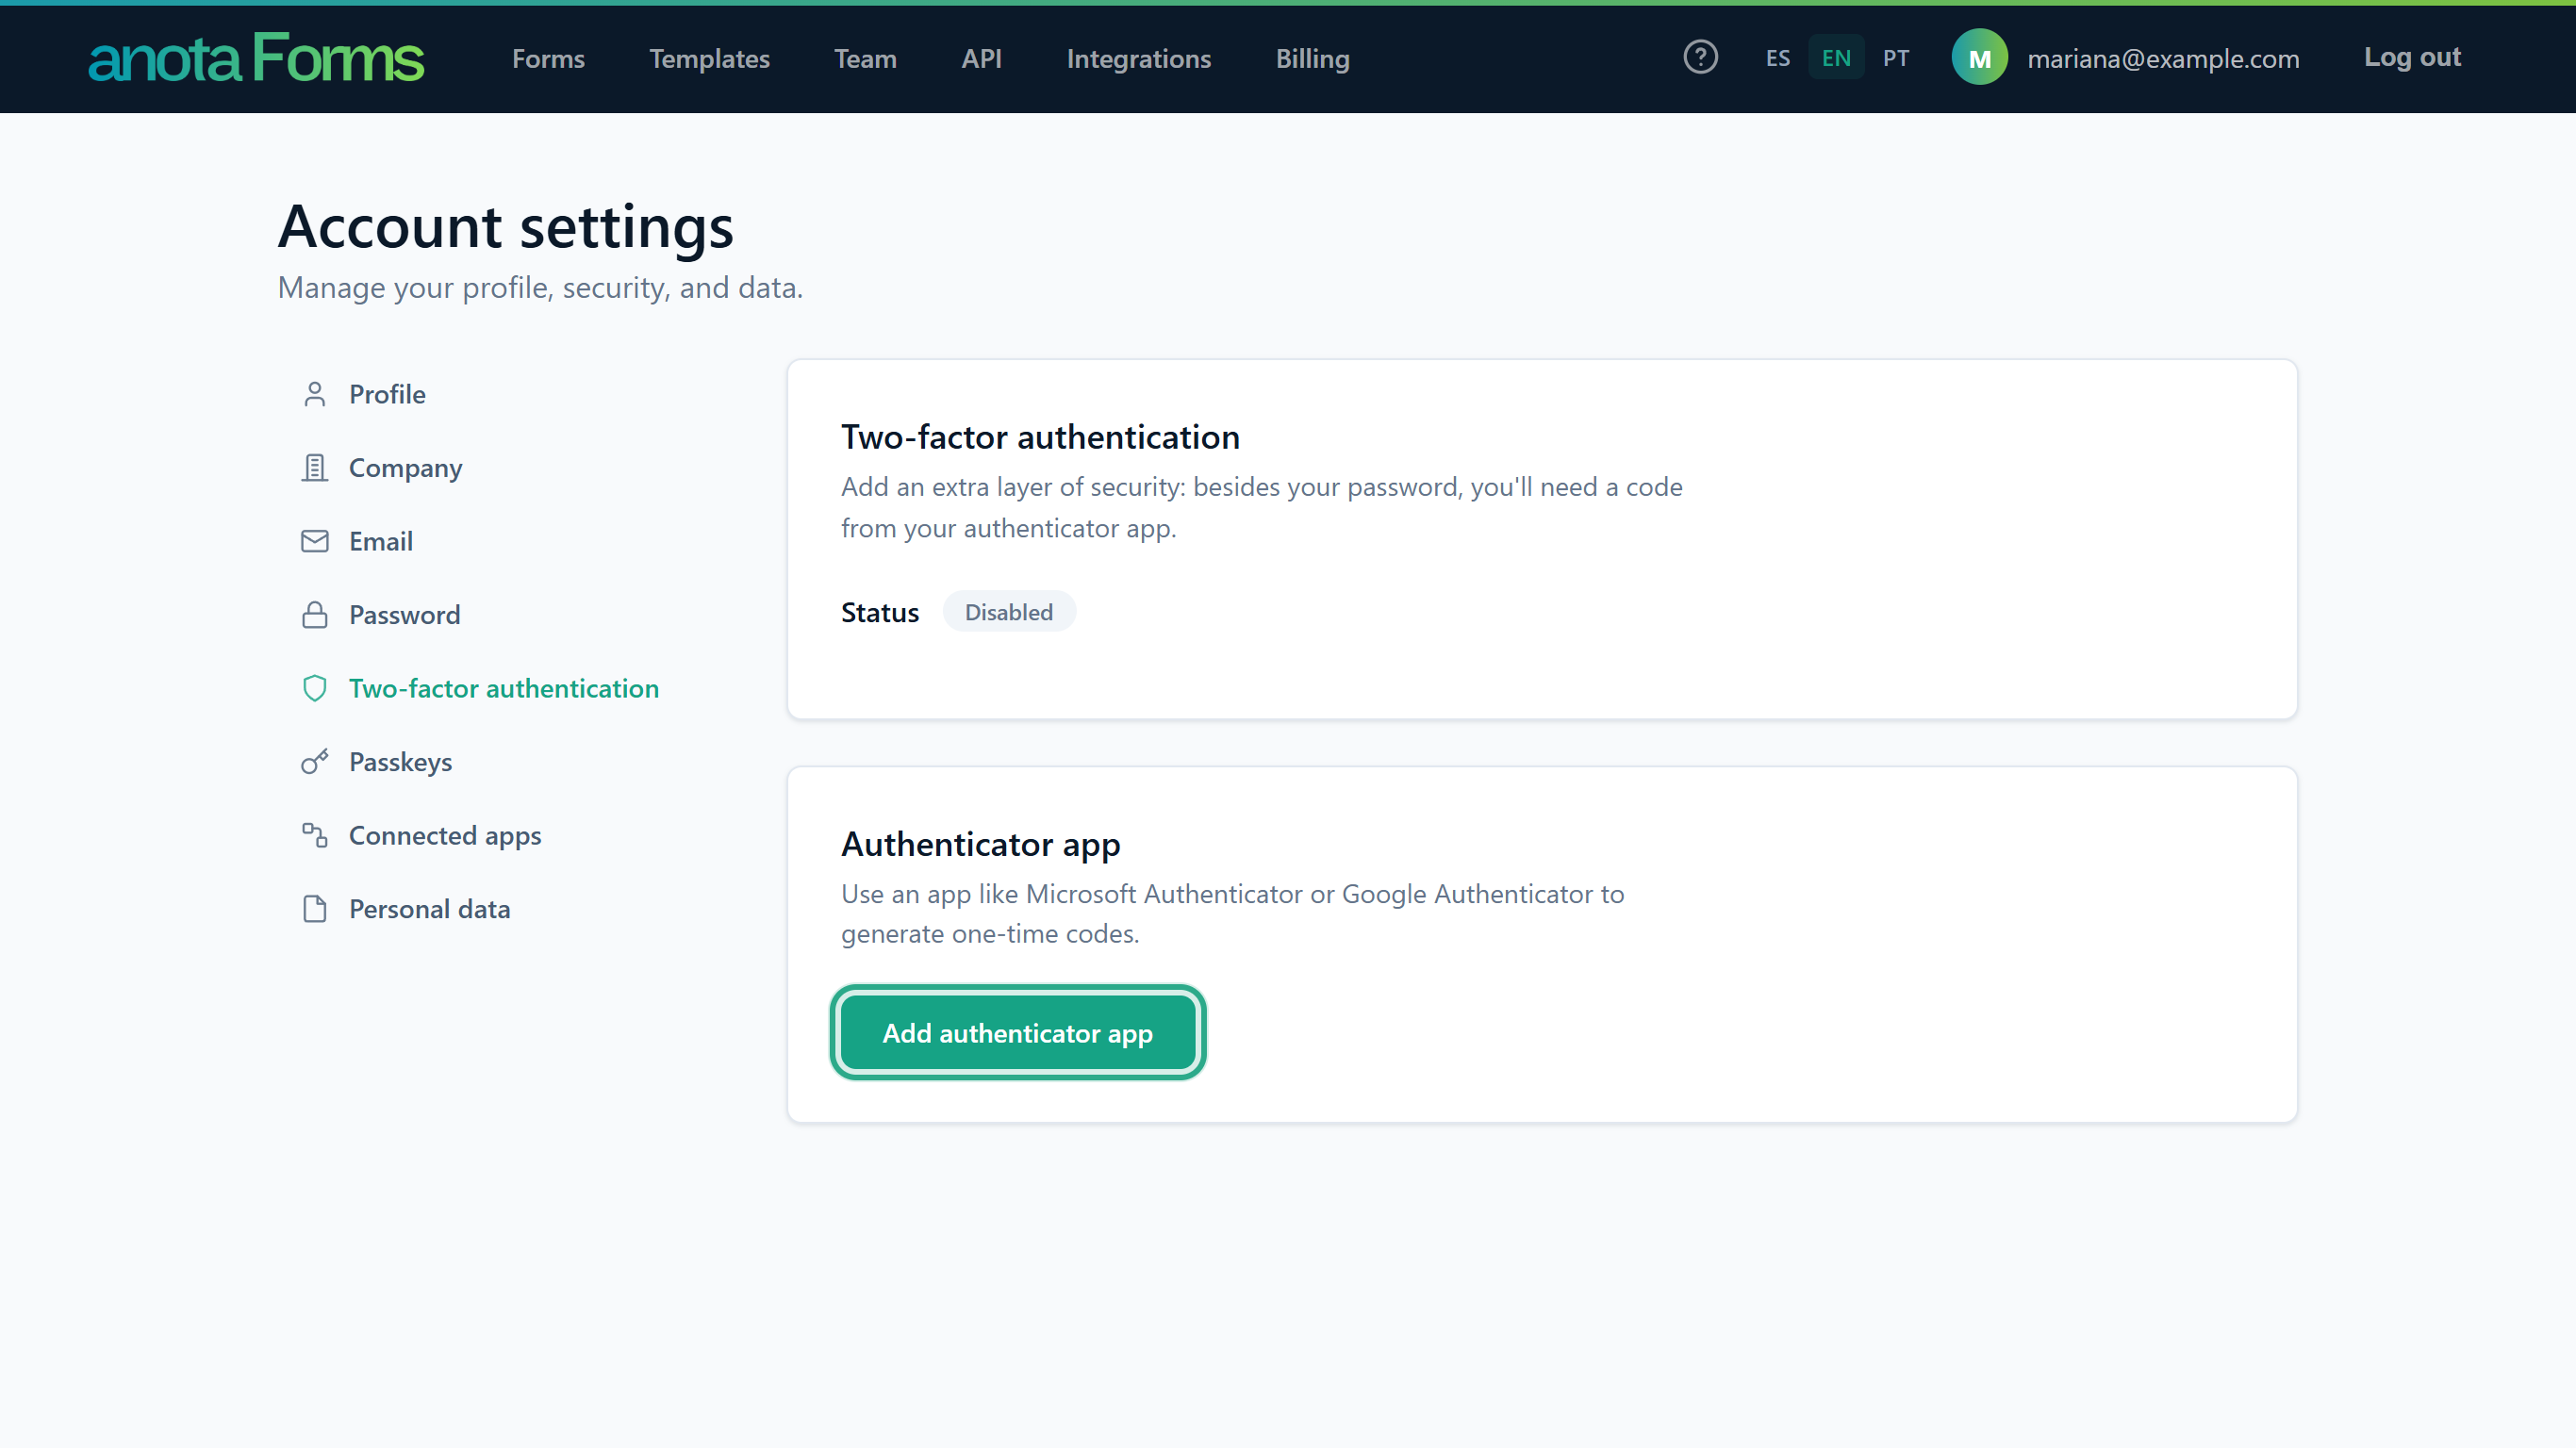 If you set up an app before, the button reads Set up authenticator app instead.
Configure authenticator app opens with three steps. In your authenticator app, add a new account and scan the QR code shown in step 2, or type the key shown there instead (spaces and capitals don't matter). The account appears in your app as anota with your email address.
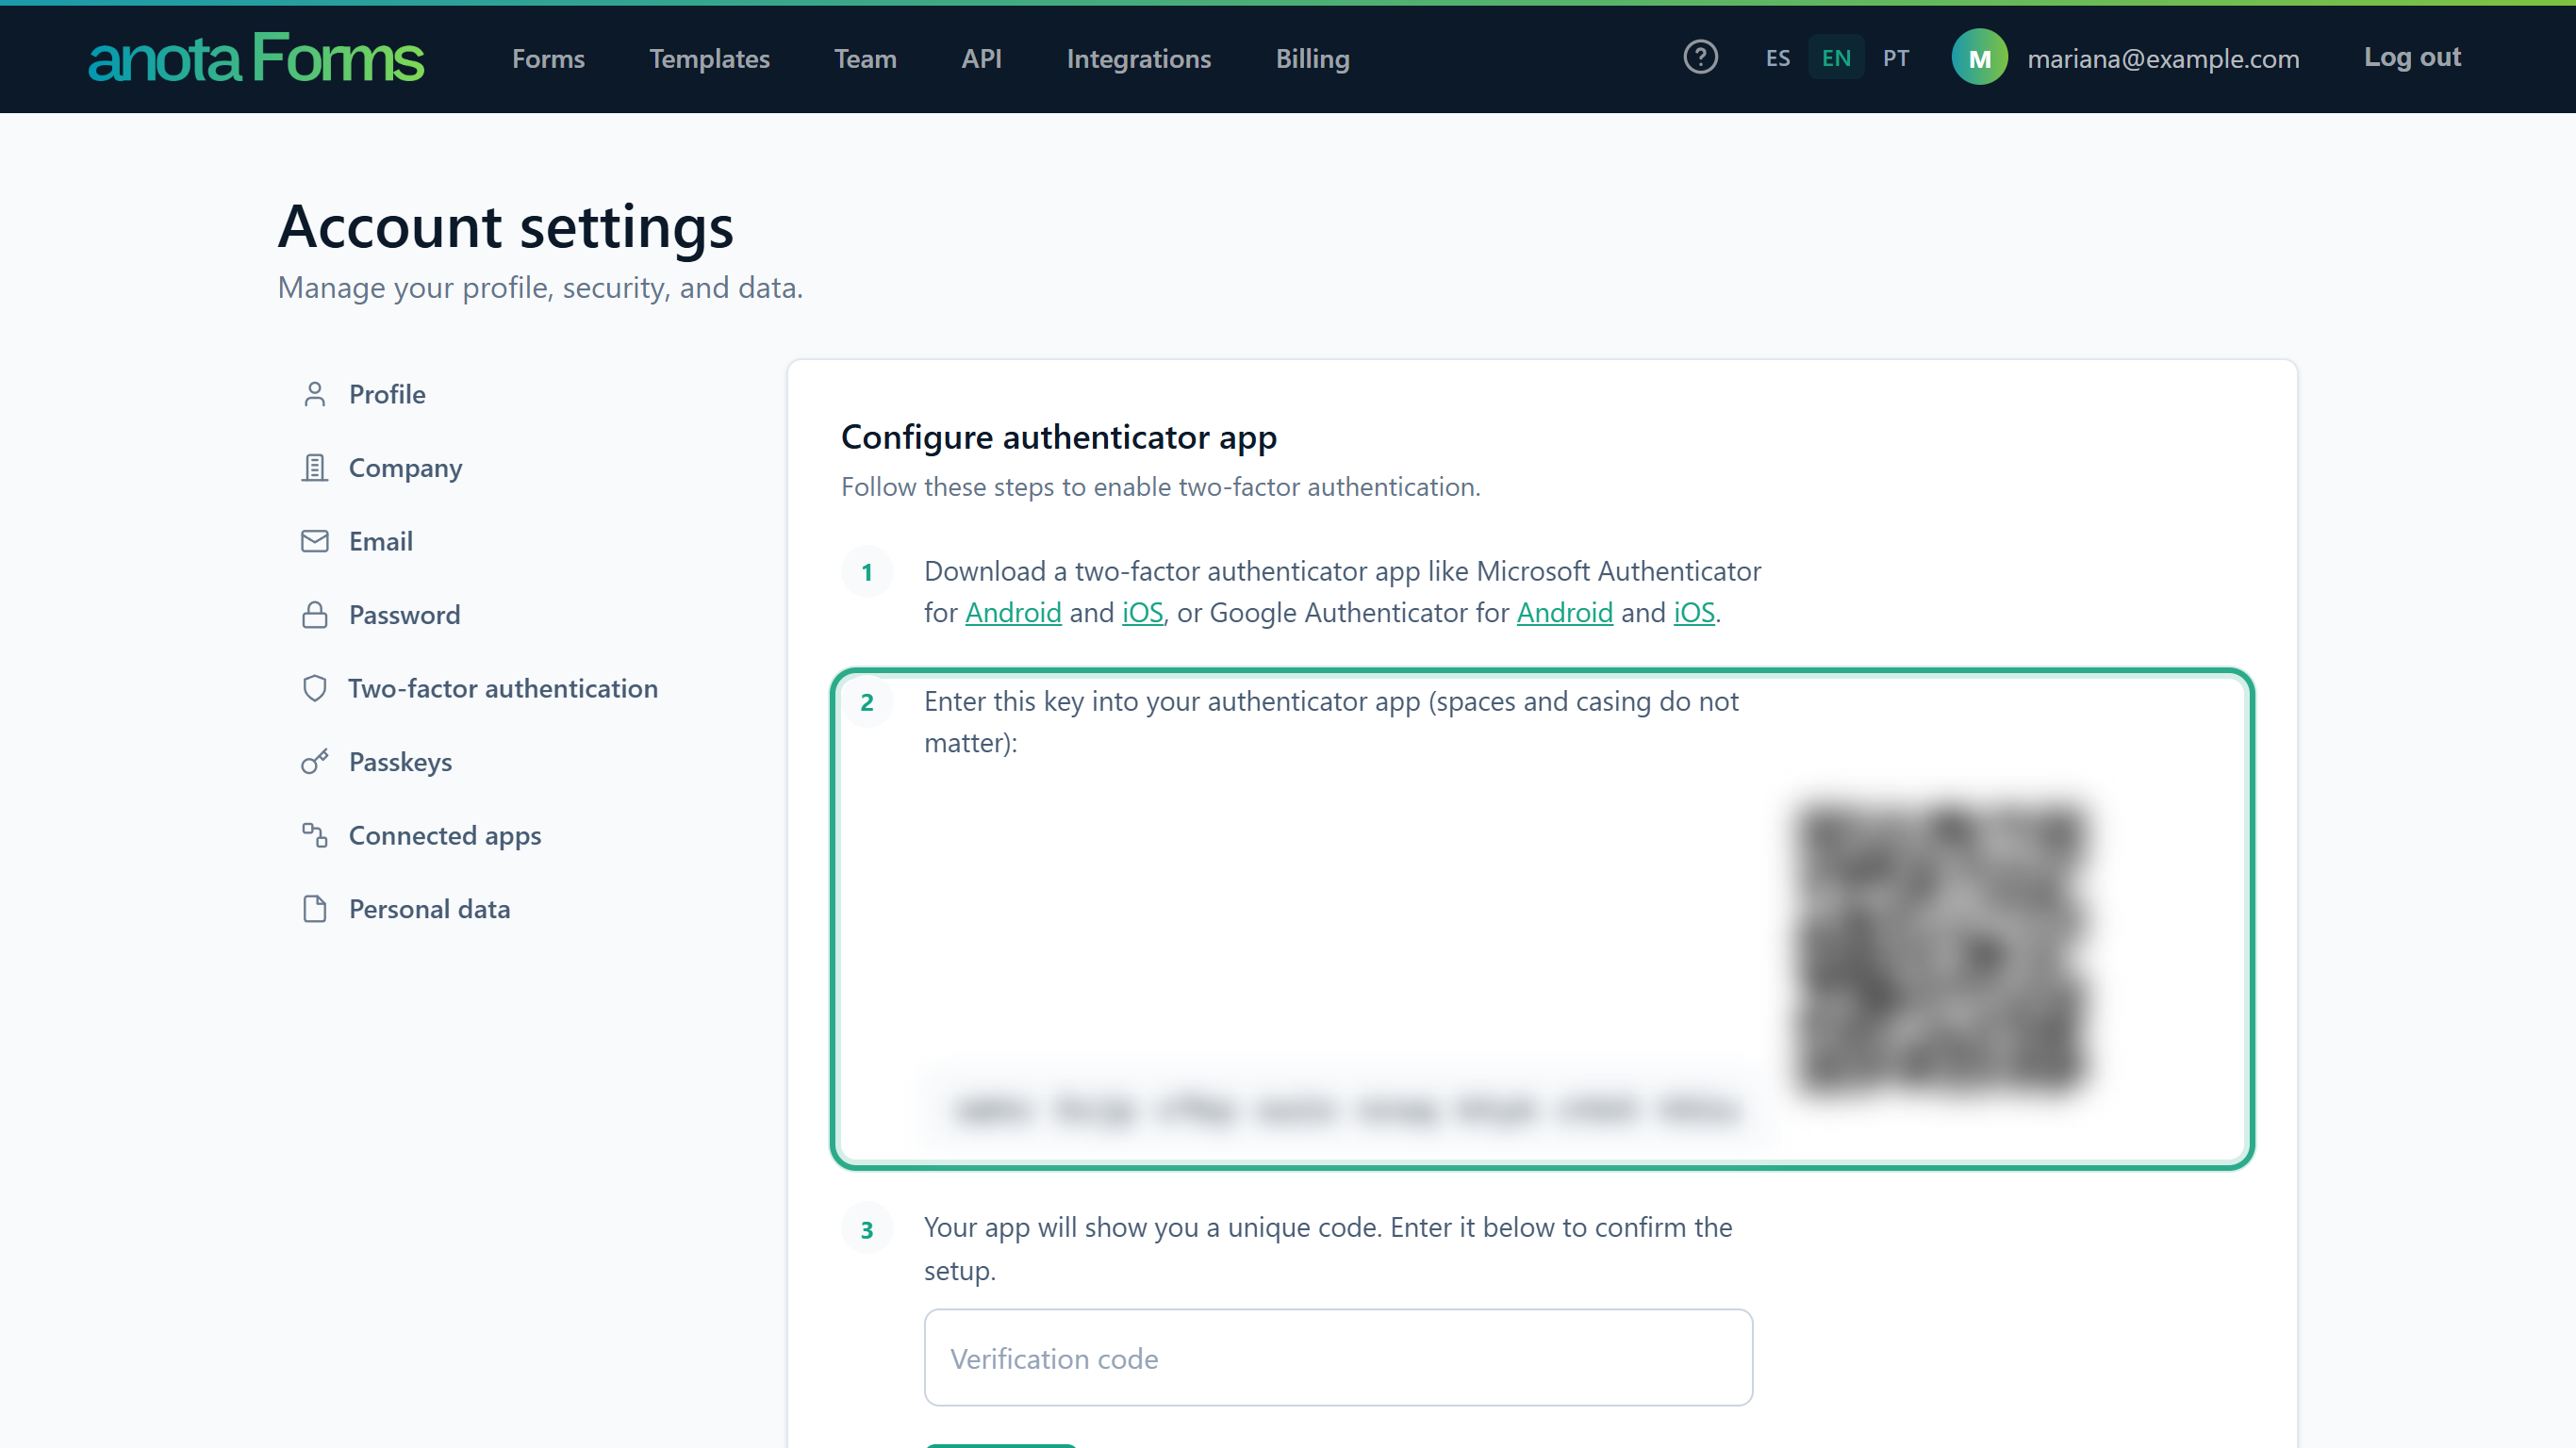 The key and the QR code are blurred here because the QR code holds the same secret as the key. Step 1 on the page links to Microsoft Authenticator and Google Authenticator for Android and iOS.
Type the 6-digit code your app now shows in Verification code and click Verify.
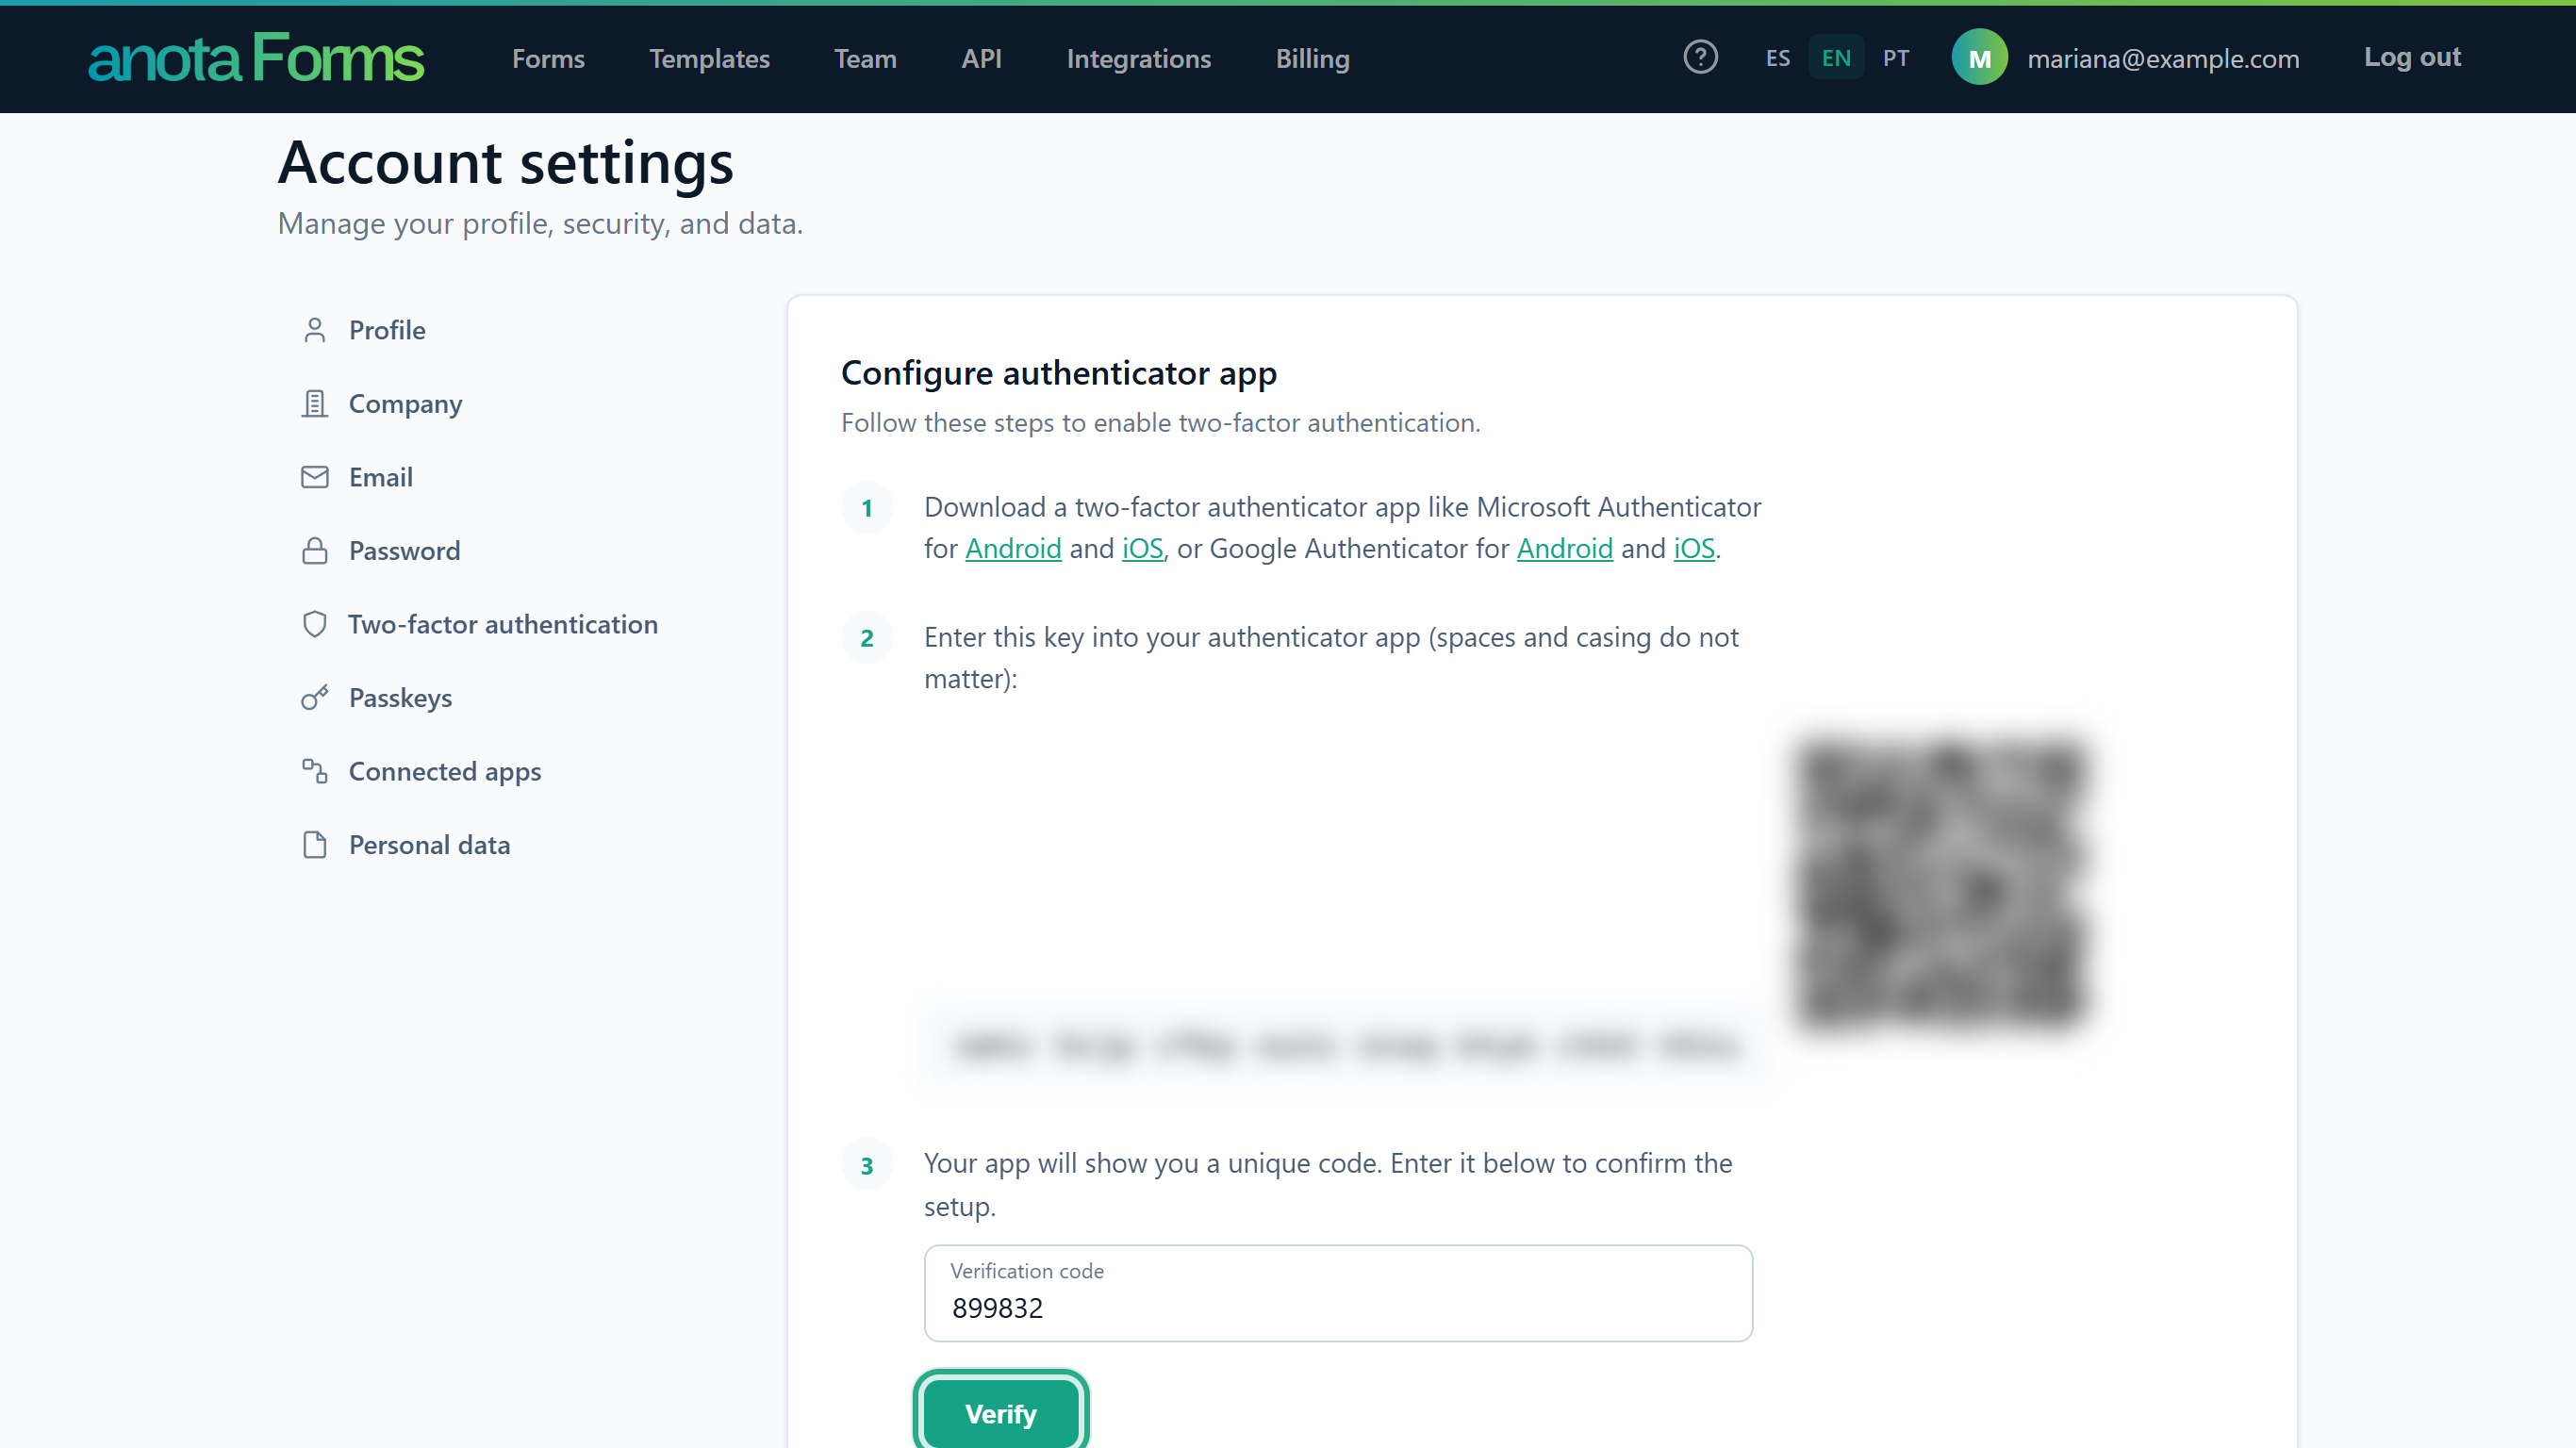 If the code is wrong, anota shows "Error: Verification code is invalid." Check that your phone's clock is set automatically and try the latest code.
anota shows Your authenticator app has been verified. and your 10 Recovery codes. Click Download codes to save them as a text file (anota-recovery-codes.txt), or write them down now, and keep them somewhere safe: they aren't shown again.
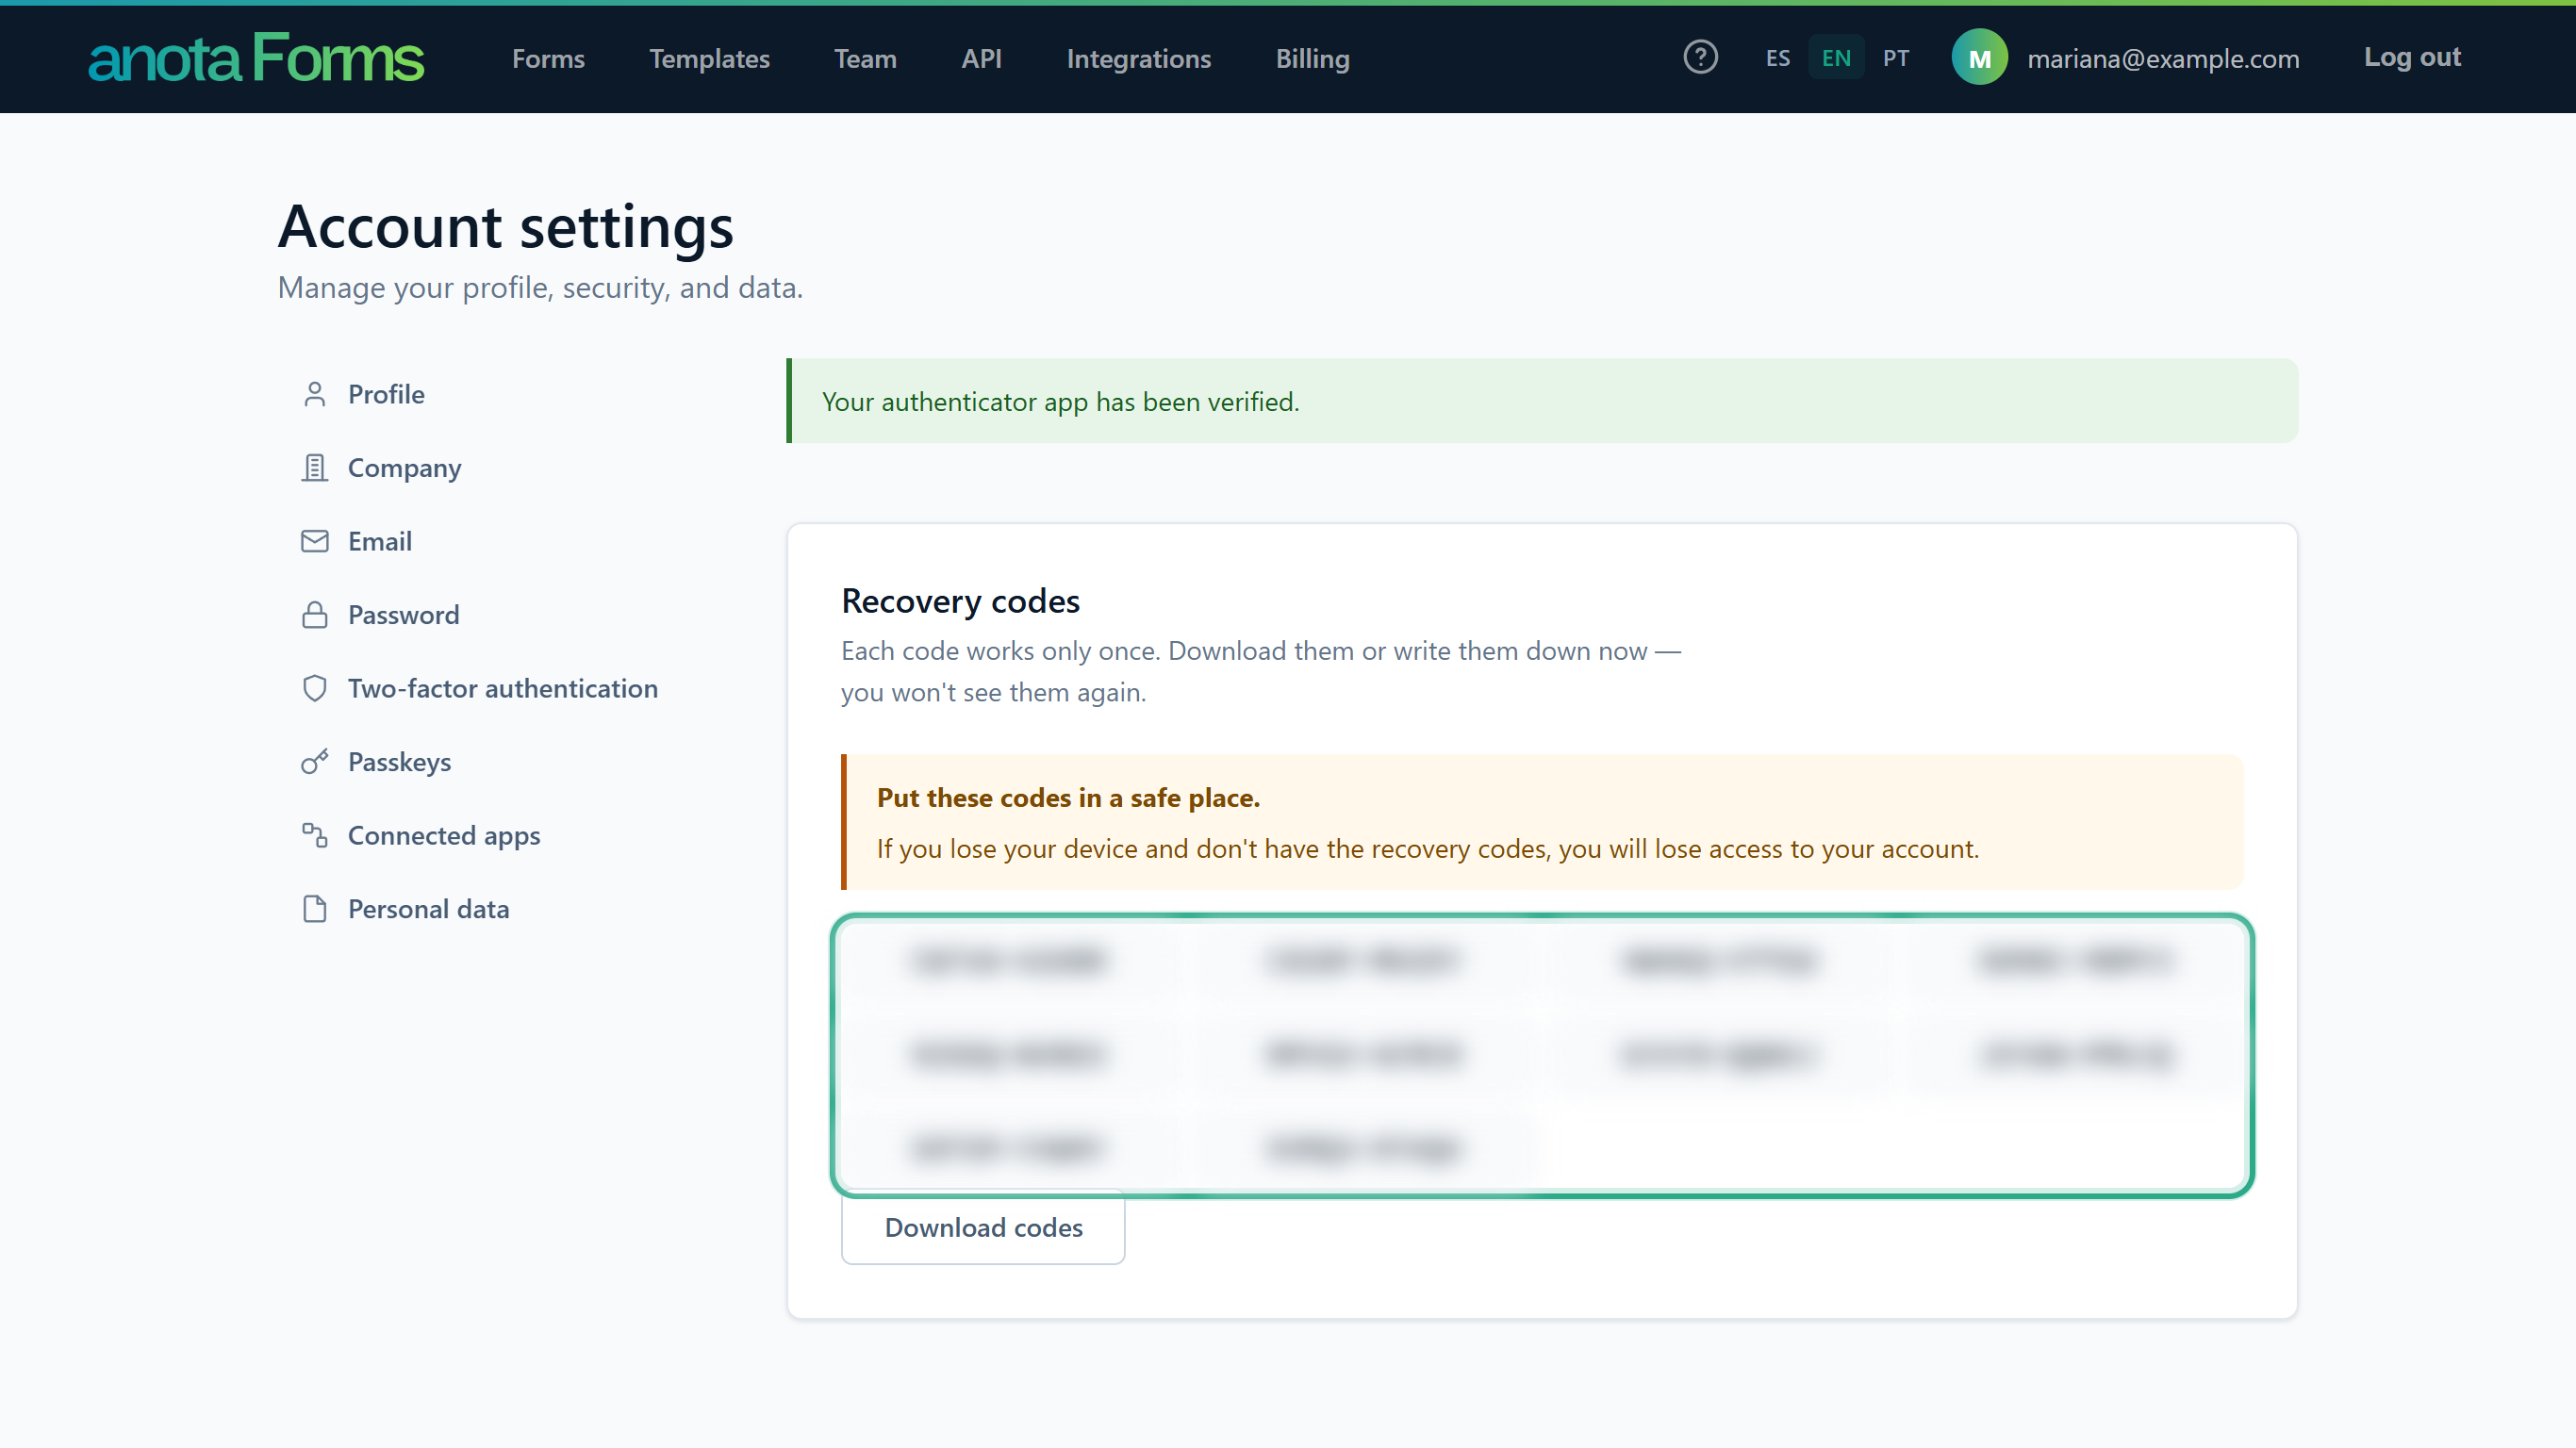 The codes only appear the first time you turn on 2FA. If you already had recovery codes, you go straight back to Two-factor authentication.
Open Two-factor authentication again. Status now shows Enabled, with Reset recovery codes and Disable 2FA below it. The Authenticator app card now offers Set up authenticator app and Reset authenticator app.
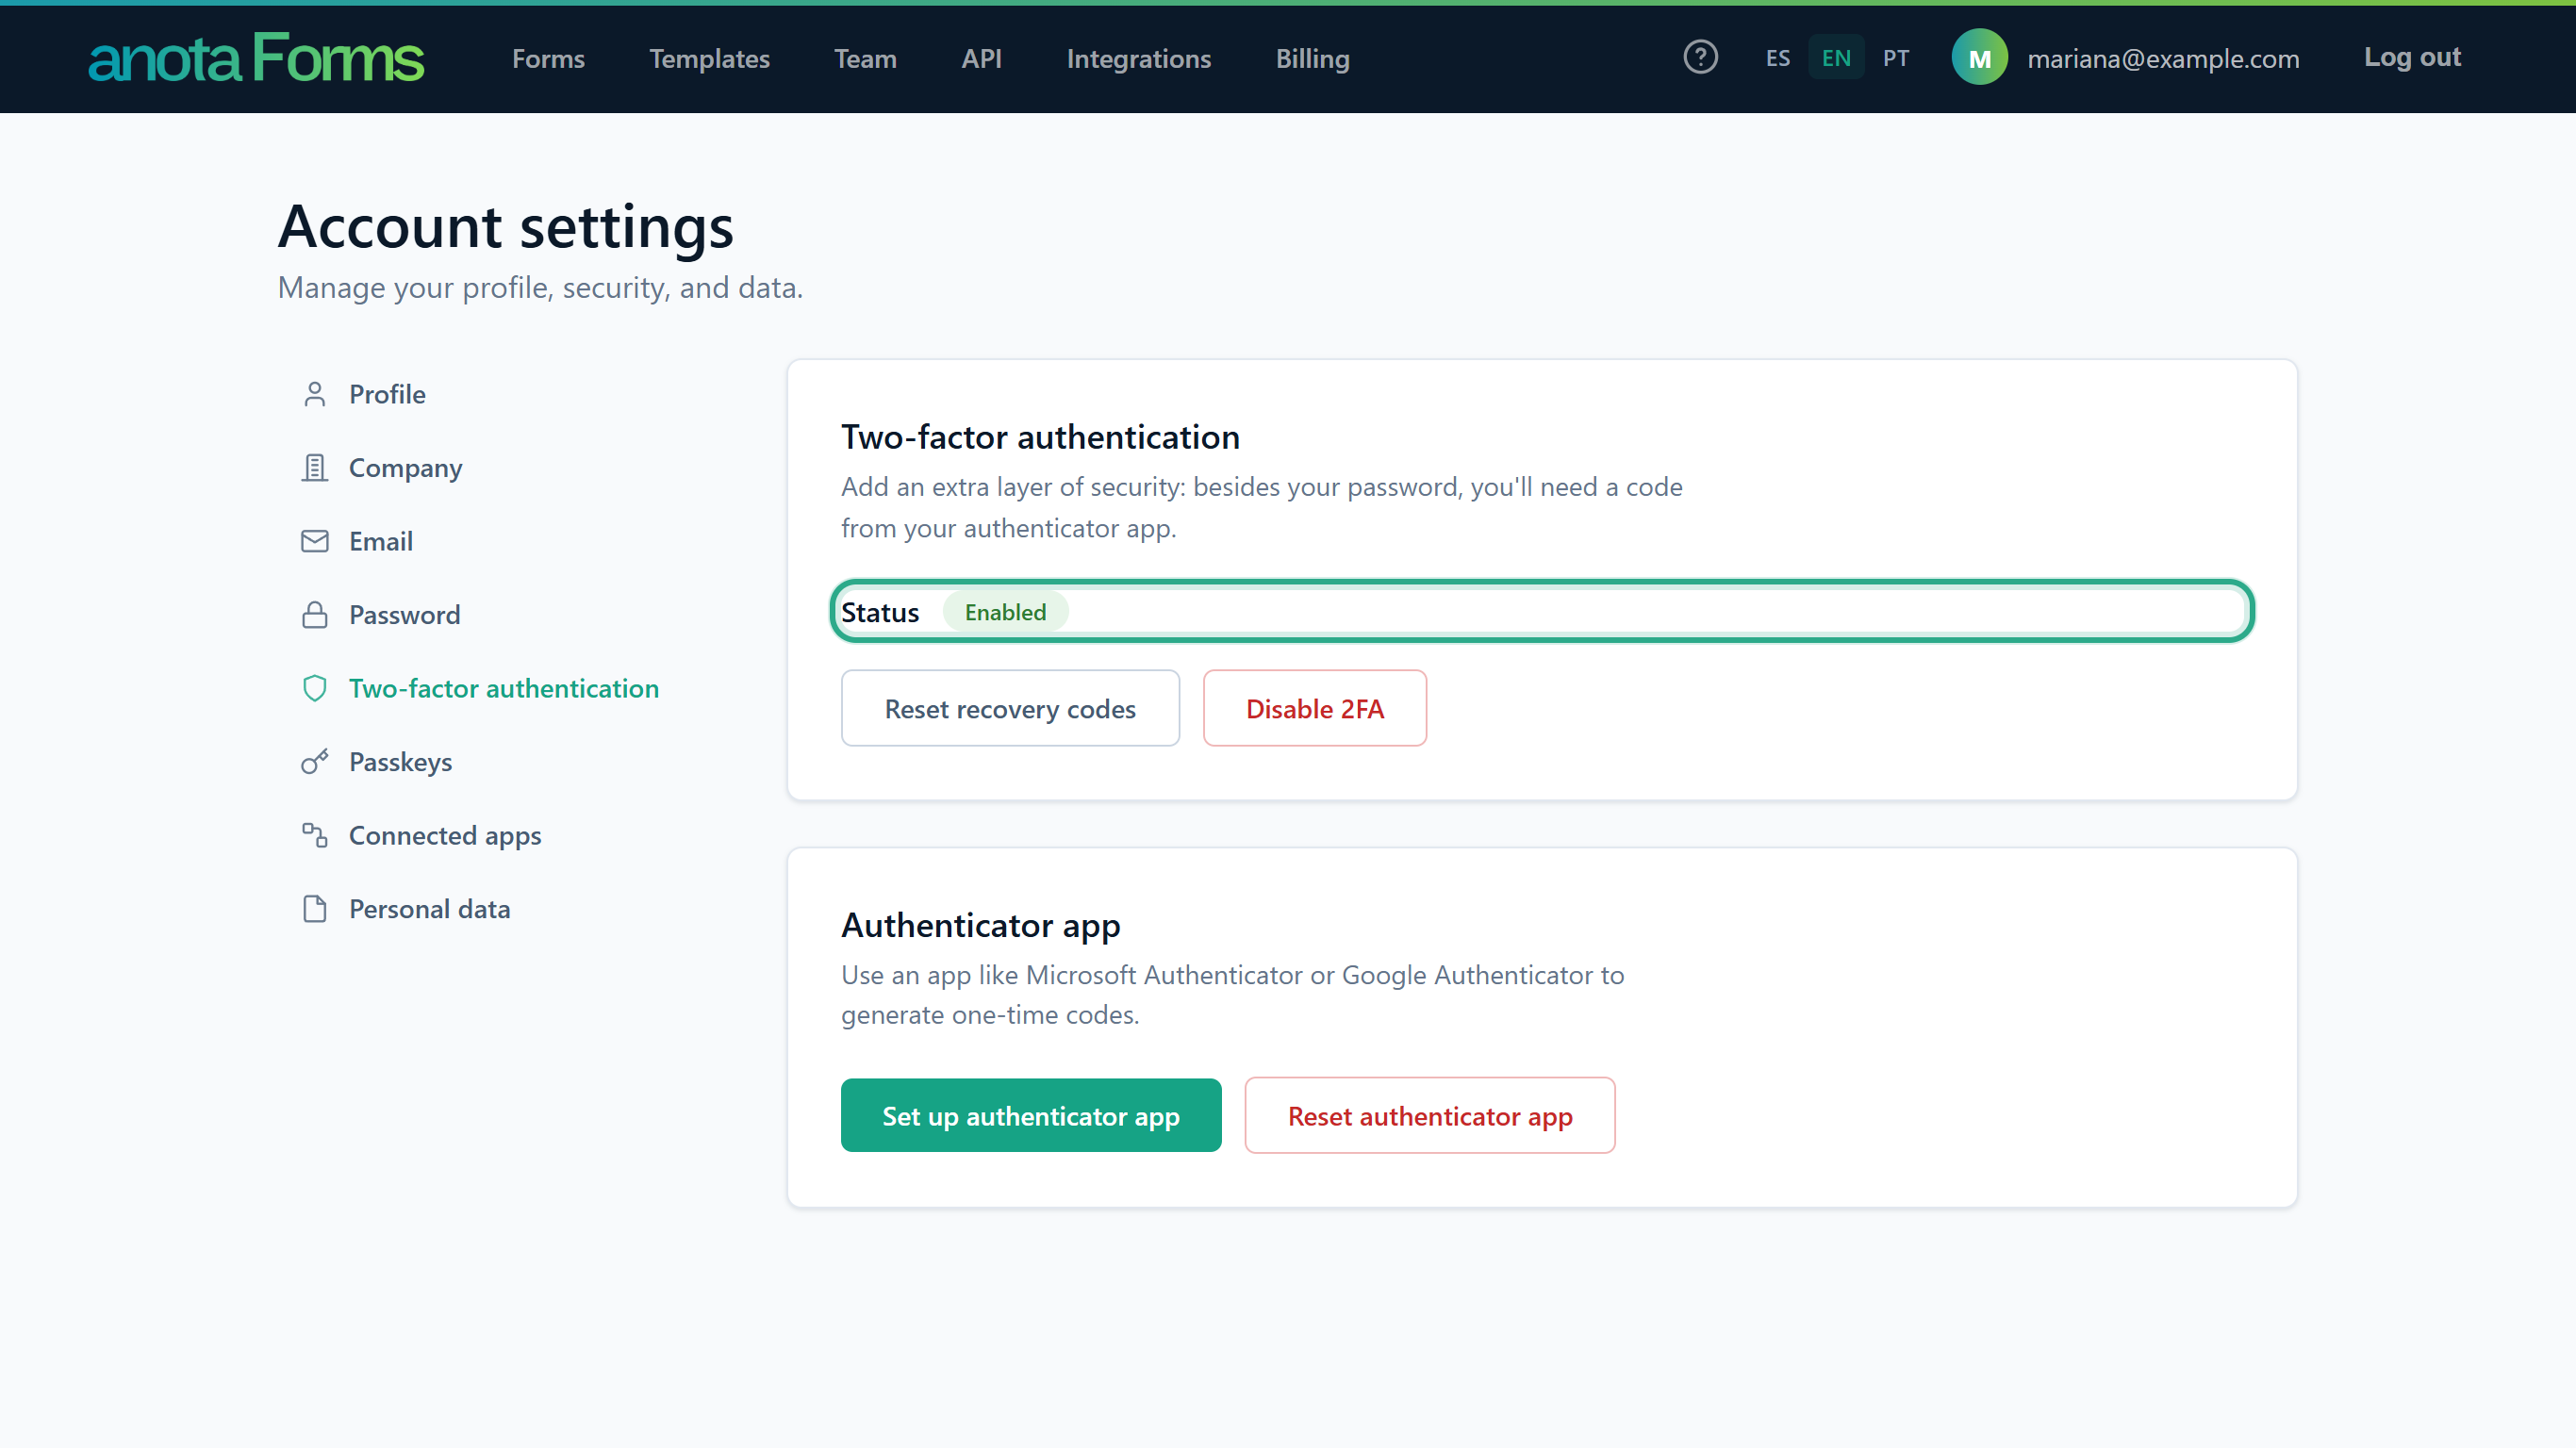 From now on, anota asks for a code after your password.
Result
Two-factor authentication is on for your account. It doesn't affect anyone else on your team.
Task 2 — Log in with your authenticator code
Step-by-step
Log in with your email and password as usual. The Two-factor authentication screen opens. Type the code from your app in Authenticator code.
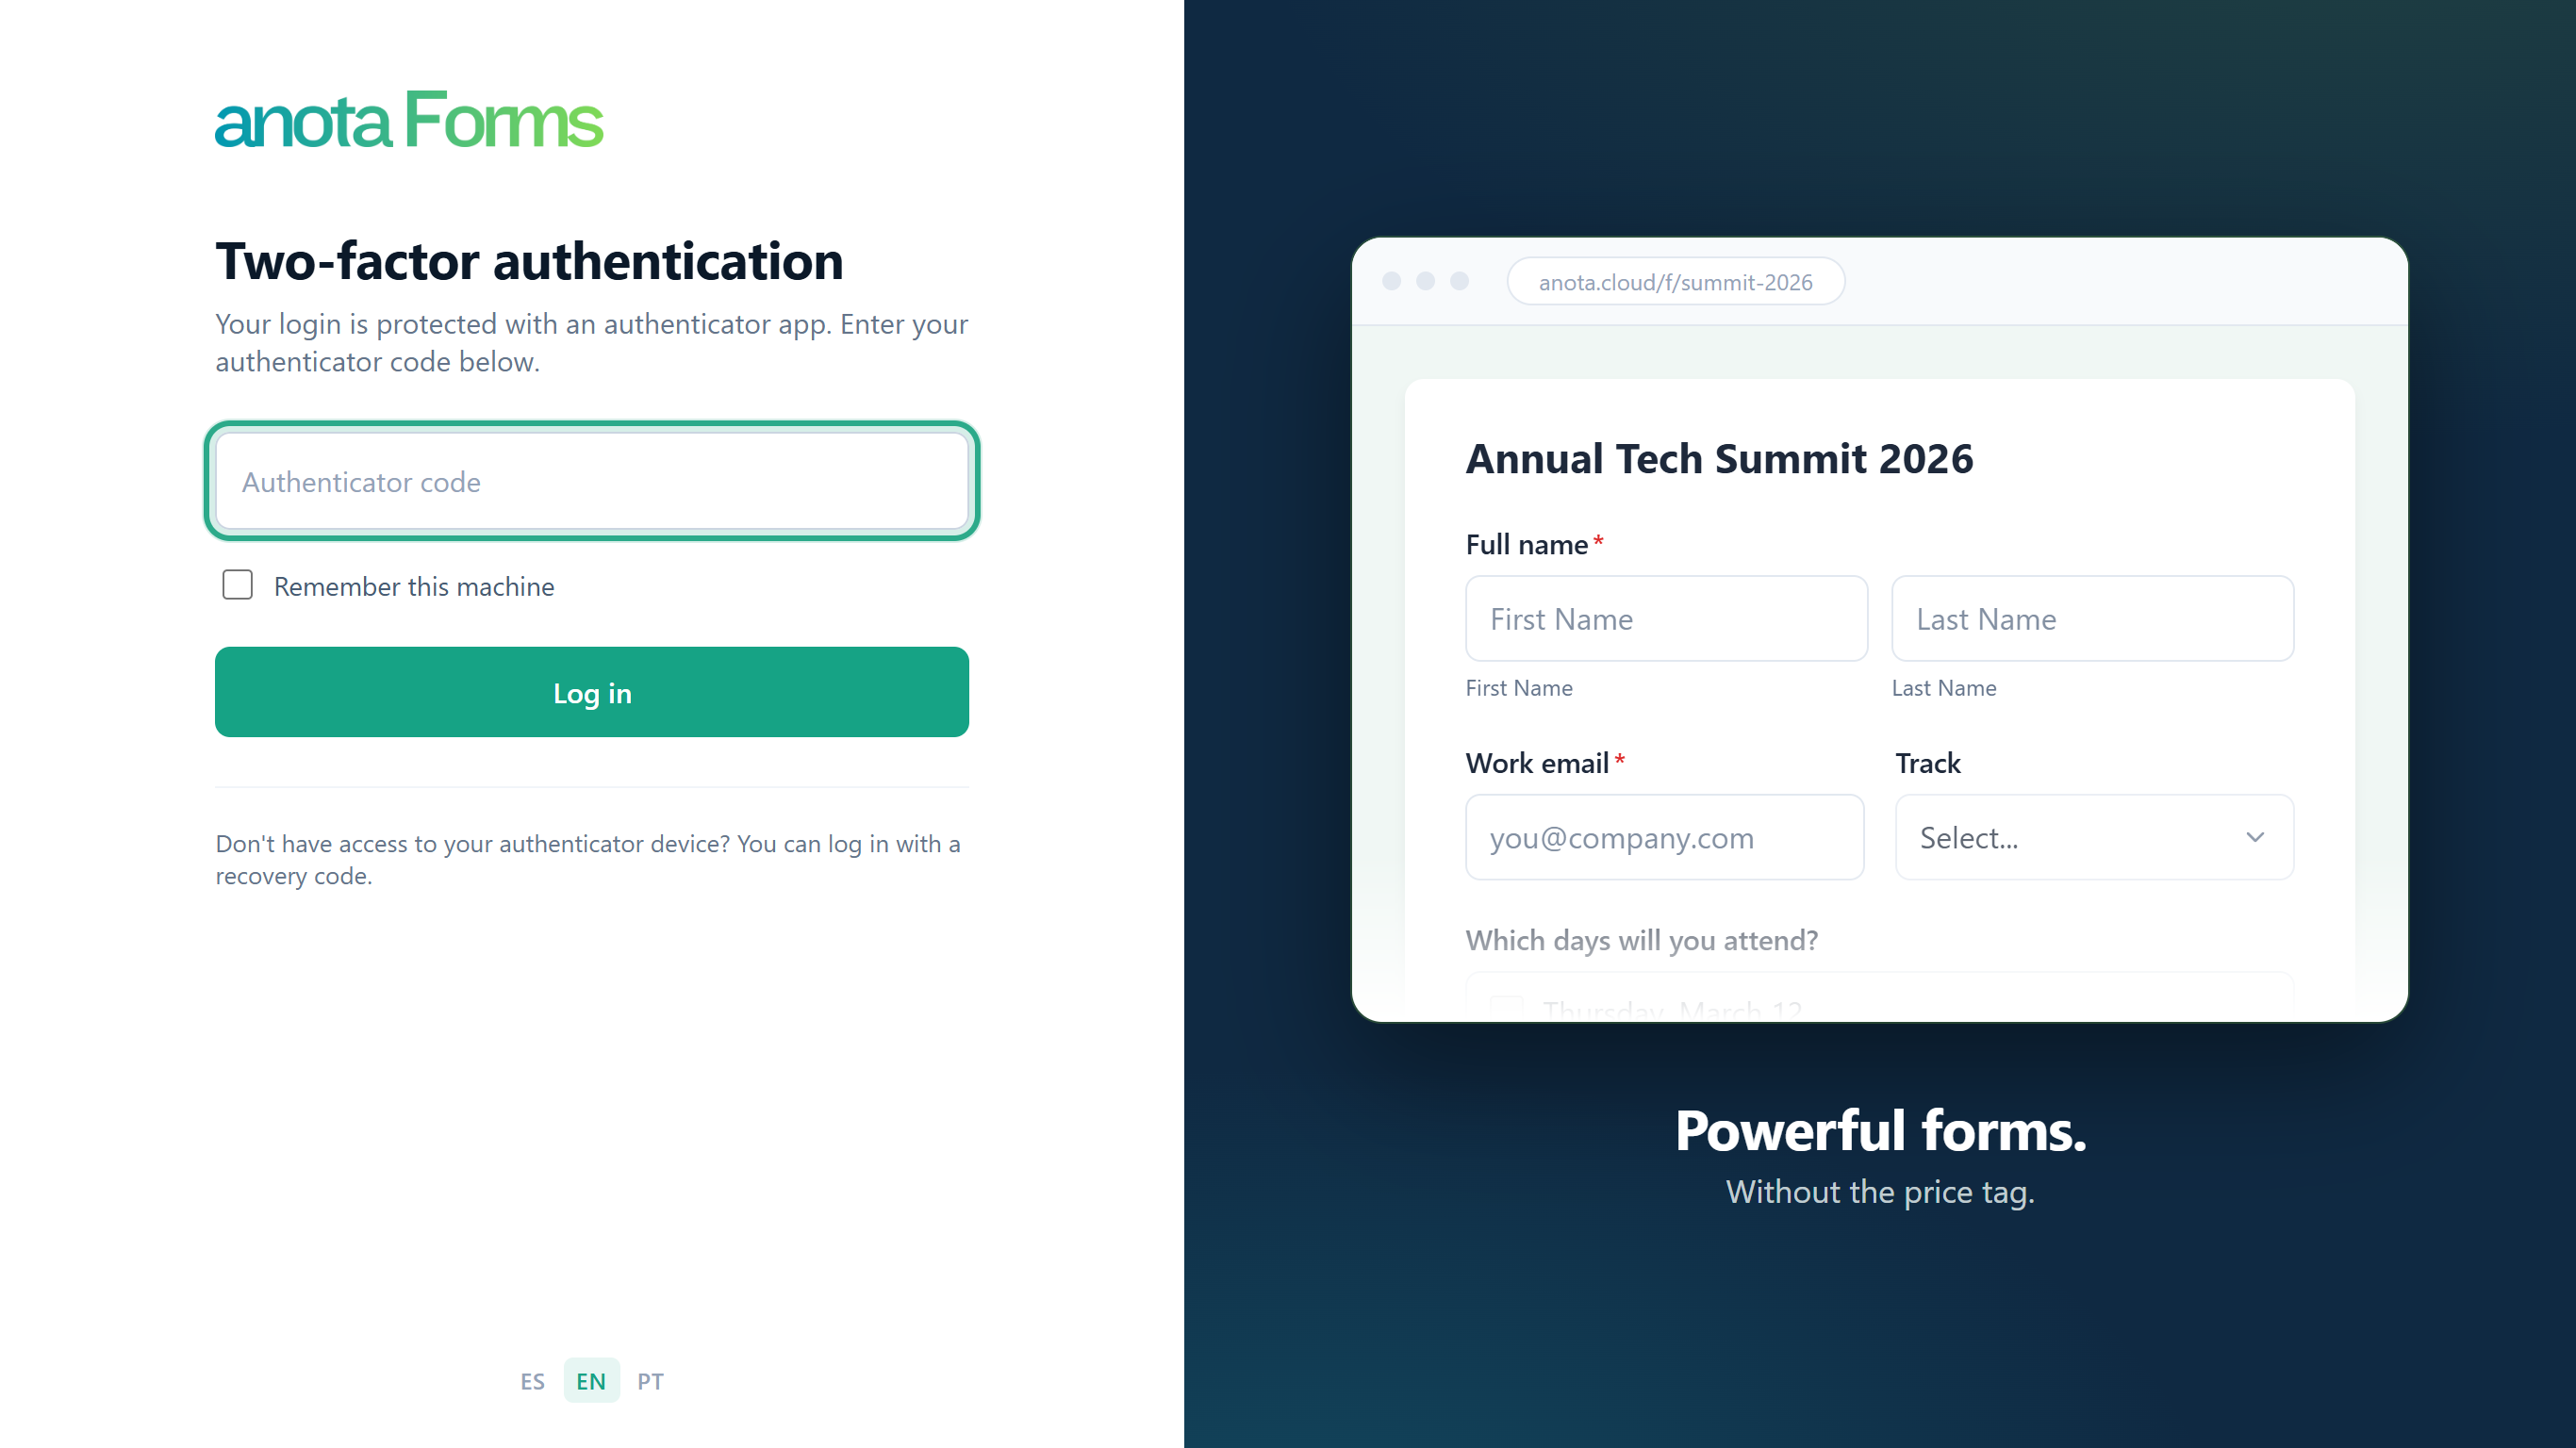 Spaces and dashes in the code are ignored.
To skip the code on this browser from now on, tick Remember this machine. Click Log in.
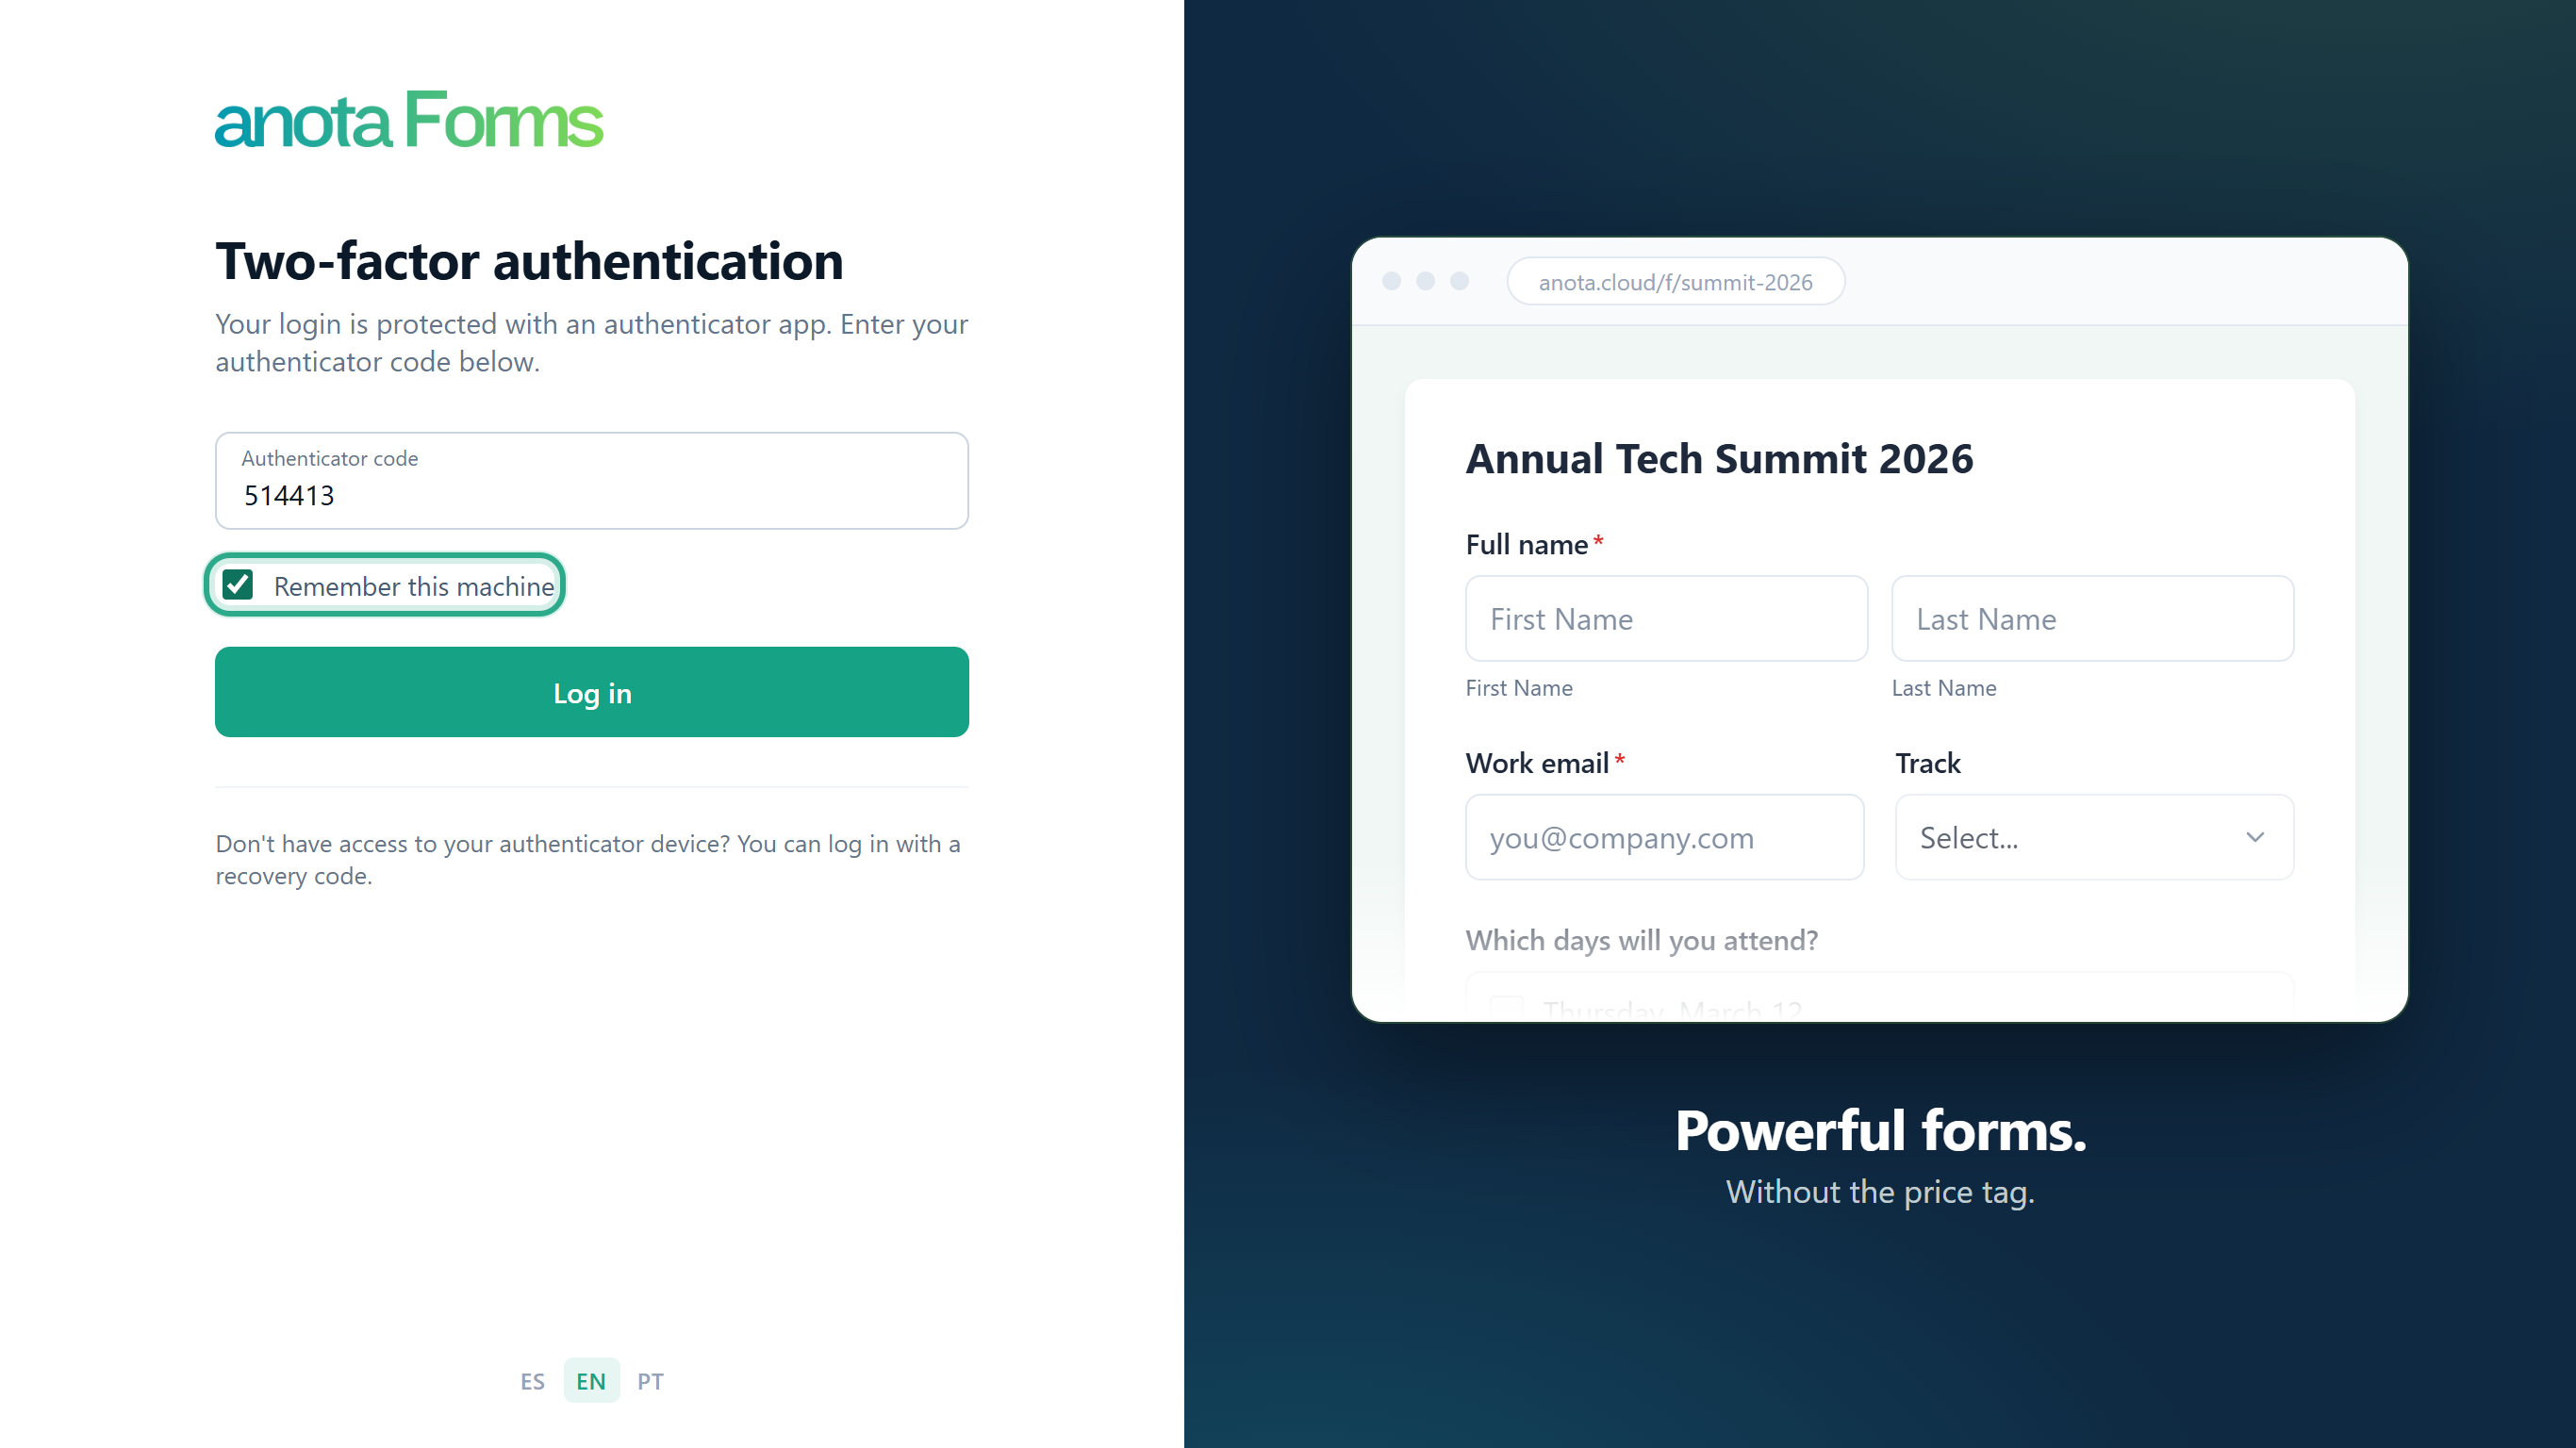 Only tick it on a computer you trust. You can undo it later (Task 3).
Result
You land on My forms. With 2FA on, anota also asks for the code when you log in with Continue with Google, where Google sign-in is available. If you type a wrong code, anota shows "Error: Invalid authenticator code."; after 5 failed attempts the account is locked for 15 minutes.
Task 3 — Forget a remembered browser
Step-by-step
On a browser where you ticked Remember this machine, open Two-factor authentication and click Forget this browser. The button only appears on a remembered browser.
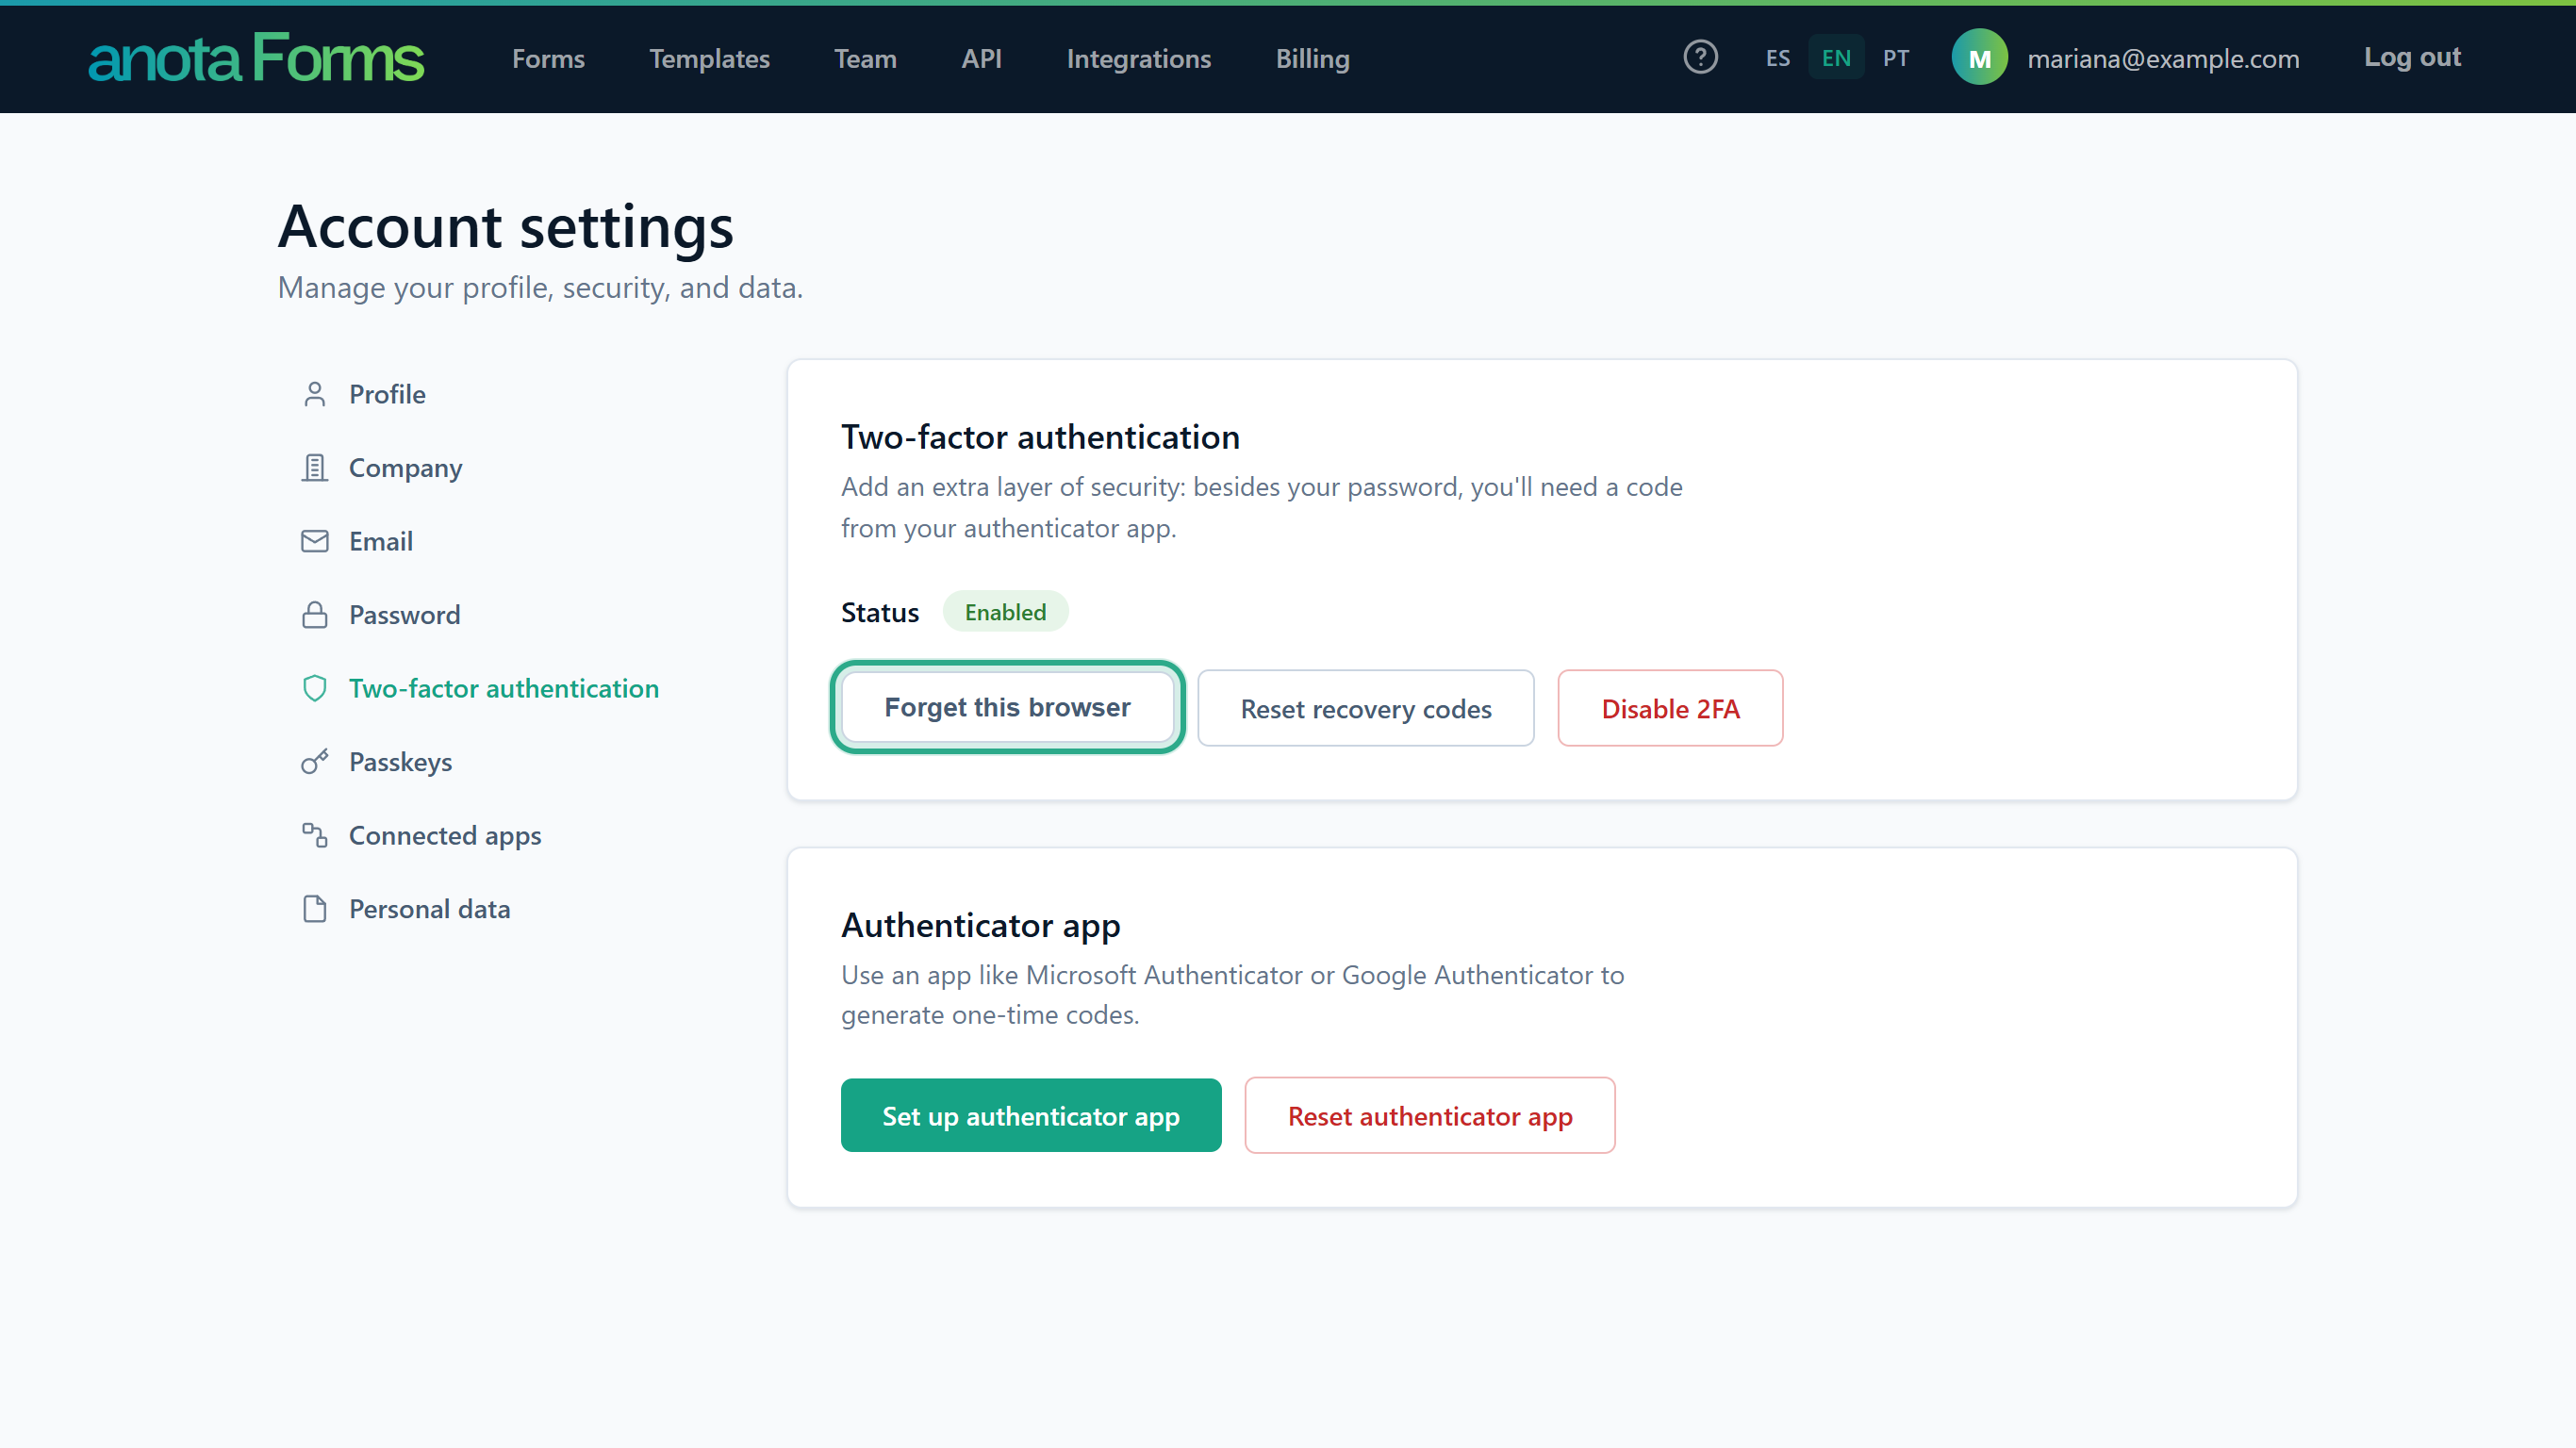 No password is needed.
anota confirms: The current browser has been forgotten. When you log in again from this browser you will be prompted for your 2FA code.
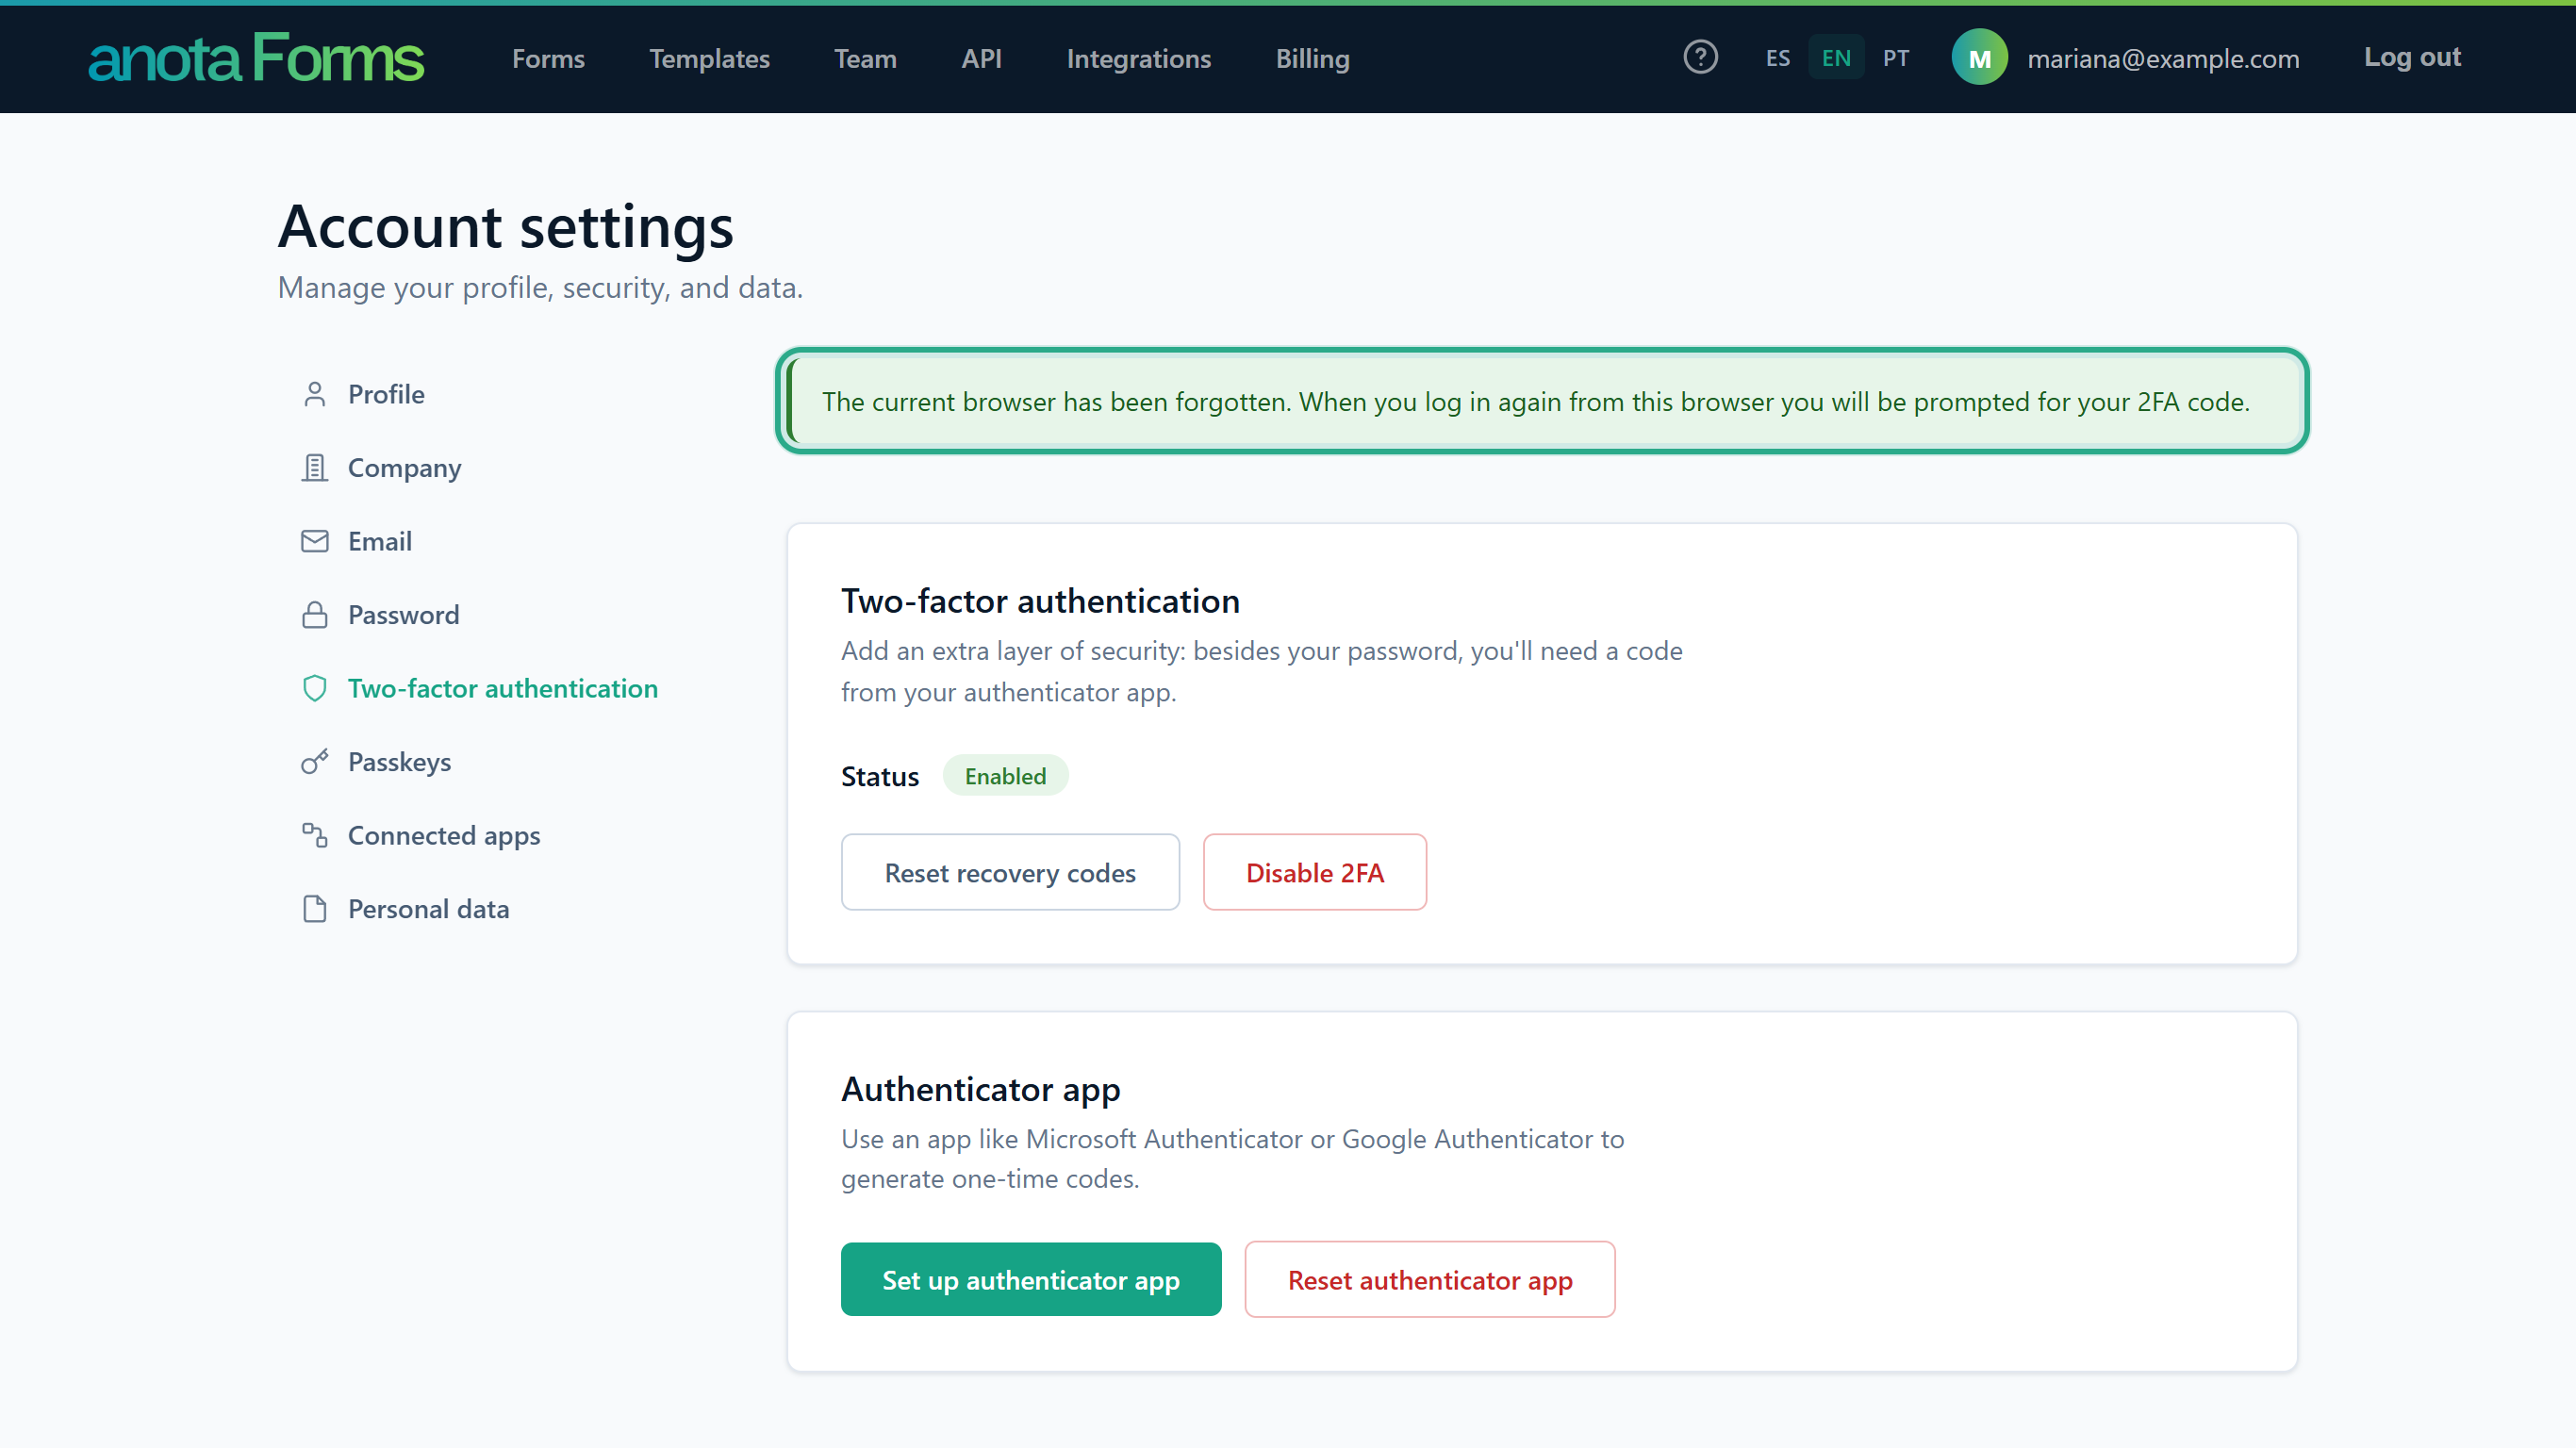 The Forget this browser button is gone.
Result
The next log-in from this browser asks for your authenticator code again.
Task 4 — Log in with a recovery code
Use this if you don't have your phone with you or lost it.
Step-by-step
After your password, on the Two-factor authentication screen, click log in with a recovery code (under "Don't have access to your authenticator device?").
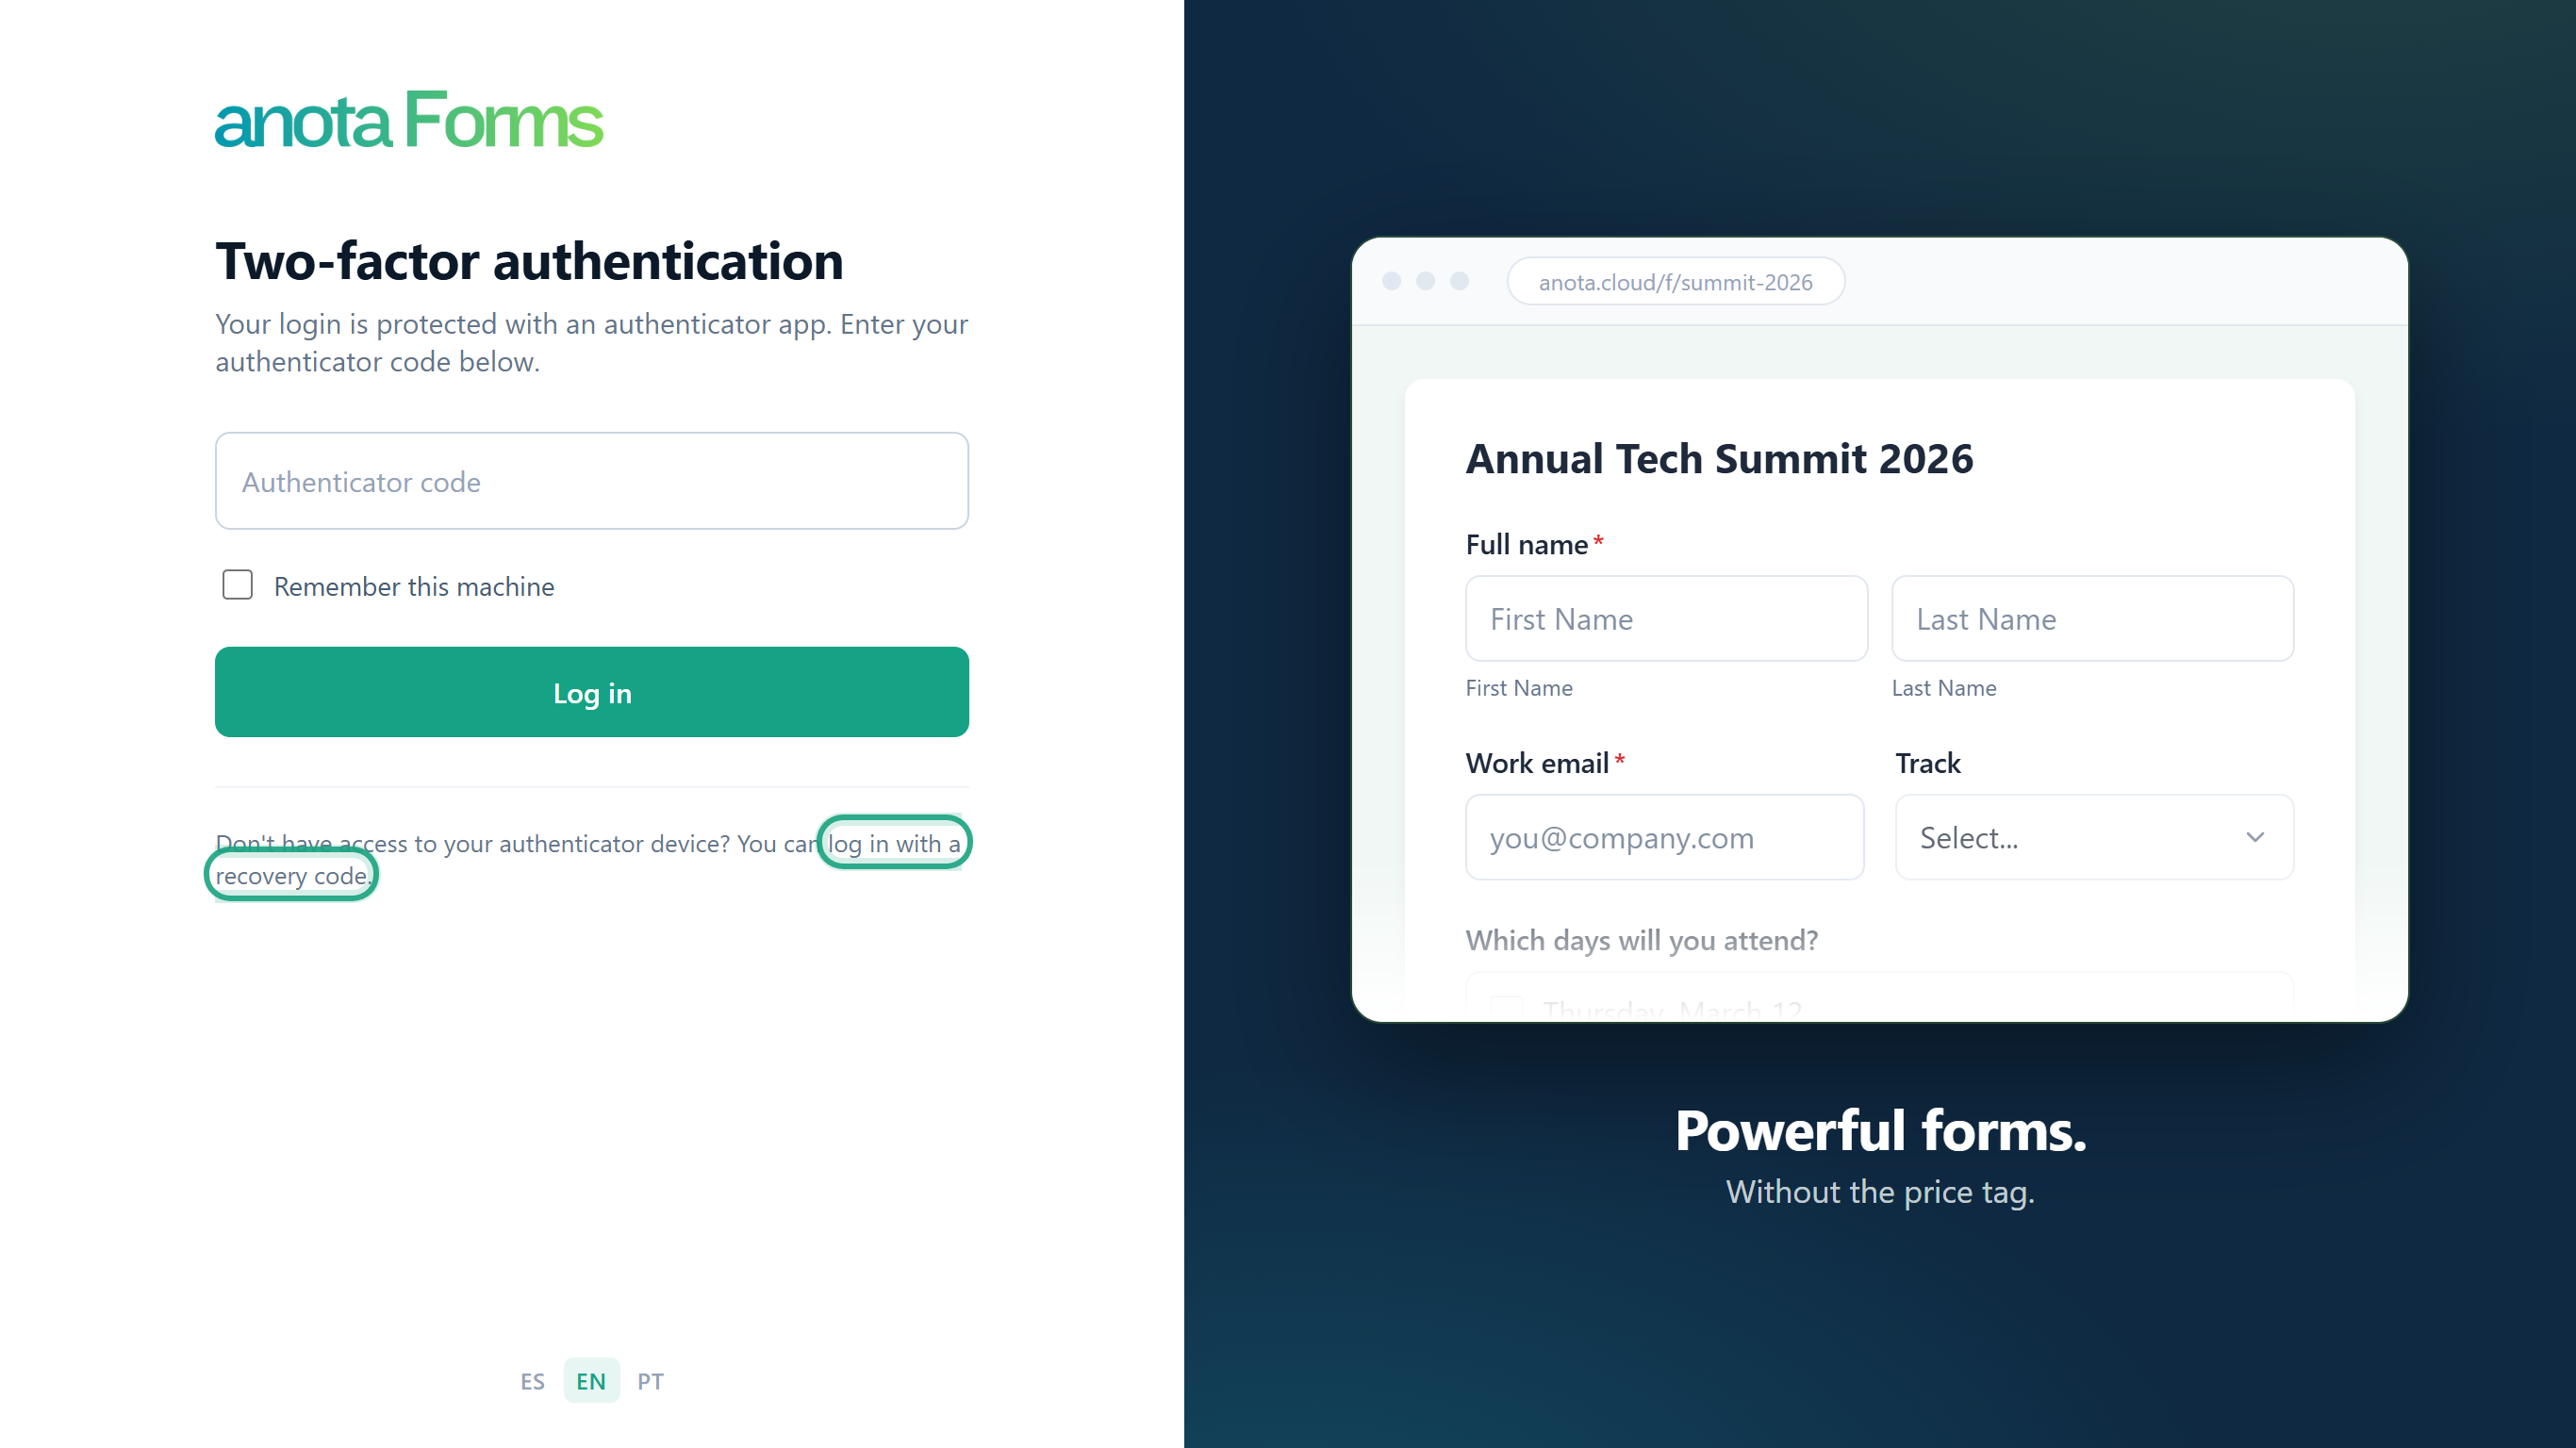 You must have entered your email and password first.
On Recovery code verification, type one of your saved codes in Recovery code and click Log in.
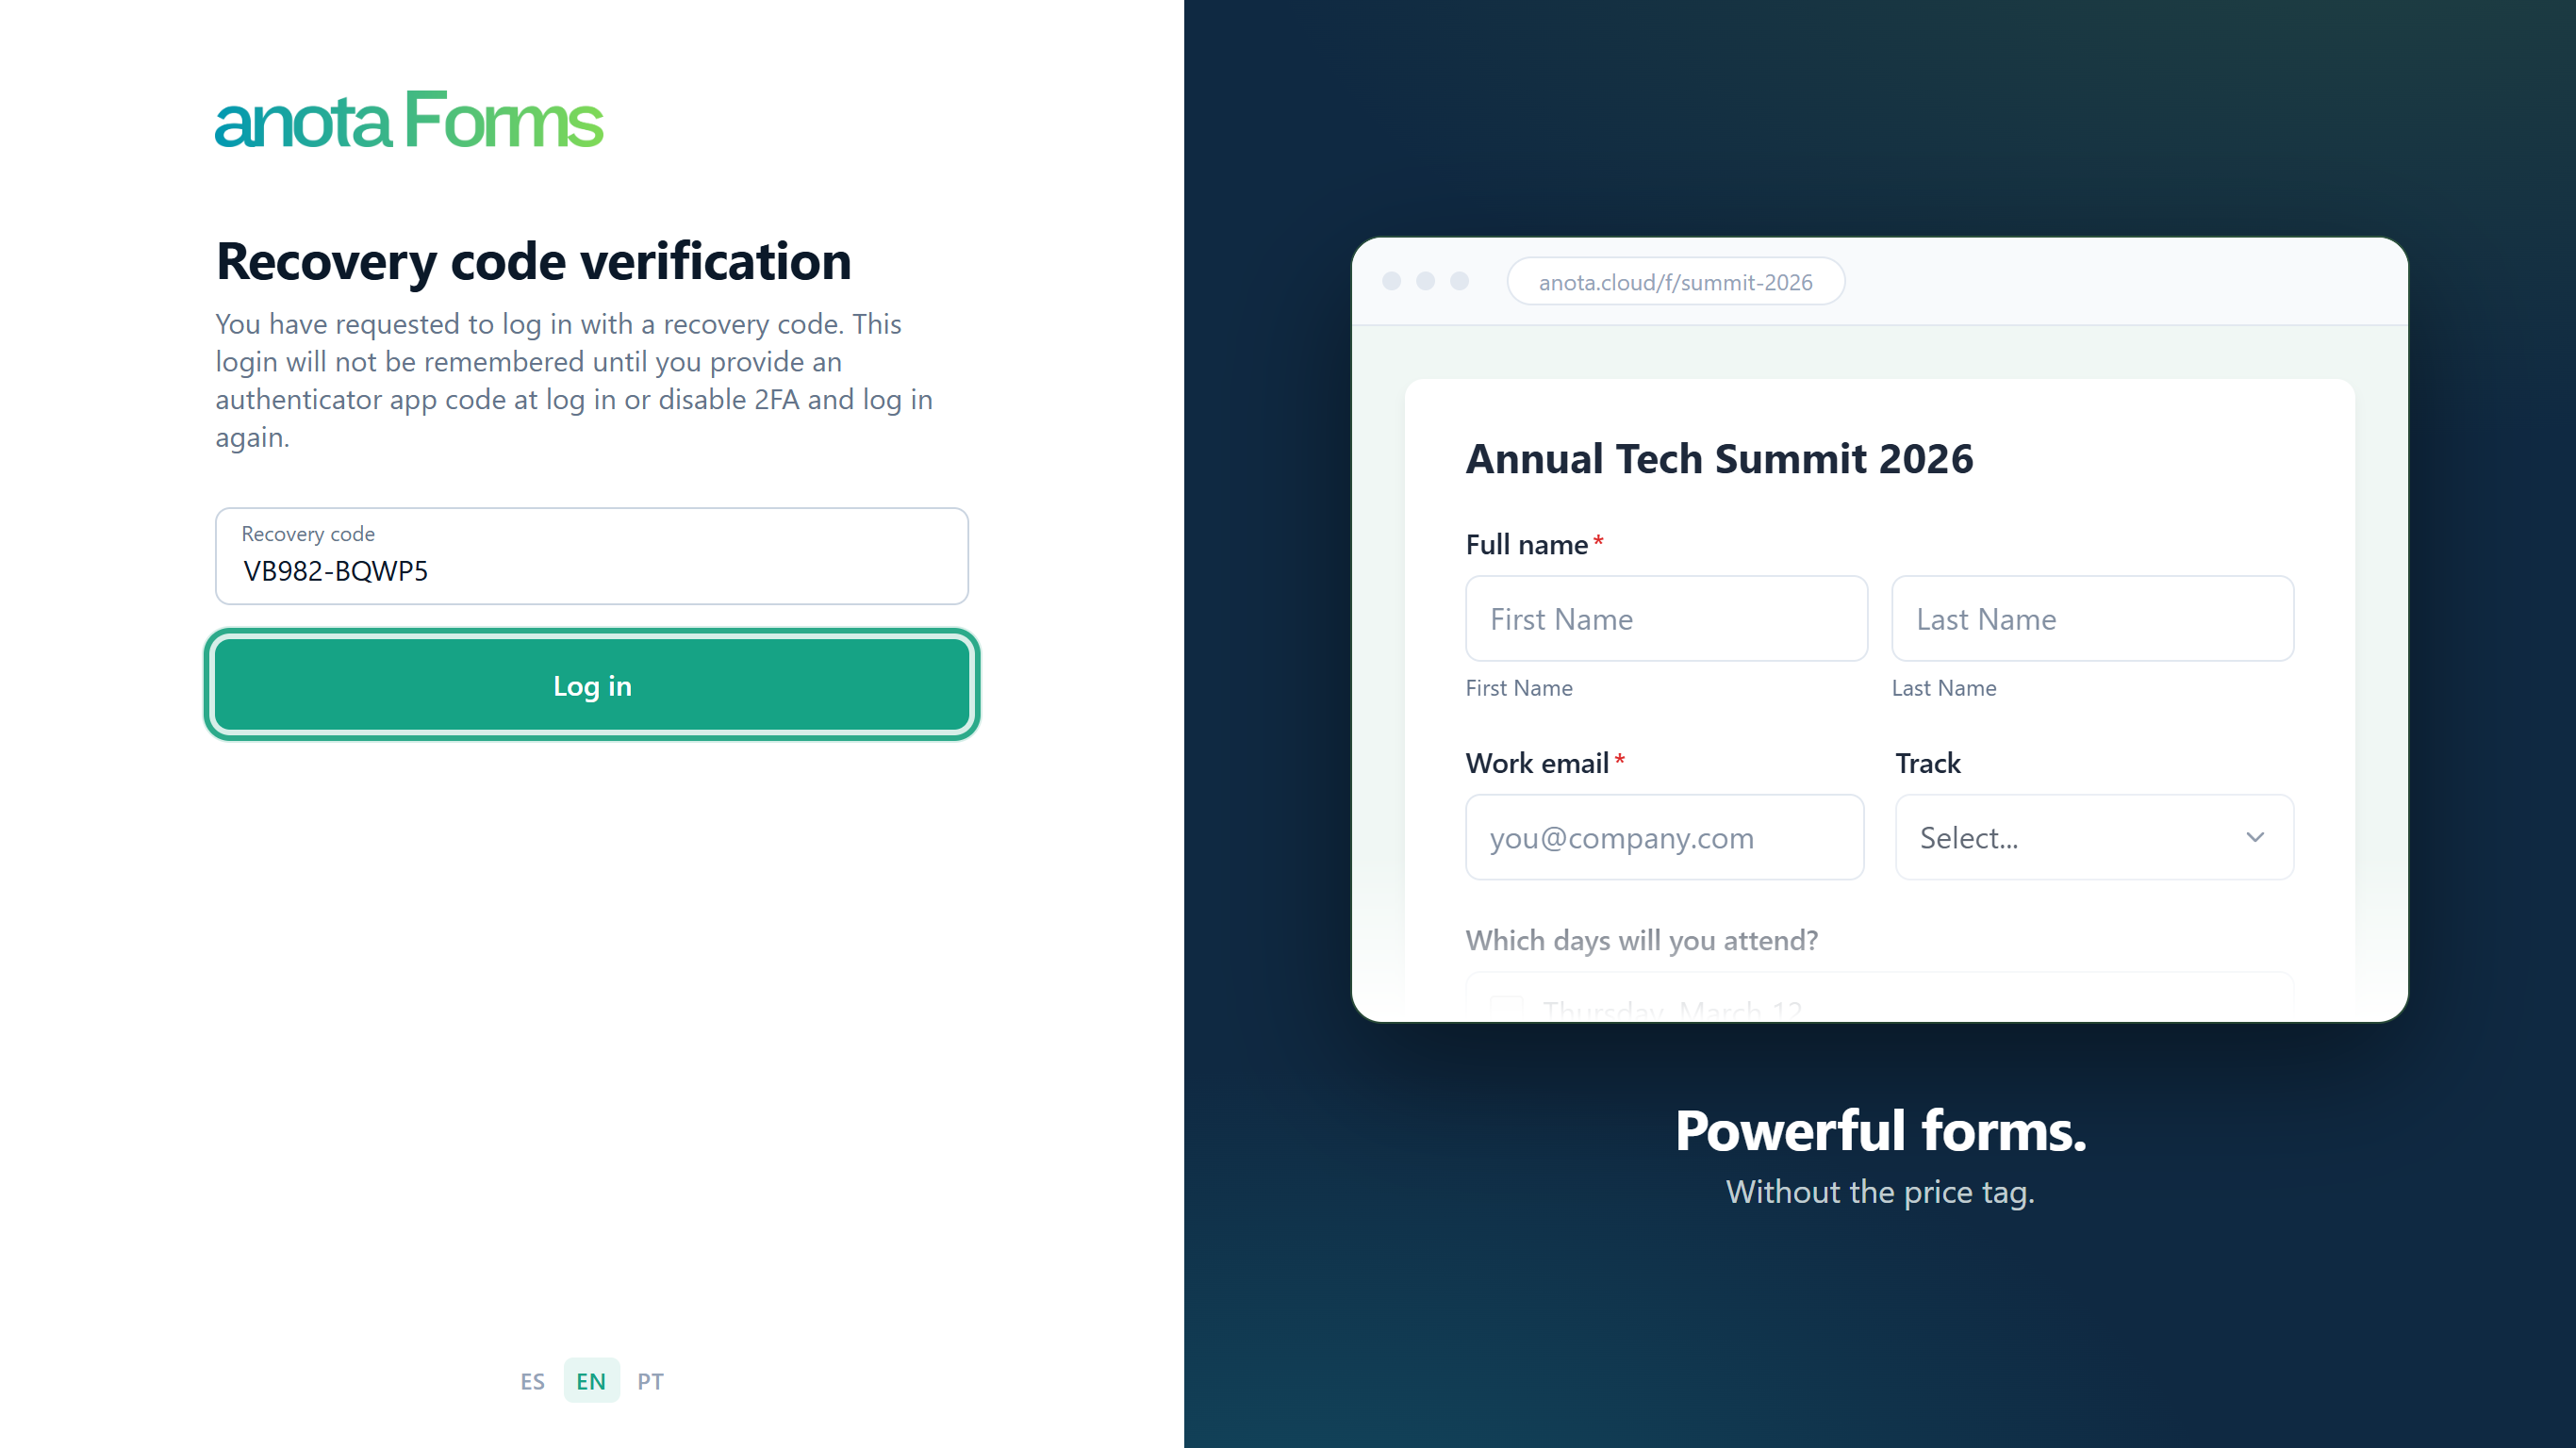 A log-in with a recovery code is never remembered on the browser.
Result
You land on My forms. That code no longer works; each code works only once. If the code is wrong, anota shows "Error: Invalid recovery code entered." When you have 3 or fewer codes left, the Two-factor authentication section warns you (for example "You have 3 recovery codes left.") and links to generate a new set of recovery codes. If you lost your phone, also reset the authenticator app (Task 7).
Task 5 — Generate new recovery codes
Step-by-step
In Two-factor authentication, click Reset recovery codes.
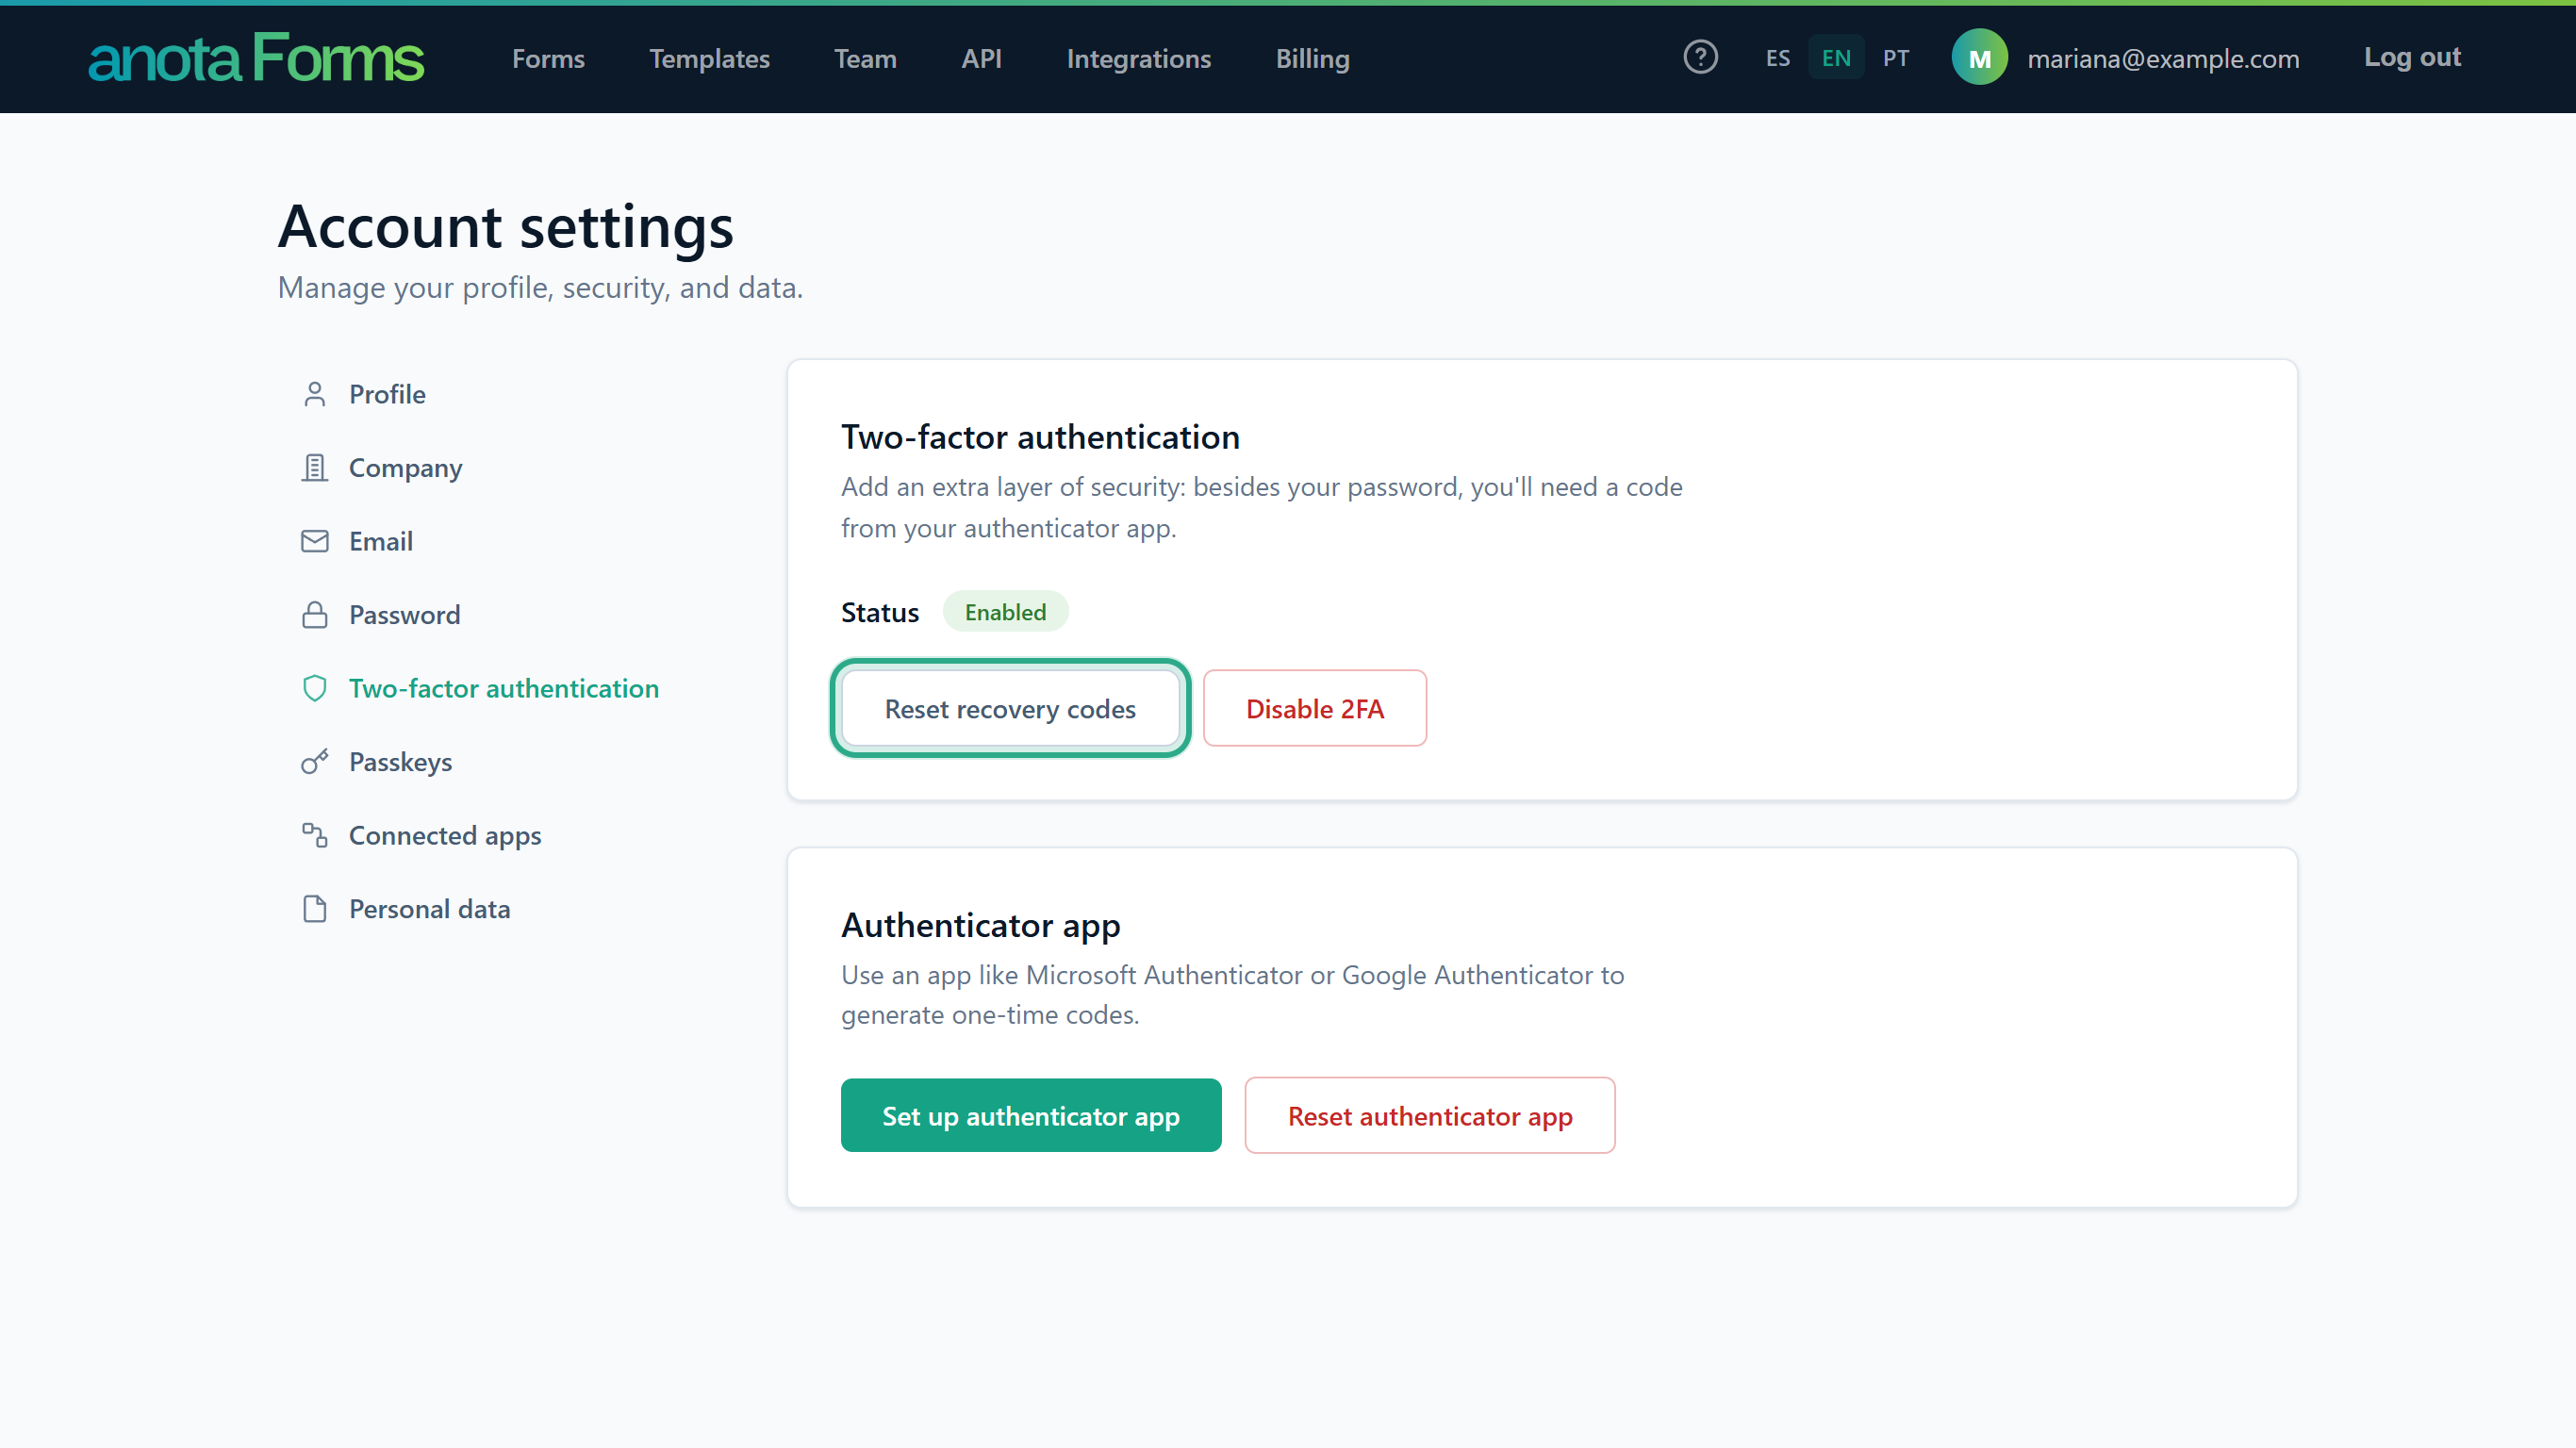 This button only appears while 2FA is on.
The Generate recovery codes card warns you to keep the codes safe. Click Generate recovery codes.
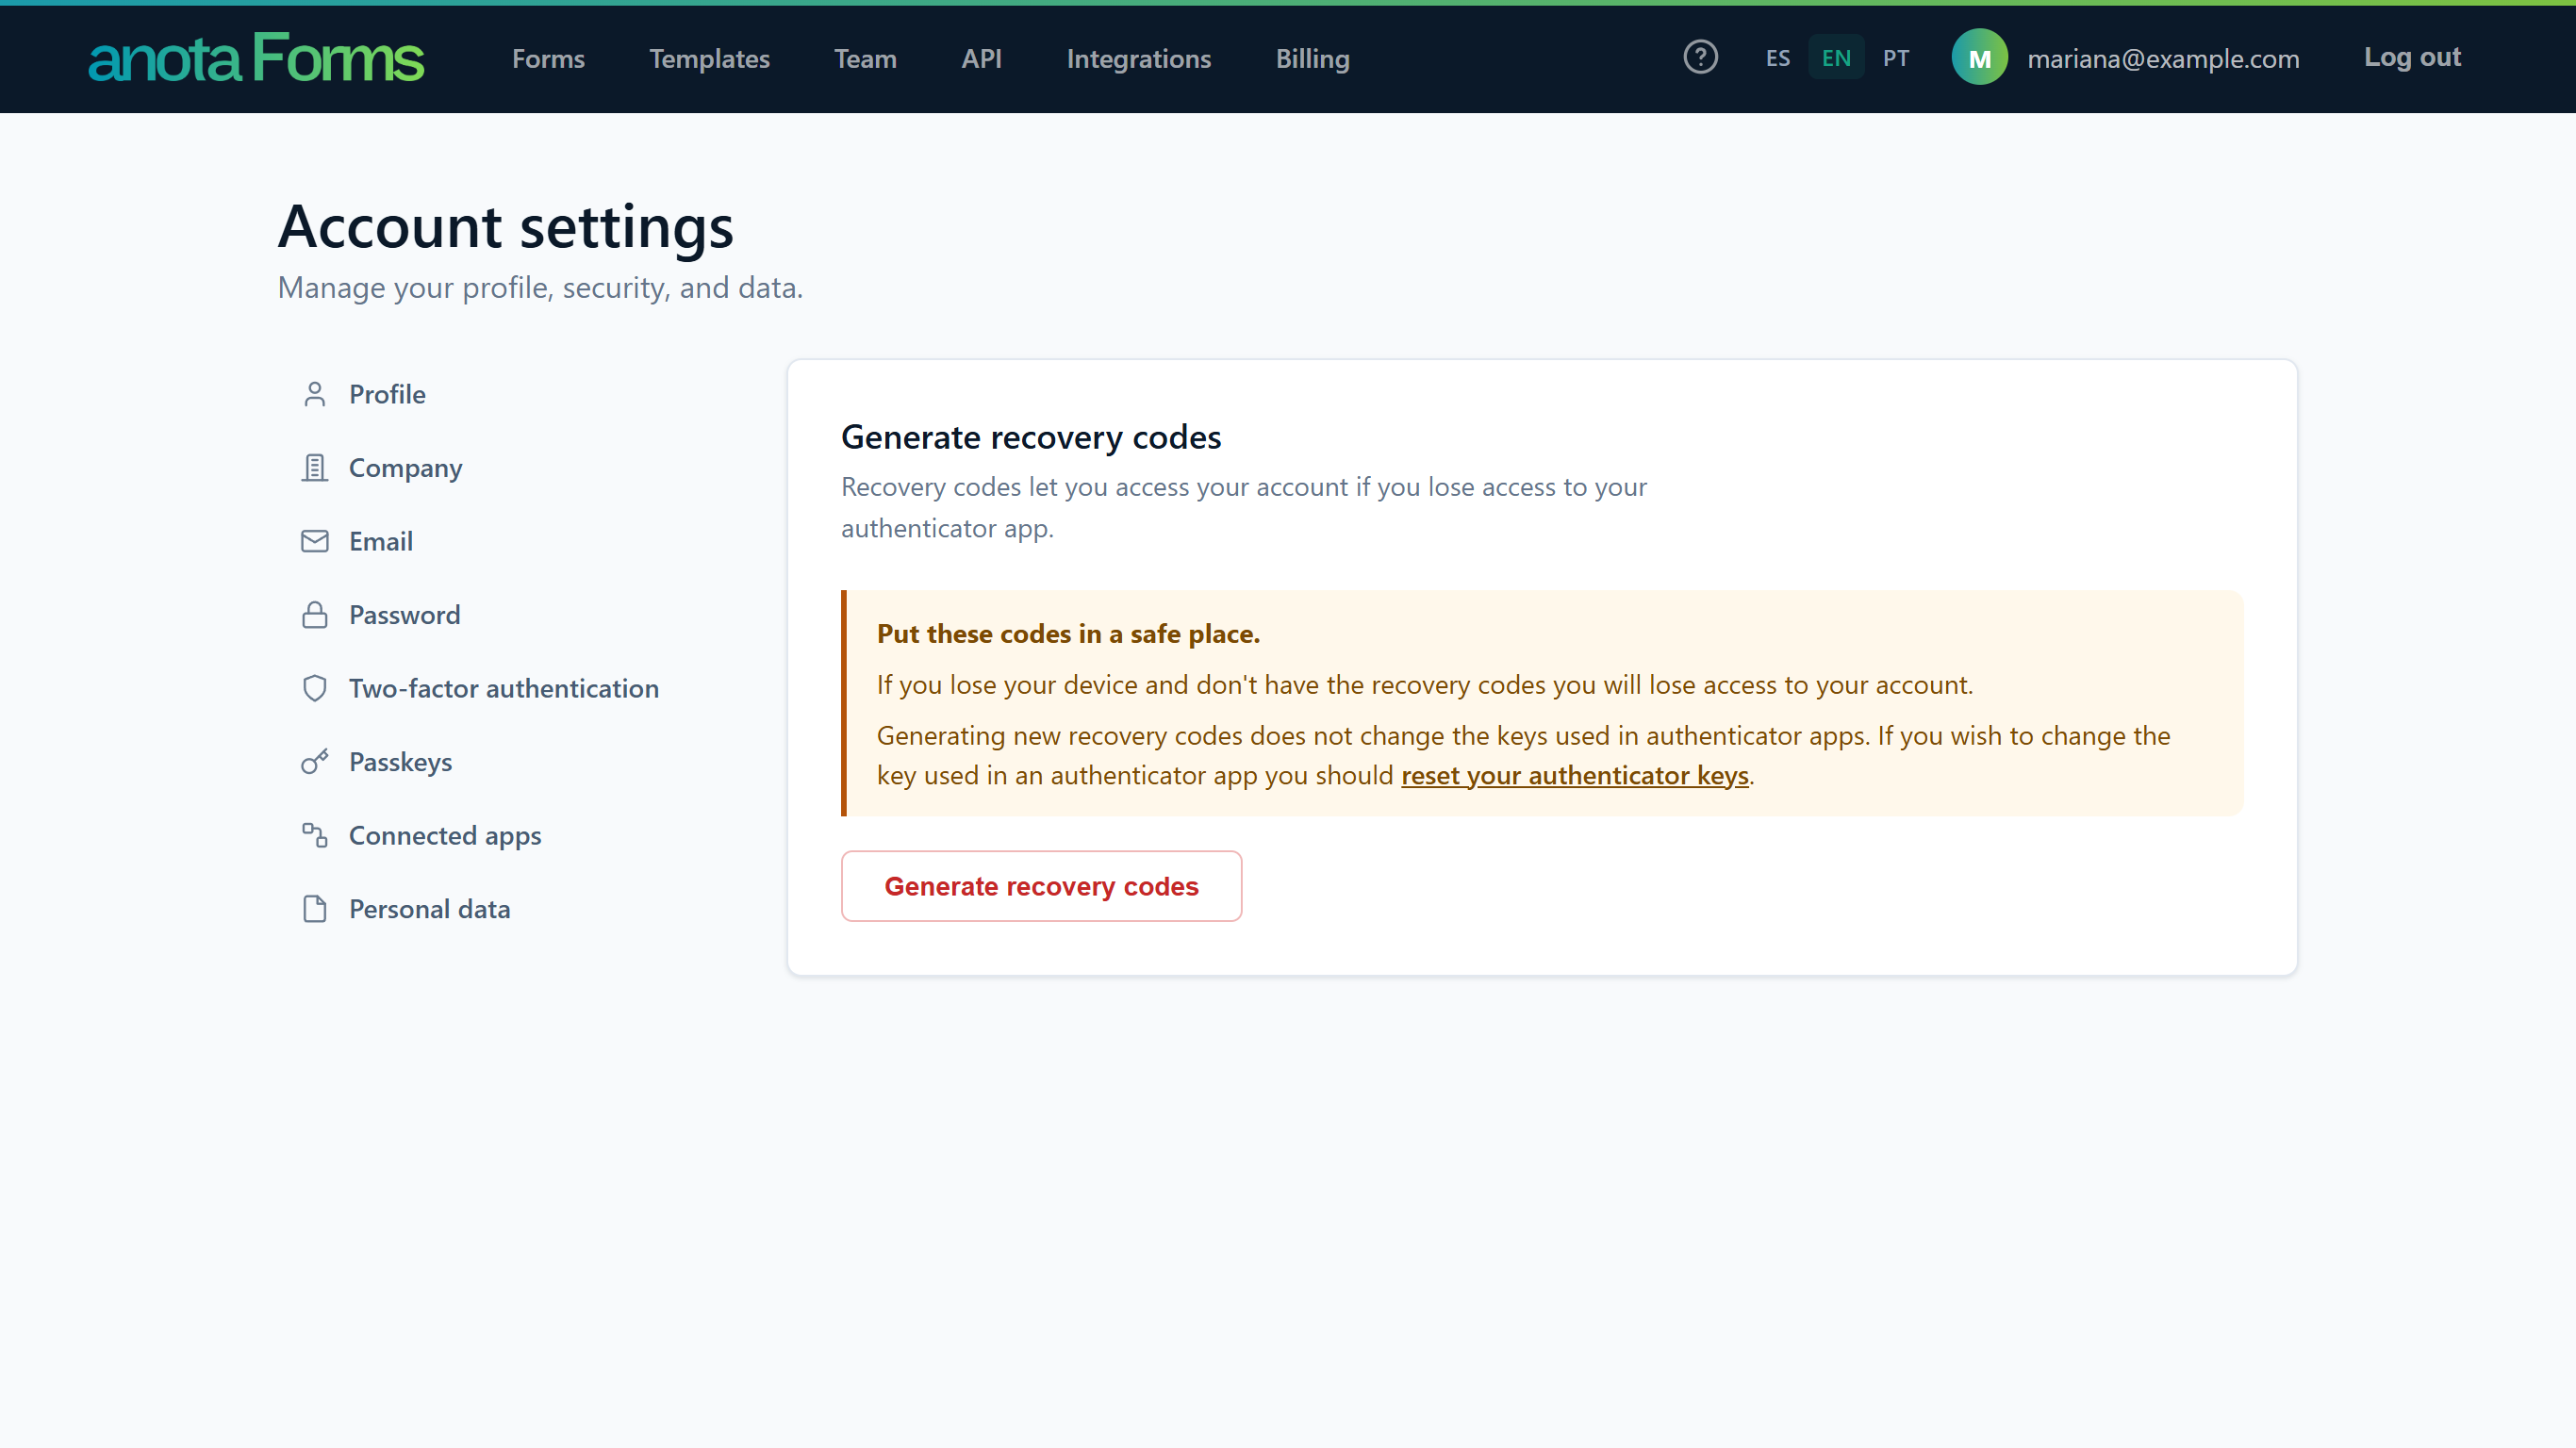 Generating new codes doesn't change the key in your authenticator app.
anota shows You have generated new recovery codes. and the 10 new codes. Click Download codes or write them down before you leave the page.
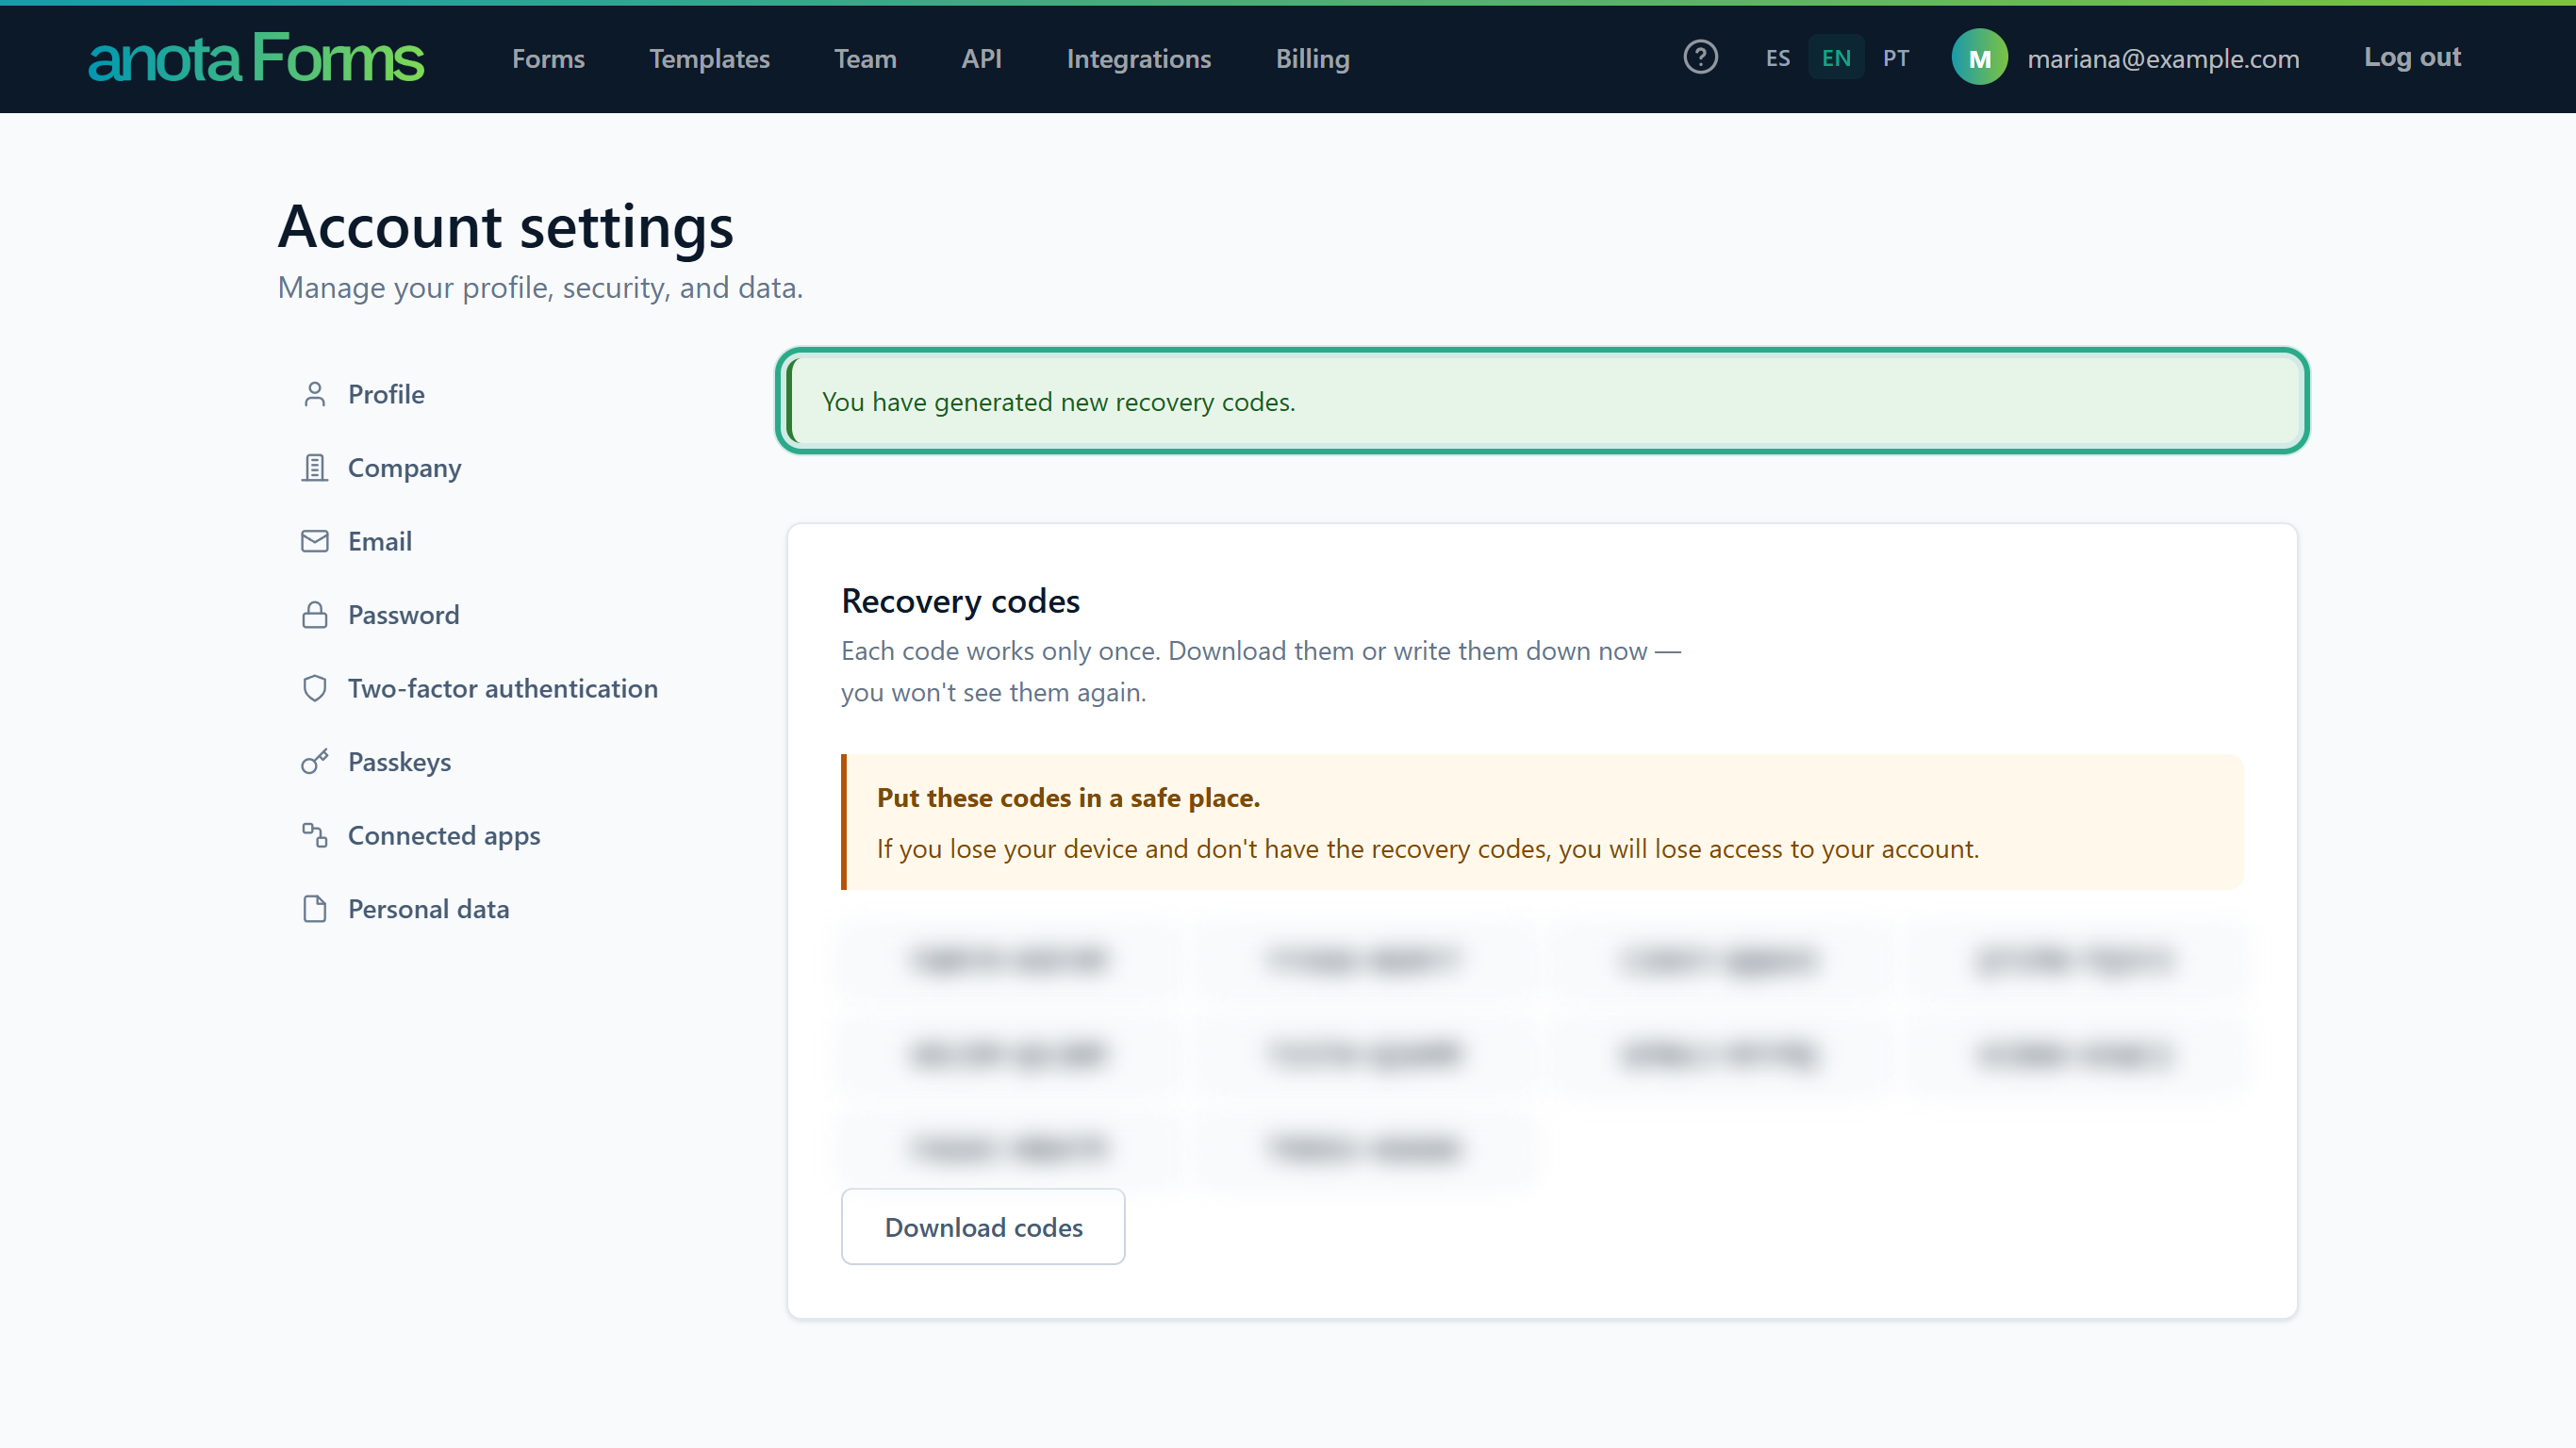 No password is needed.
Result
You have 10 new codes and every previous code stops working immediately.
Task 6 — Turn off two-factor authentication
Step-by-step
In Two-factor authentication, click Disable 2FA.
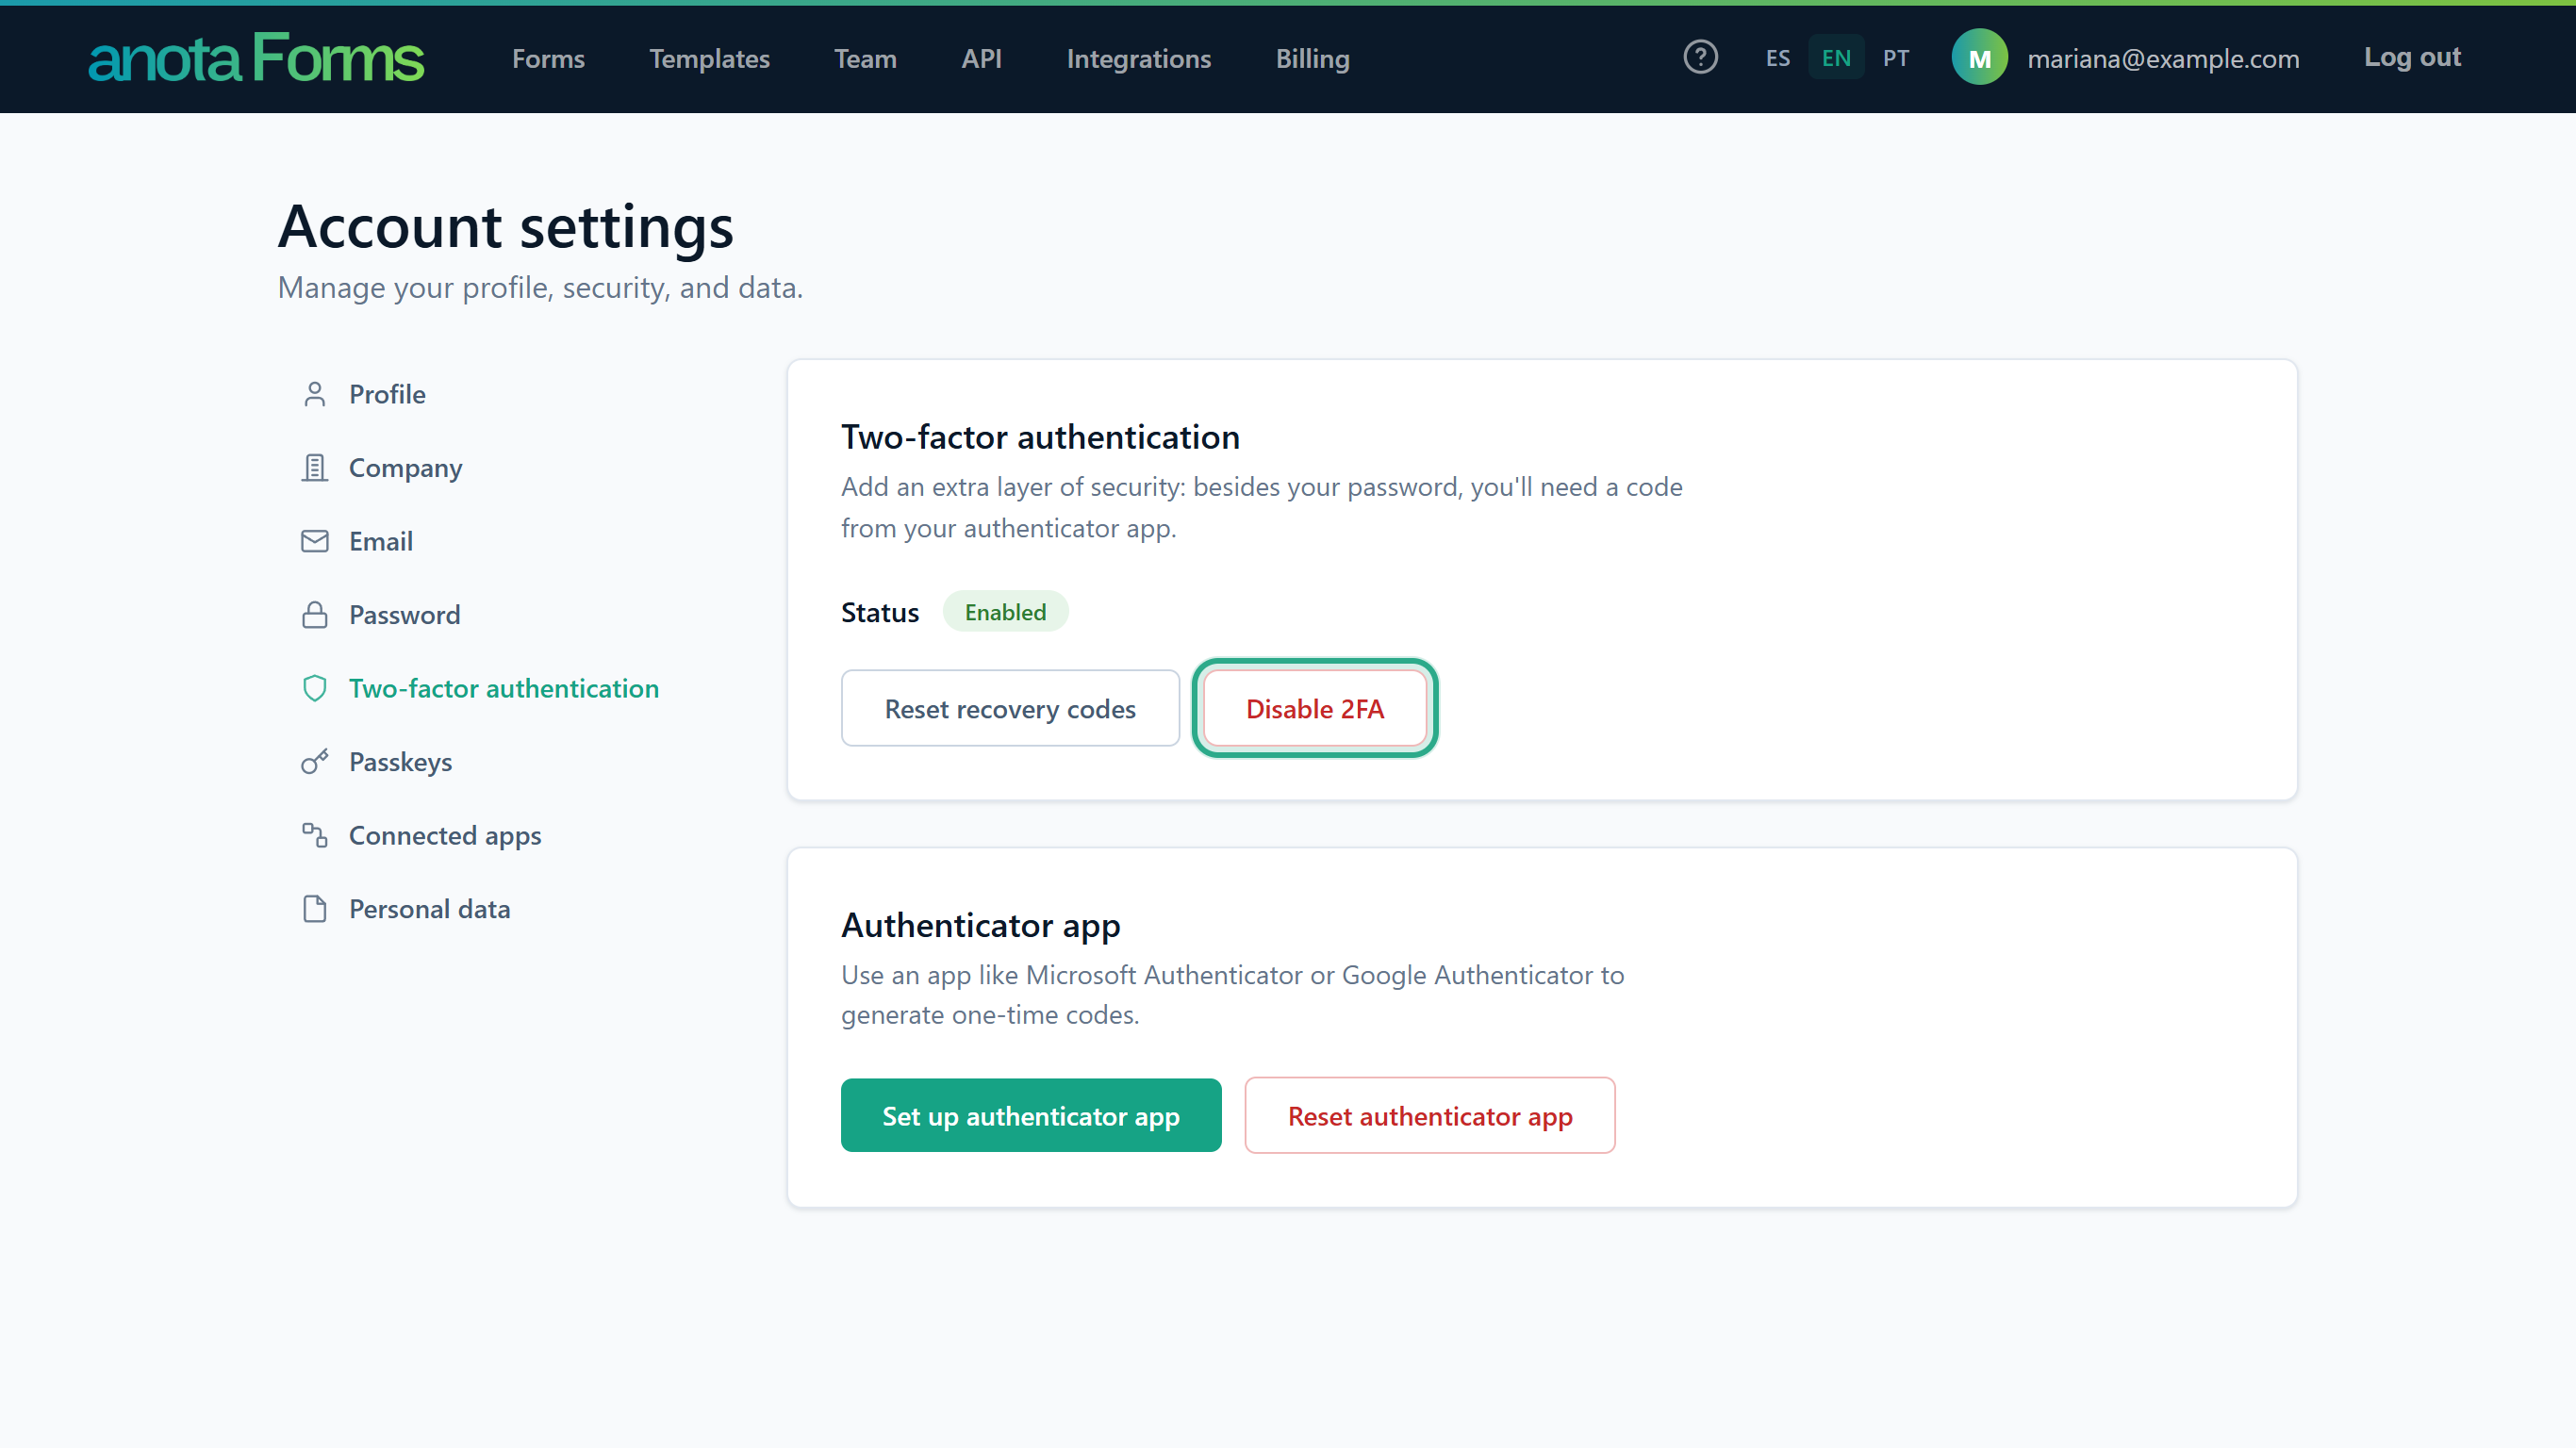 Only shown while 2FA is on.
The Disable two-factor authentication (2FA) card explains that your account will be protected by your password only. Click Disable 2FA to confirm.
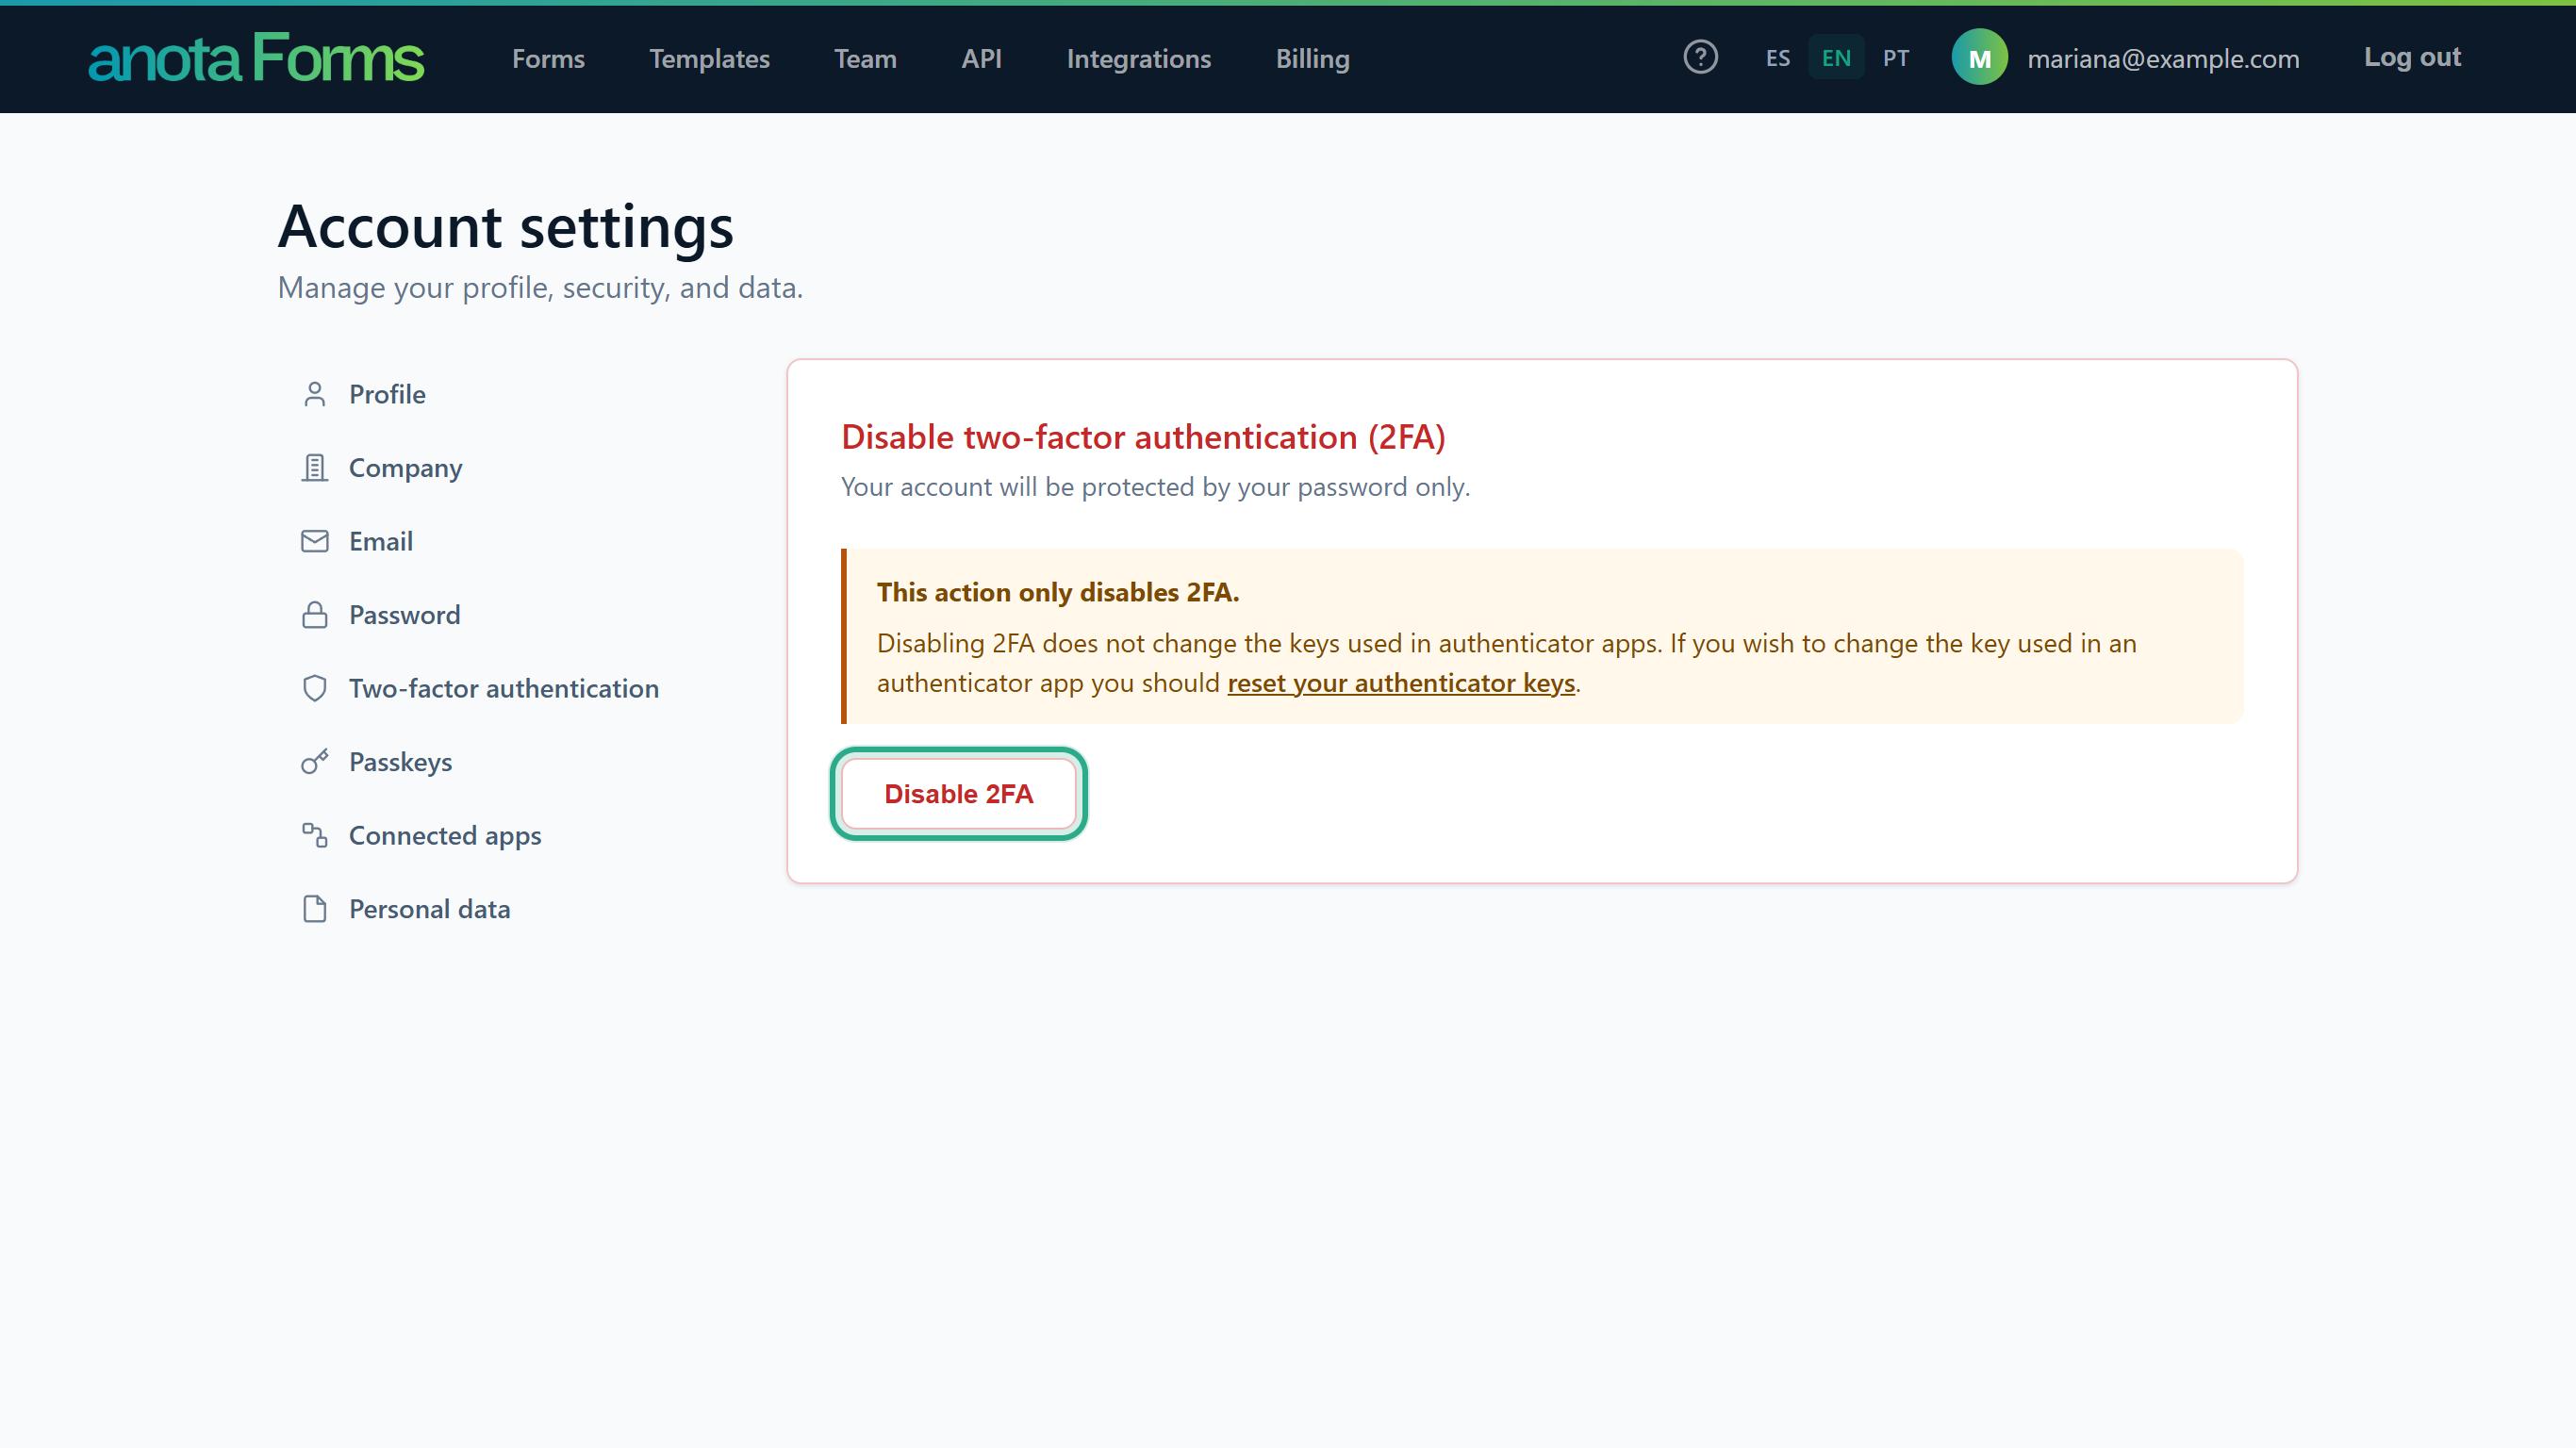 The warning links to reset your authenticator keys if you also want a new key.
anota shows 2FA has been disabled. You can re-enable it when you set up an authenticator app. and Status is back to Disabled.
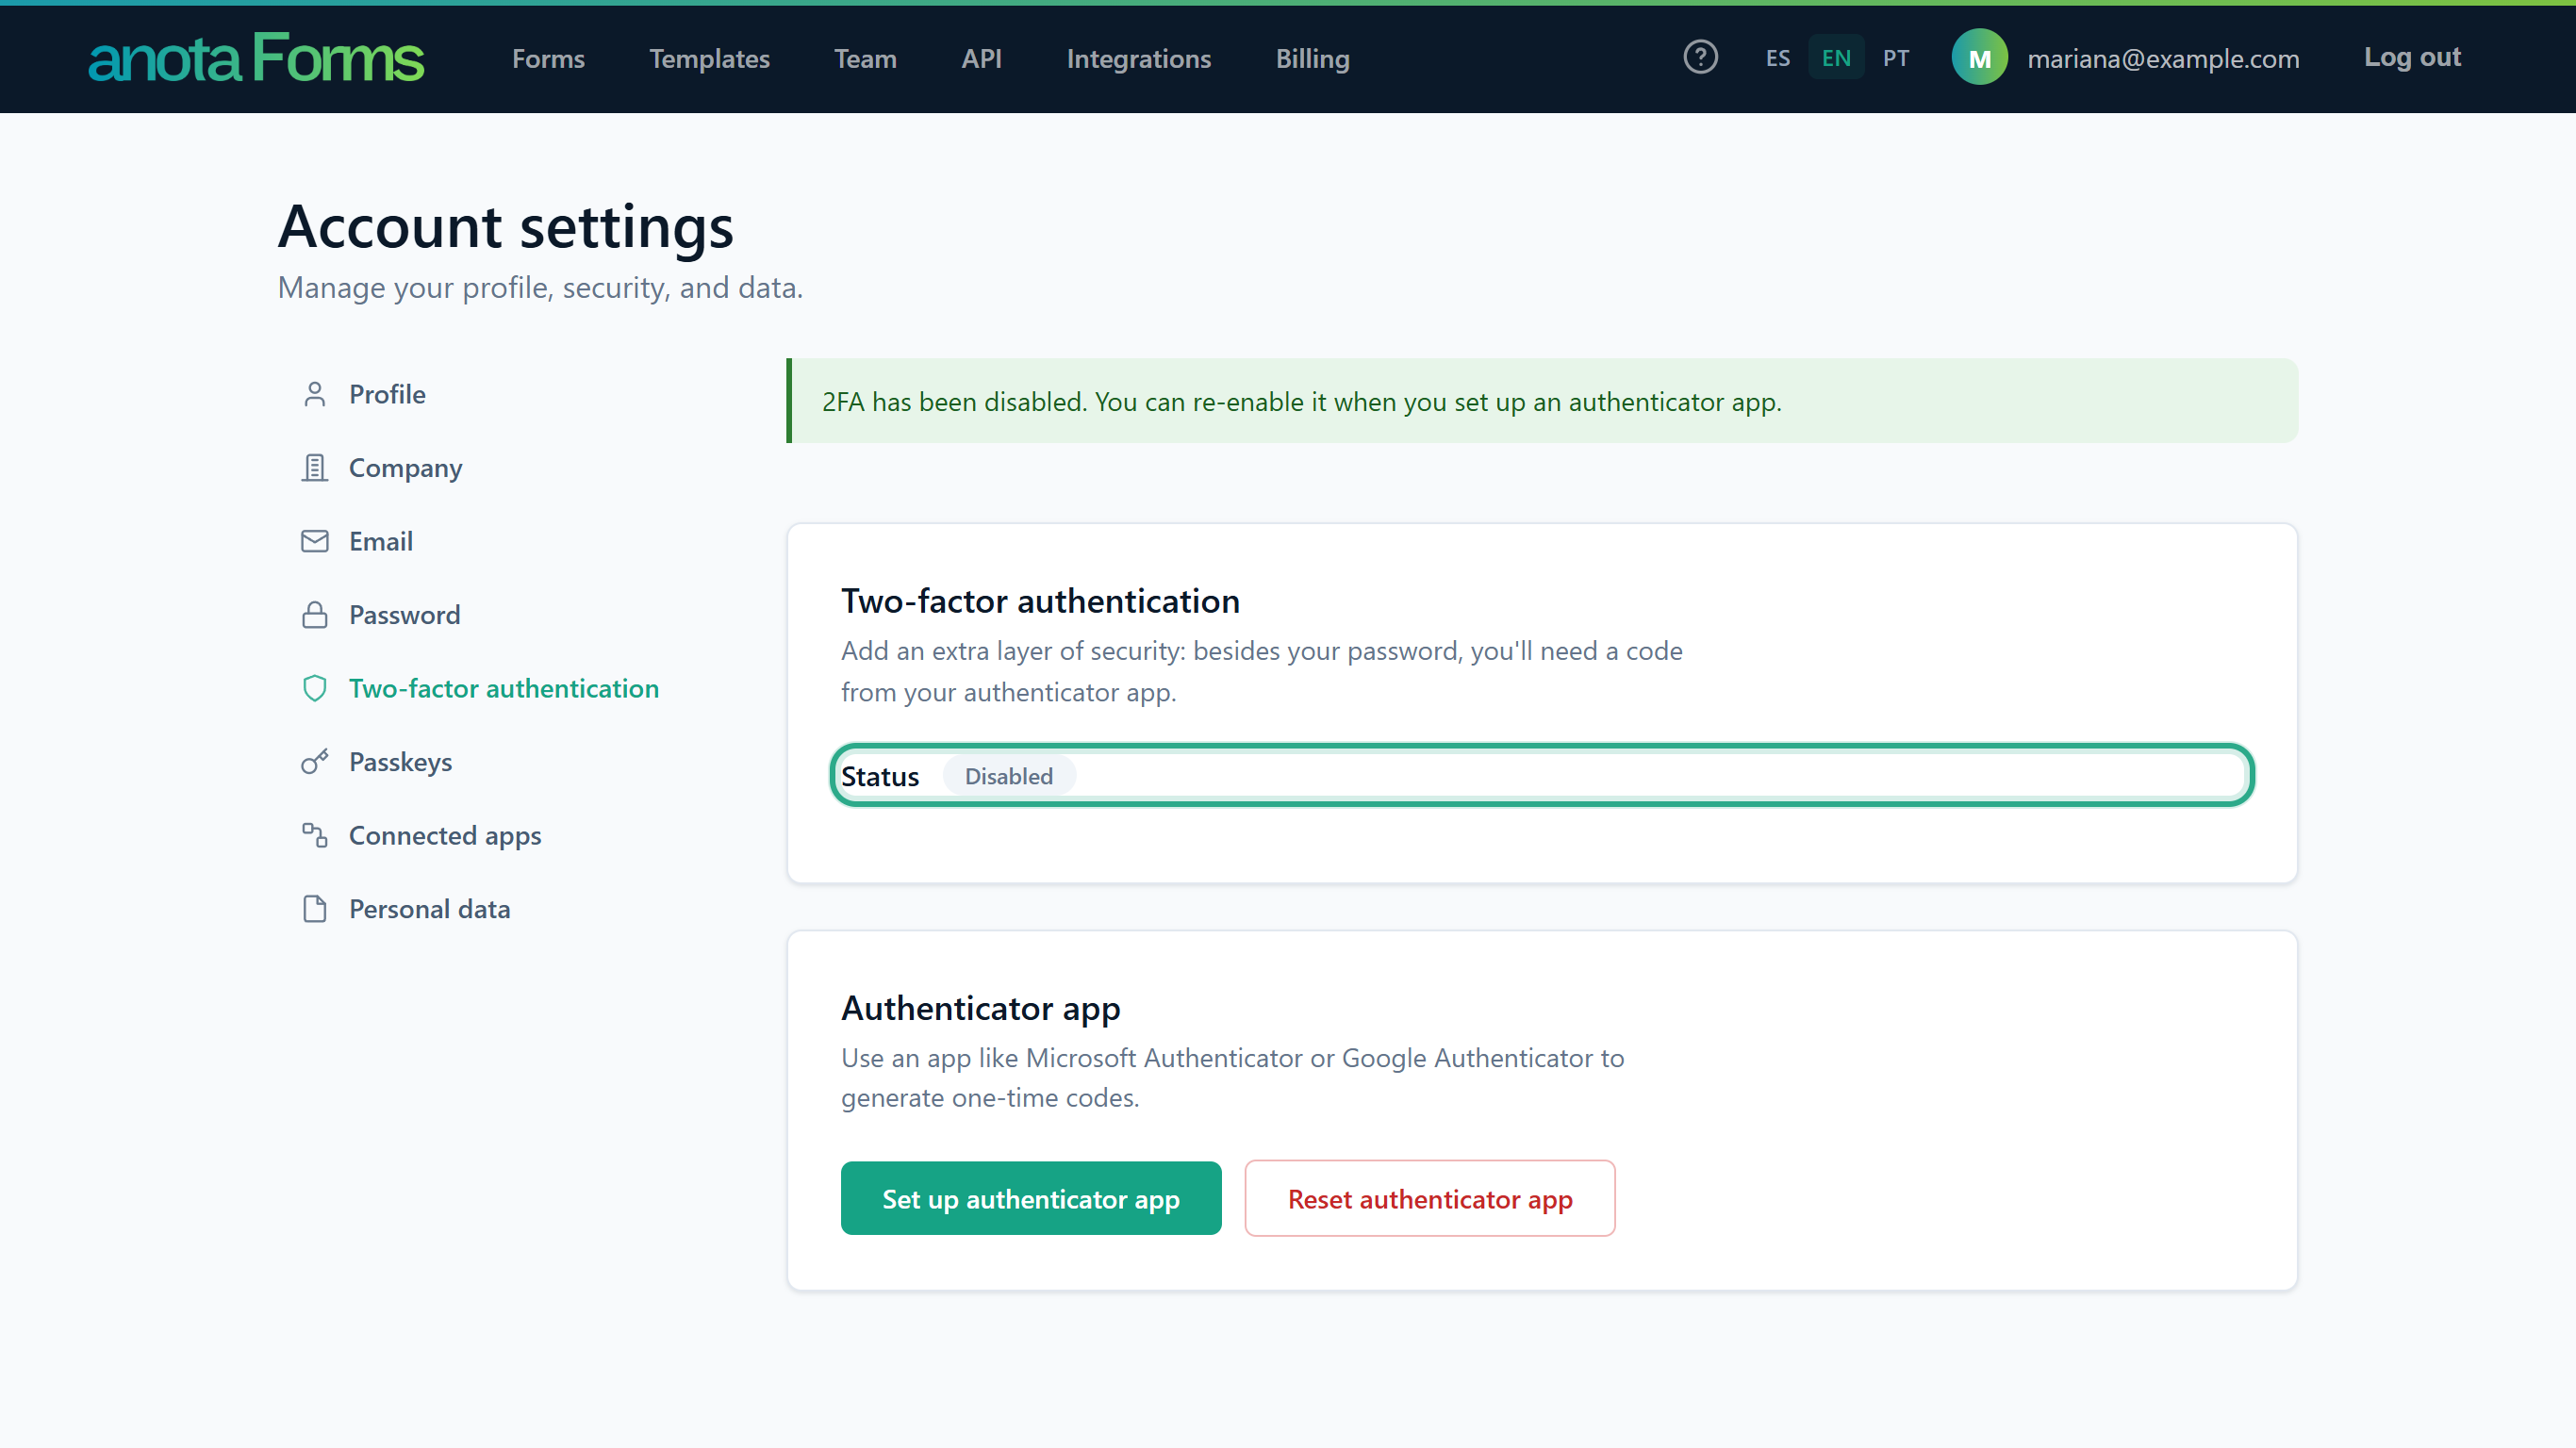 No password is needed.
Result
anota no longer asks for a code when you log in. The key in your authenticator app stays the same, so Set up authenticator app turns 2FA back on with the app you already have.
Task 7 — Reset the authenticator app
Use this if you lost the phone with your authenticator app, or want to start over with a different app.
Step-by-step
In the Authenticator app card of Two-factor authentication, click Reset authenticator app.
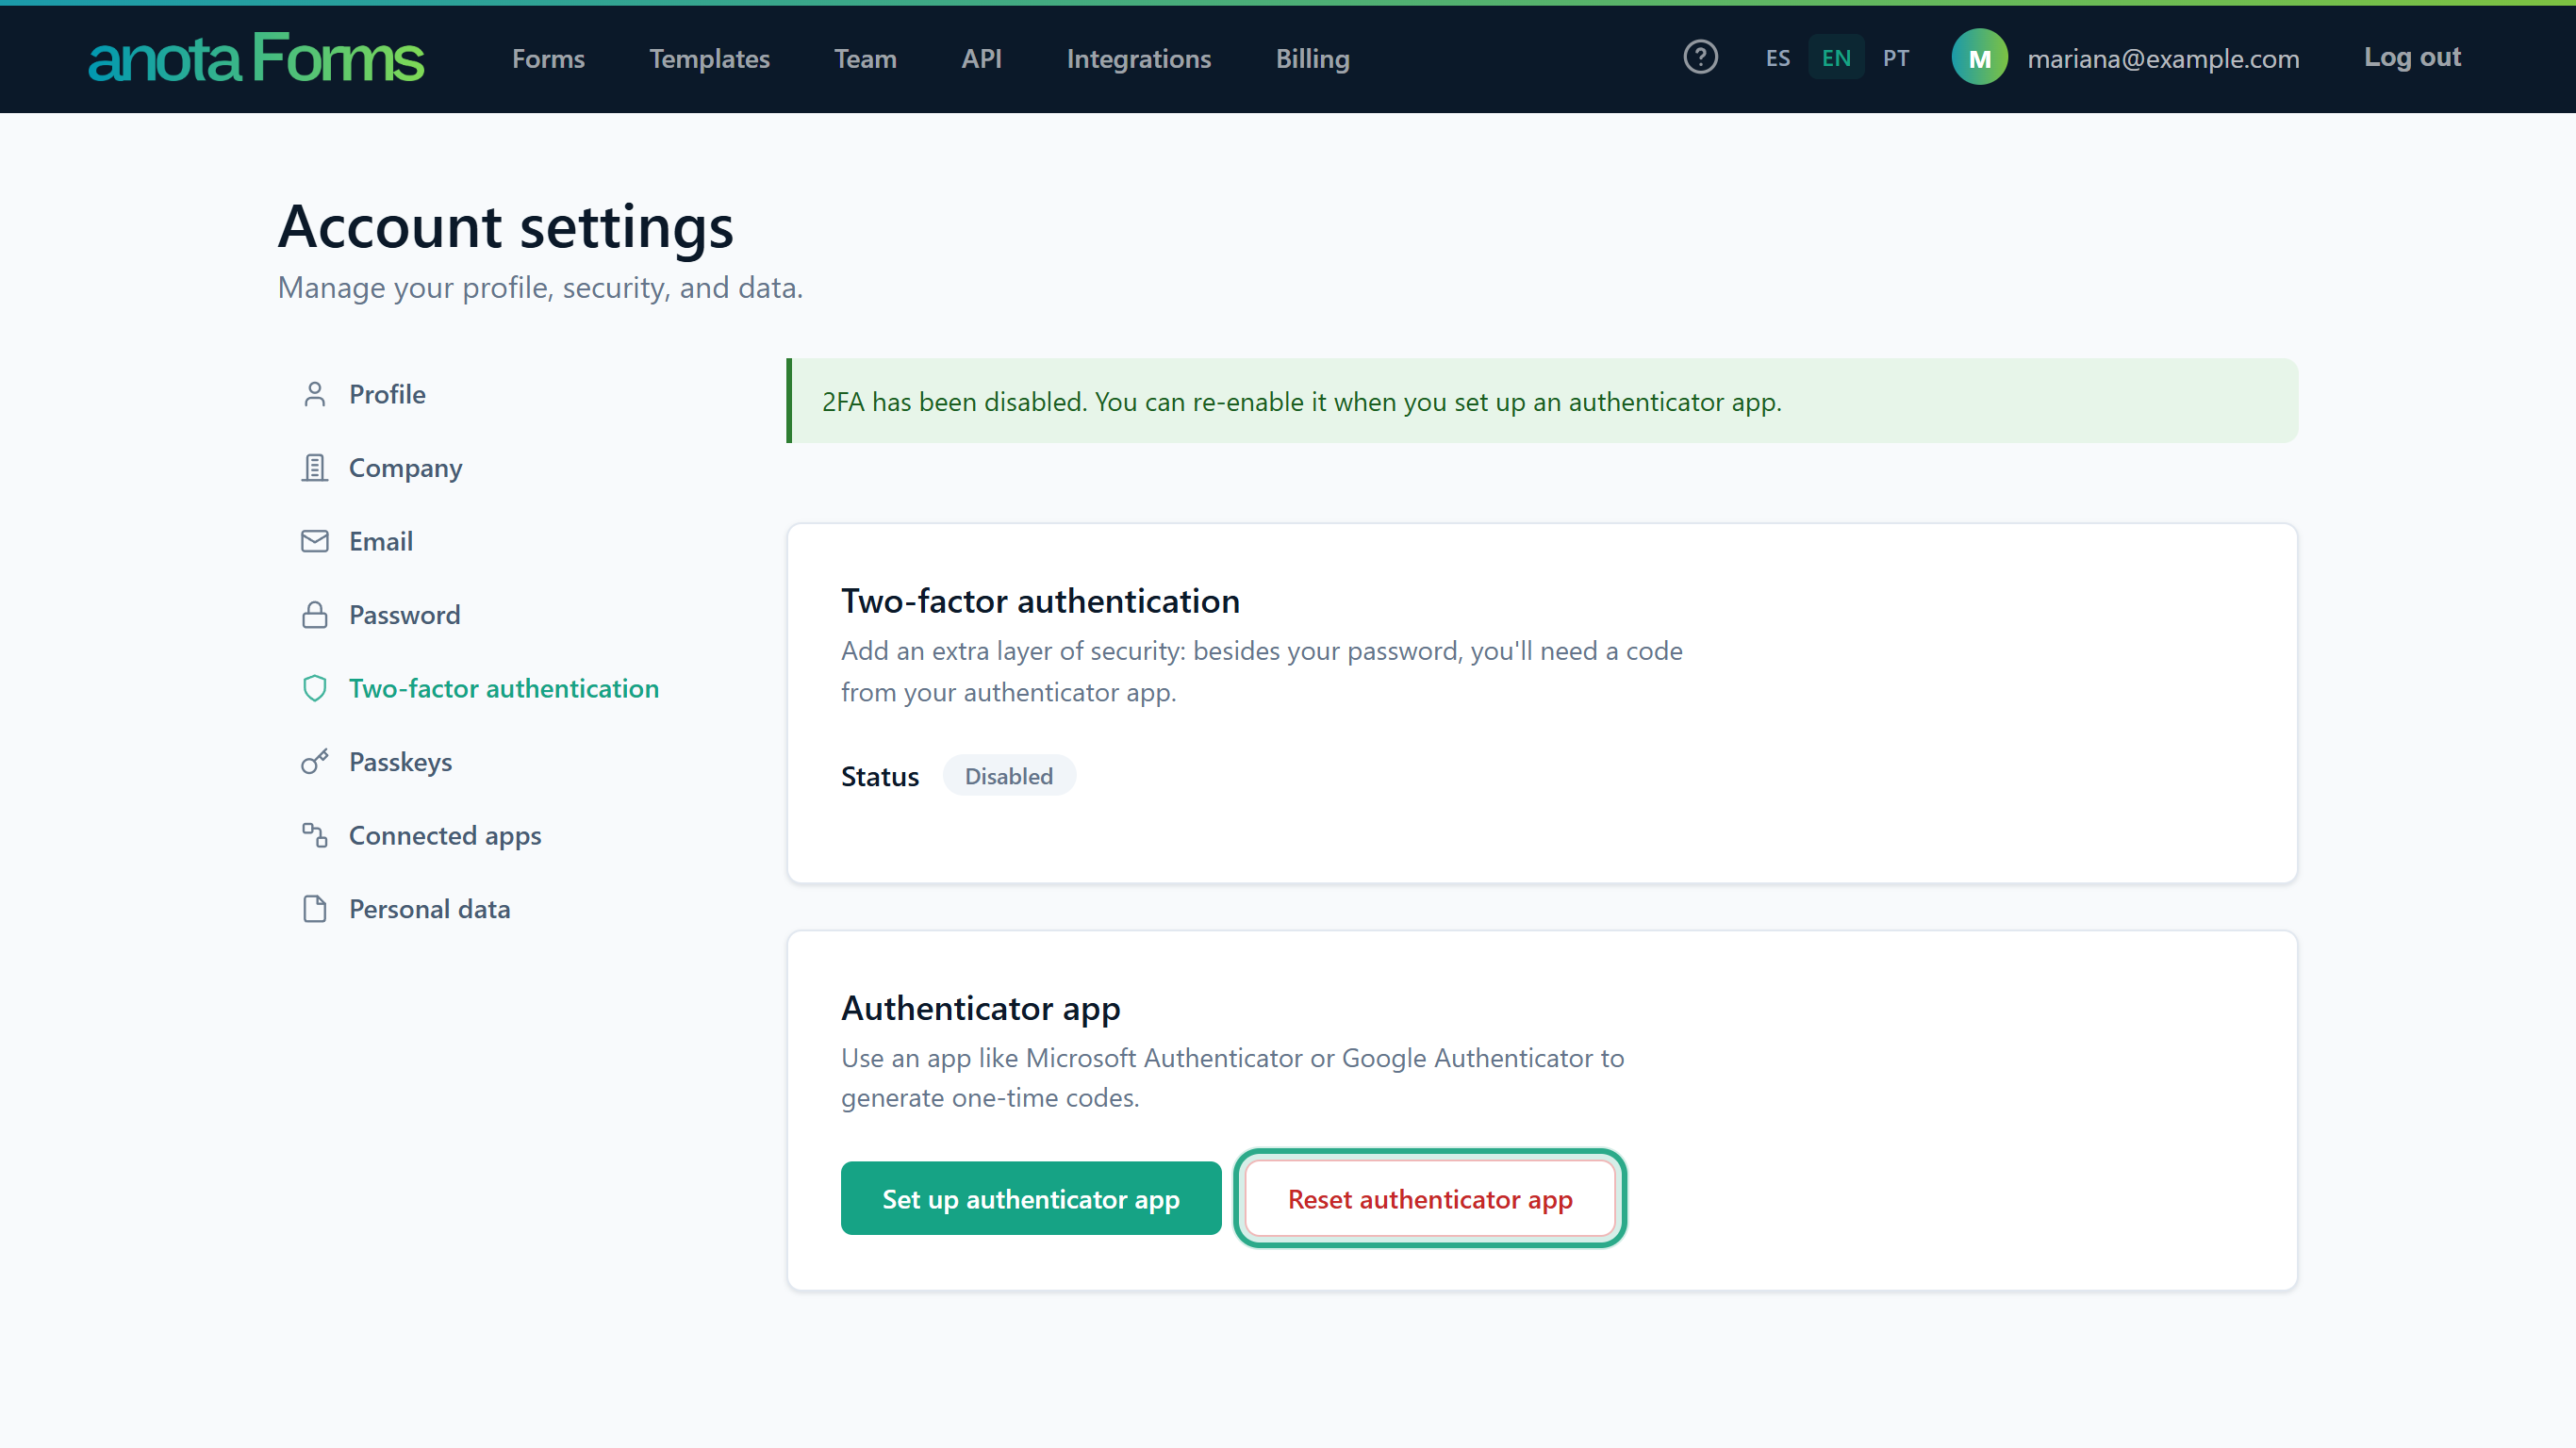 The button is there whether 2FA is on or off, once you have set up an app.
The Reset authenticator key card warns that your app stops working until you set it up again. Click Reset authenticator key.
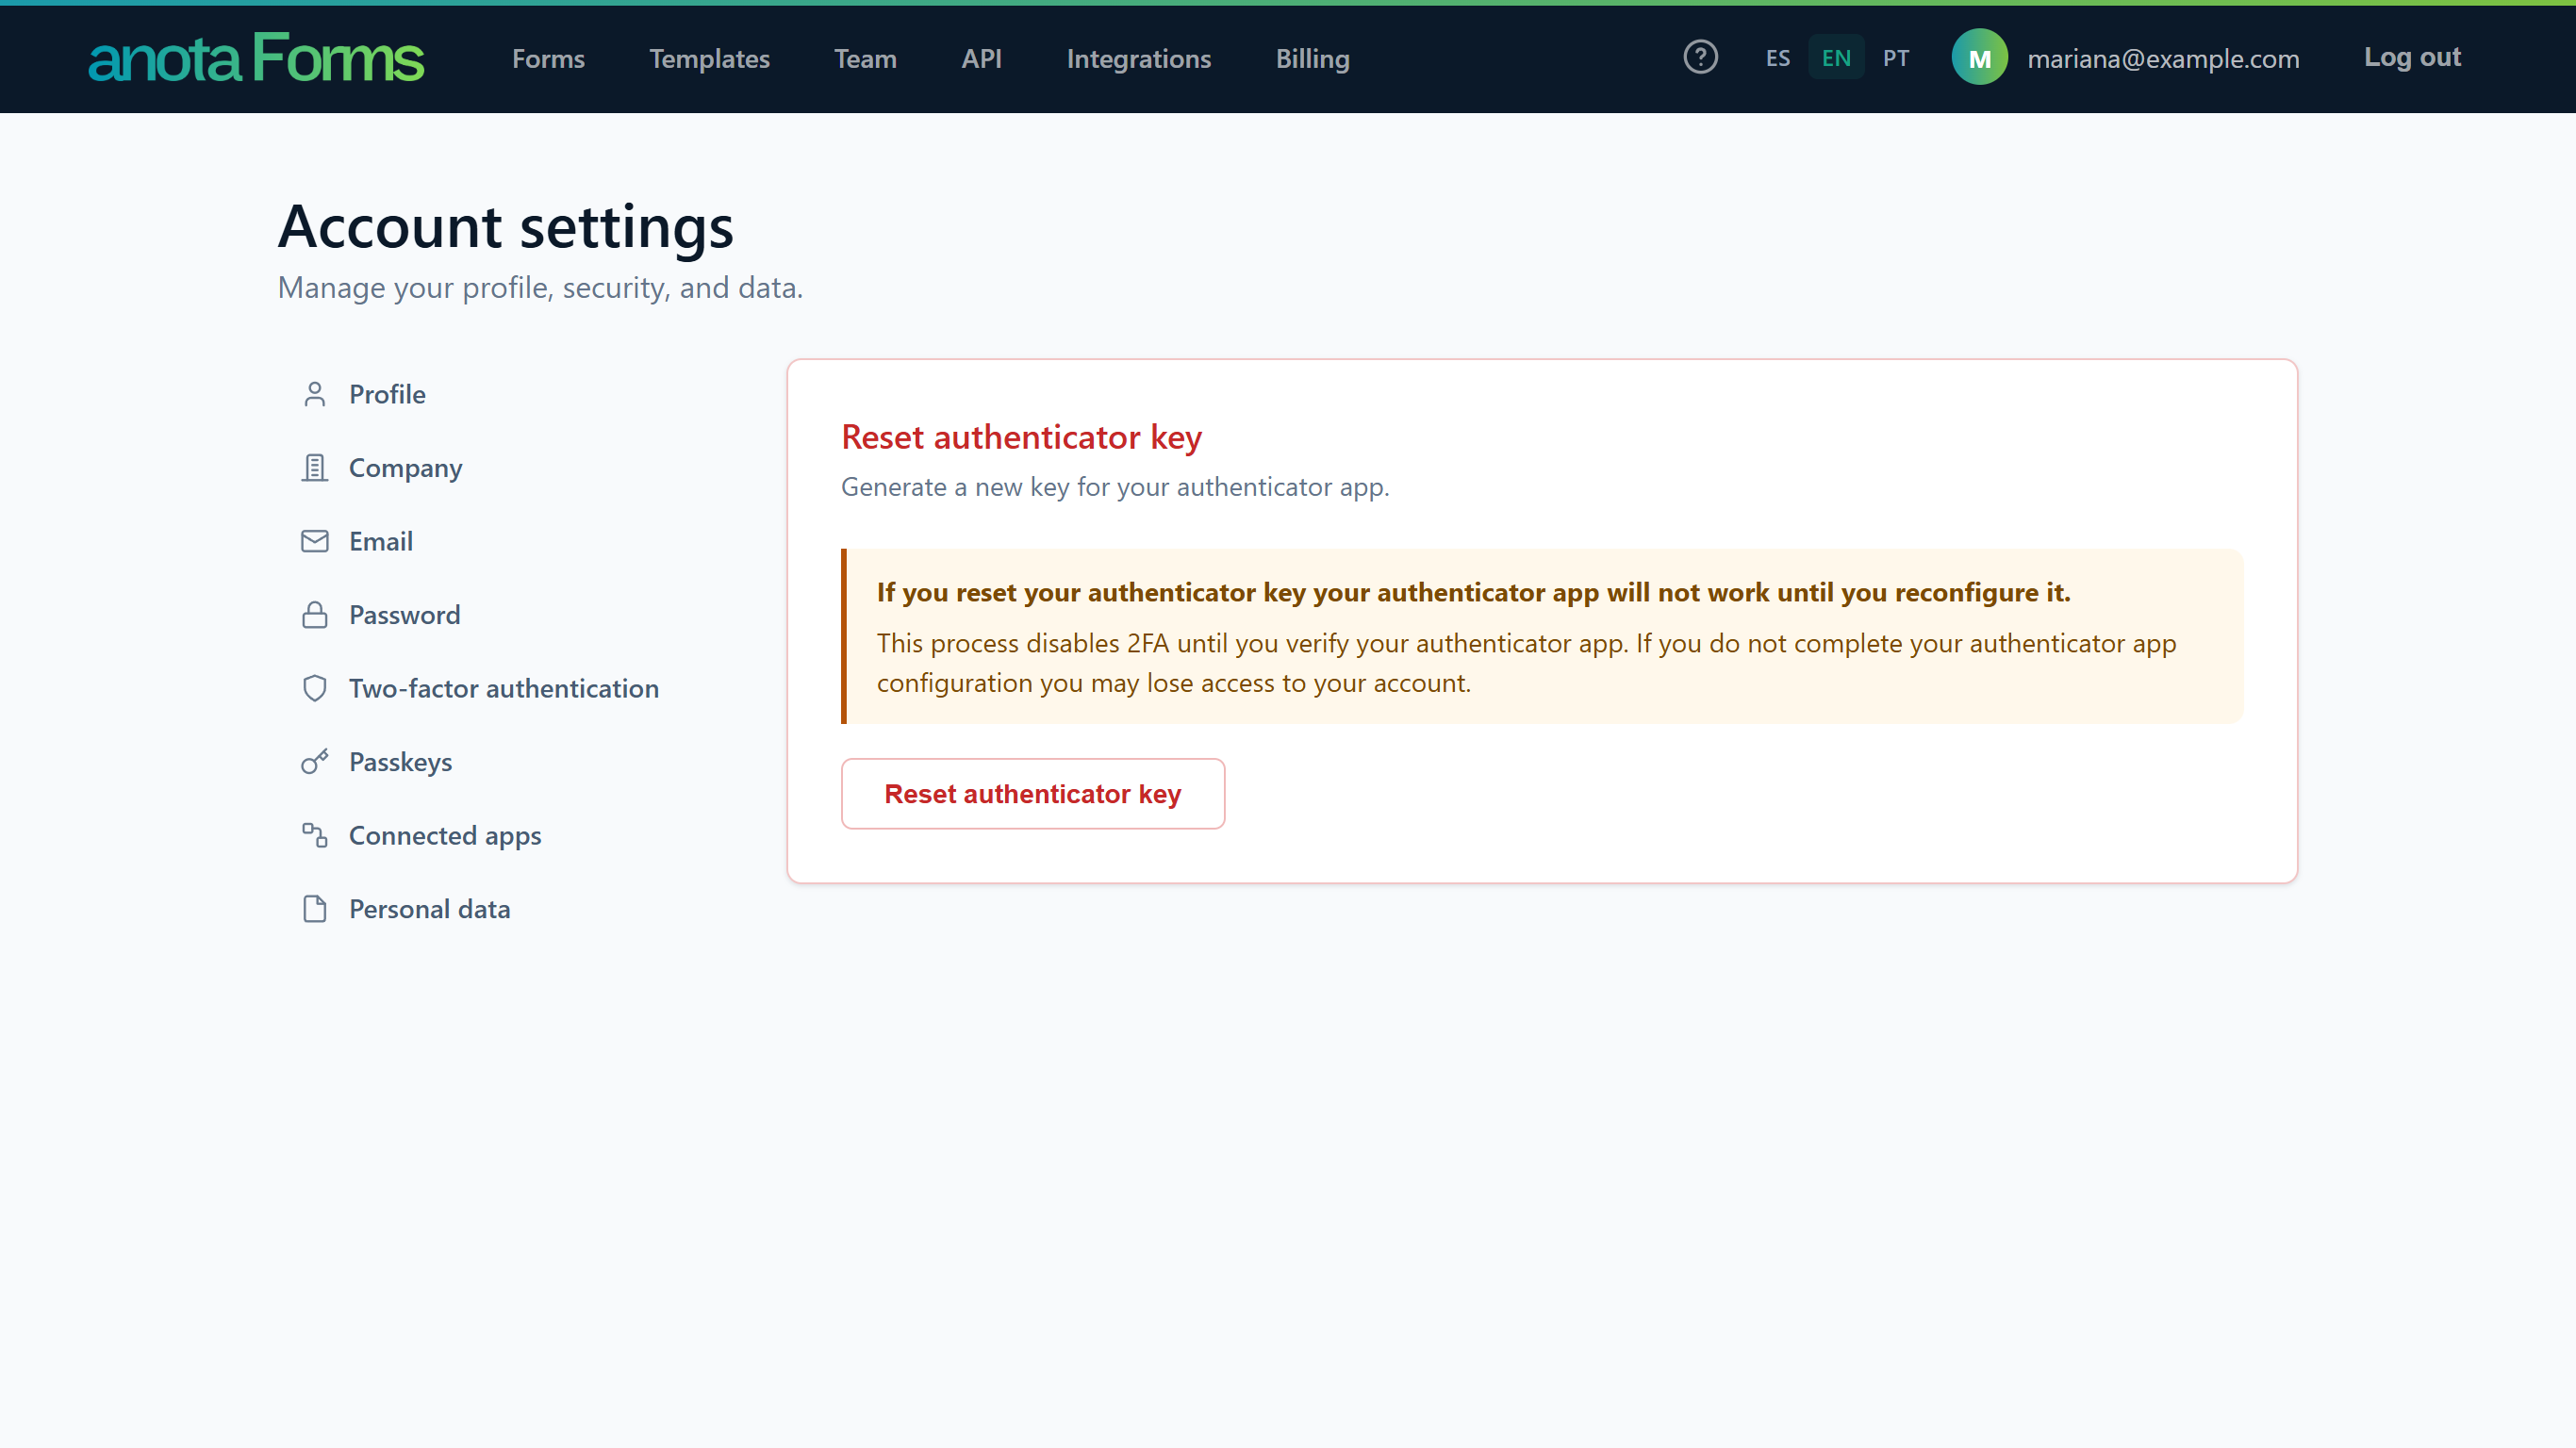 Resetting also turns 2FA off until you verify the new key.
anota shows Your authenticator app key has been reset, you will need to configure your authenticator app using the new key. and opens Configure authenticator app with a new key. Continue from step 2 to turn 2FA on again.
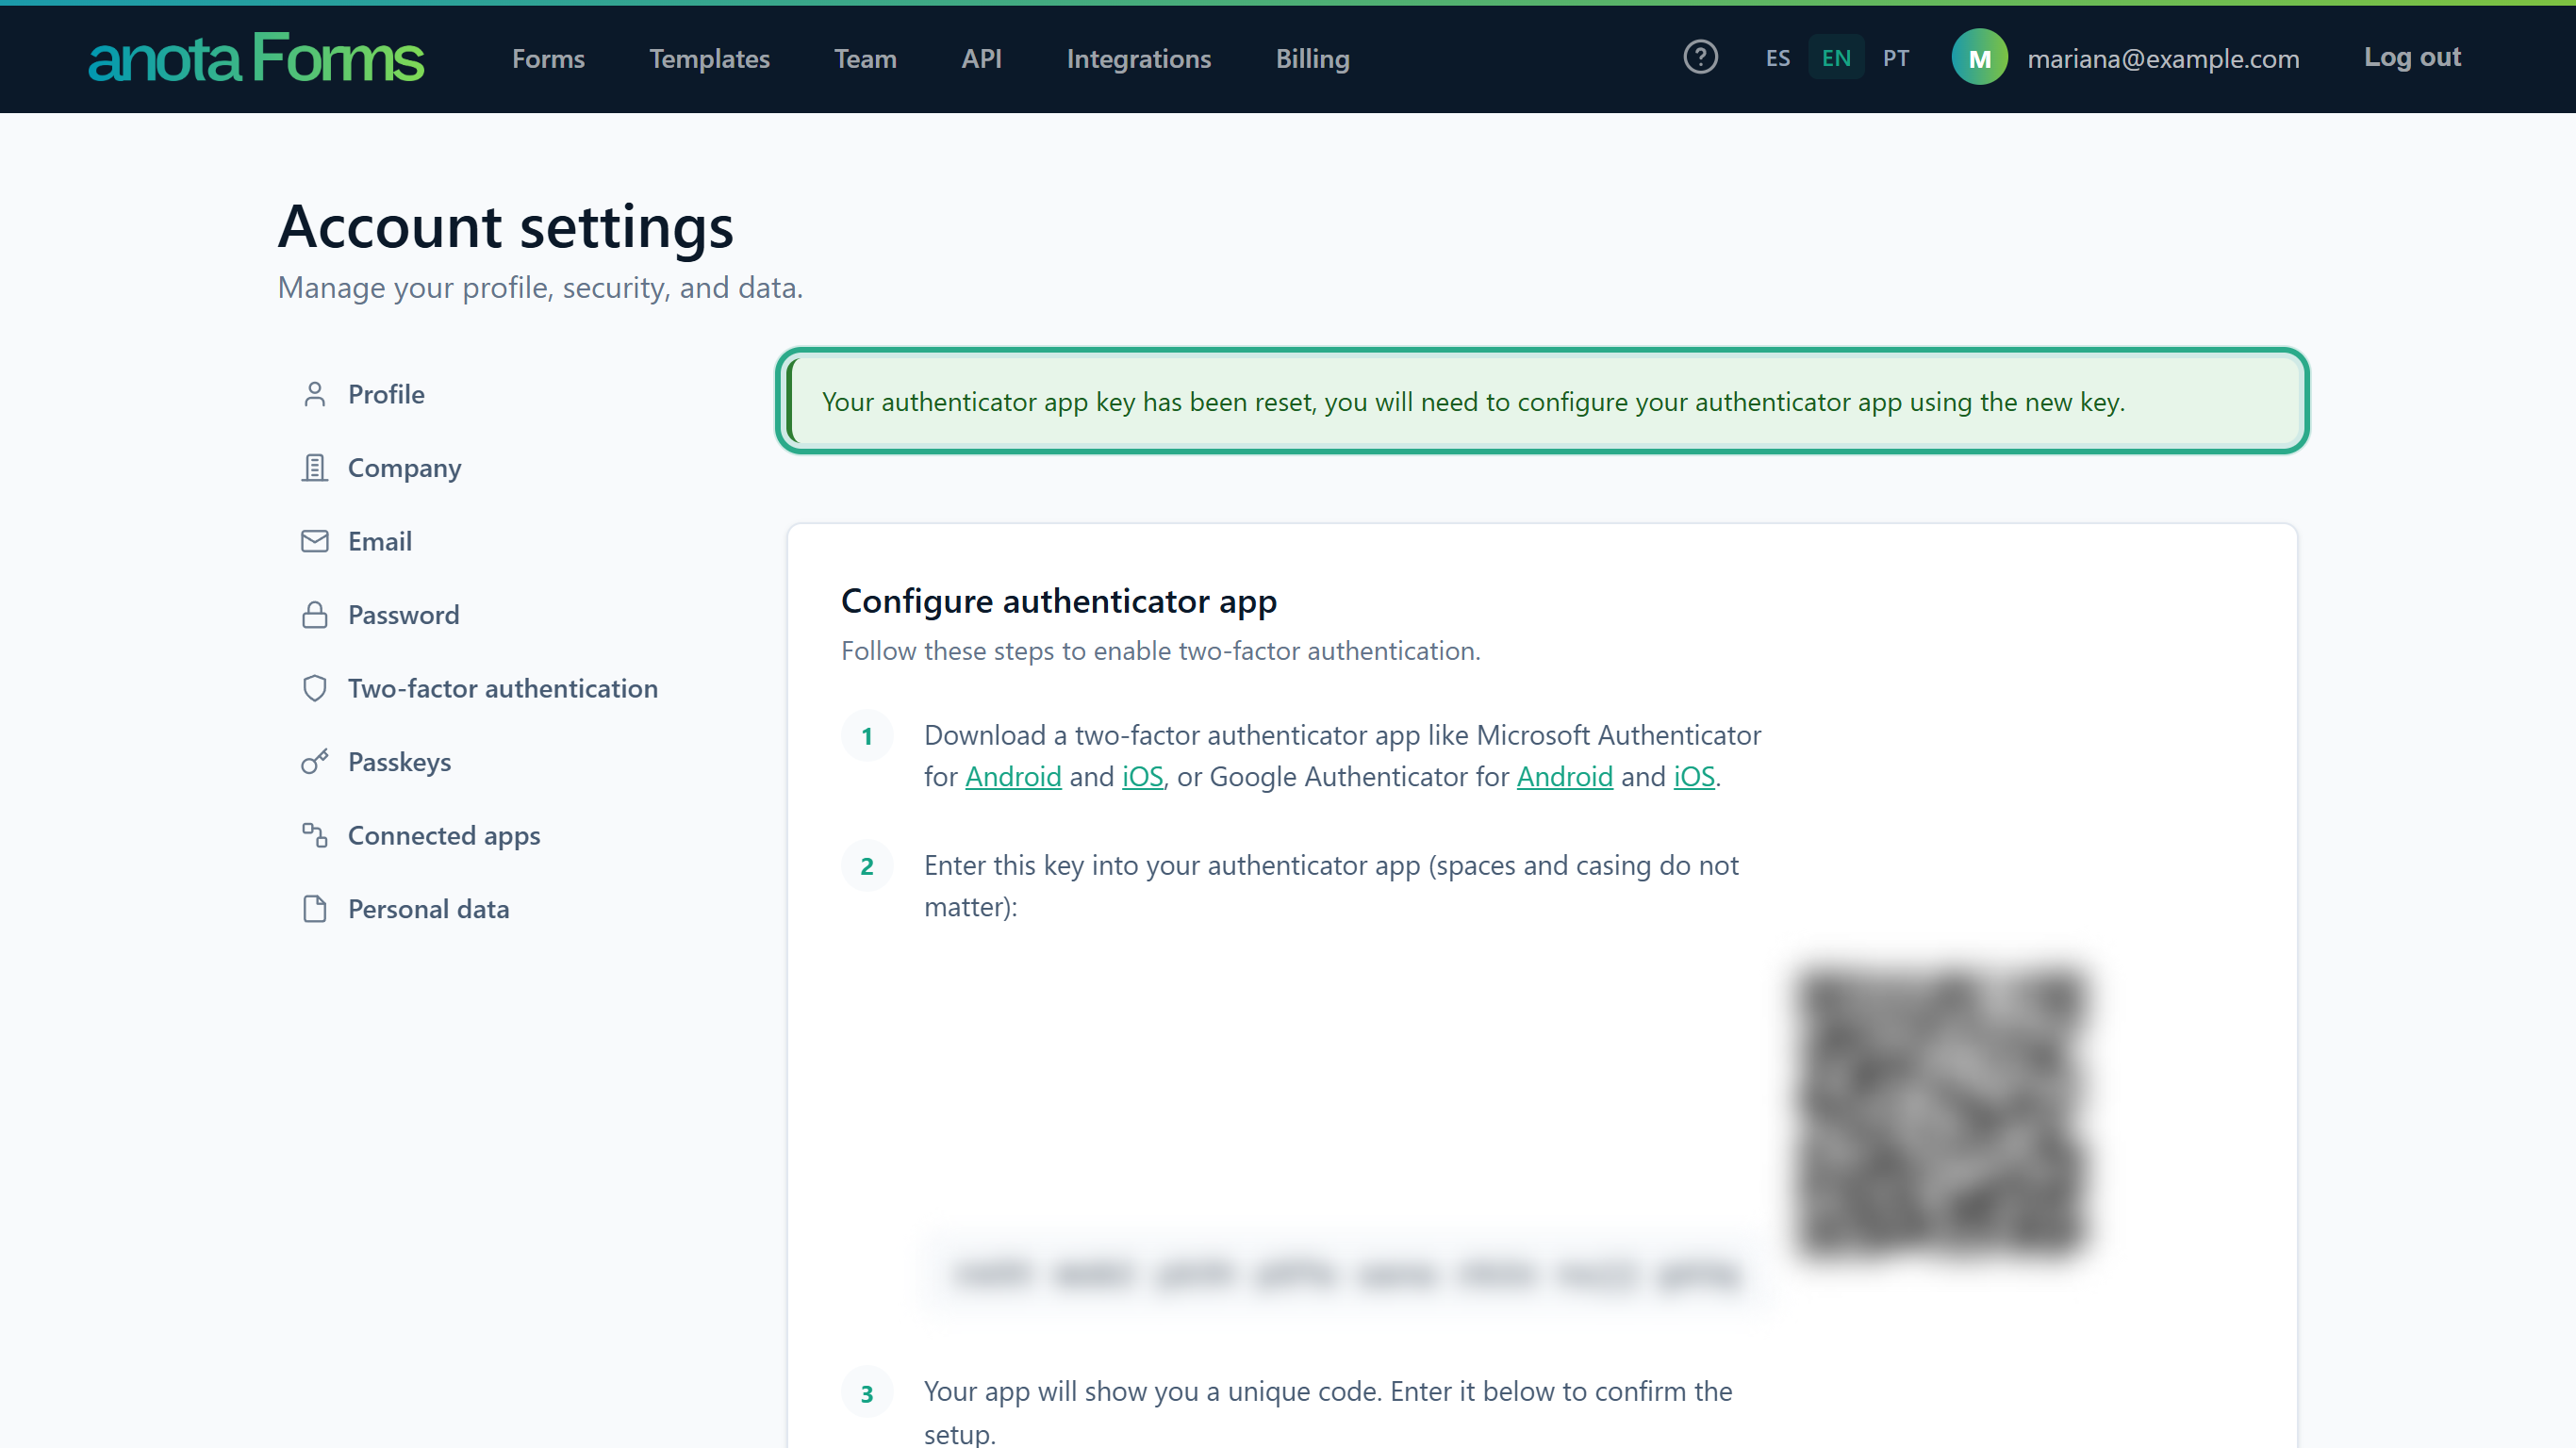 If you don't finish the setup, 2FA stays off.
Result
The old key no longer works. Remove the old anota account from your authenticator app and scan the new QR code or add the new key.
Task 8 — Add a passkey
Prerequisites
- A device or browser that supports passkeys (fingerprint, face, device PIN or a security key). If your browser lacks passkey support, anota shows "Error: Some passkey features are missing. Please update your browser."
Step-by-step
In Account settings, click Passkeys in the account menu. With none registered, it says No passkeys are registered yet. Click Add a new passkey.
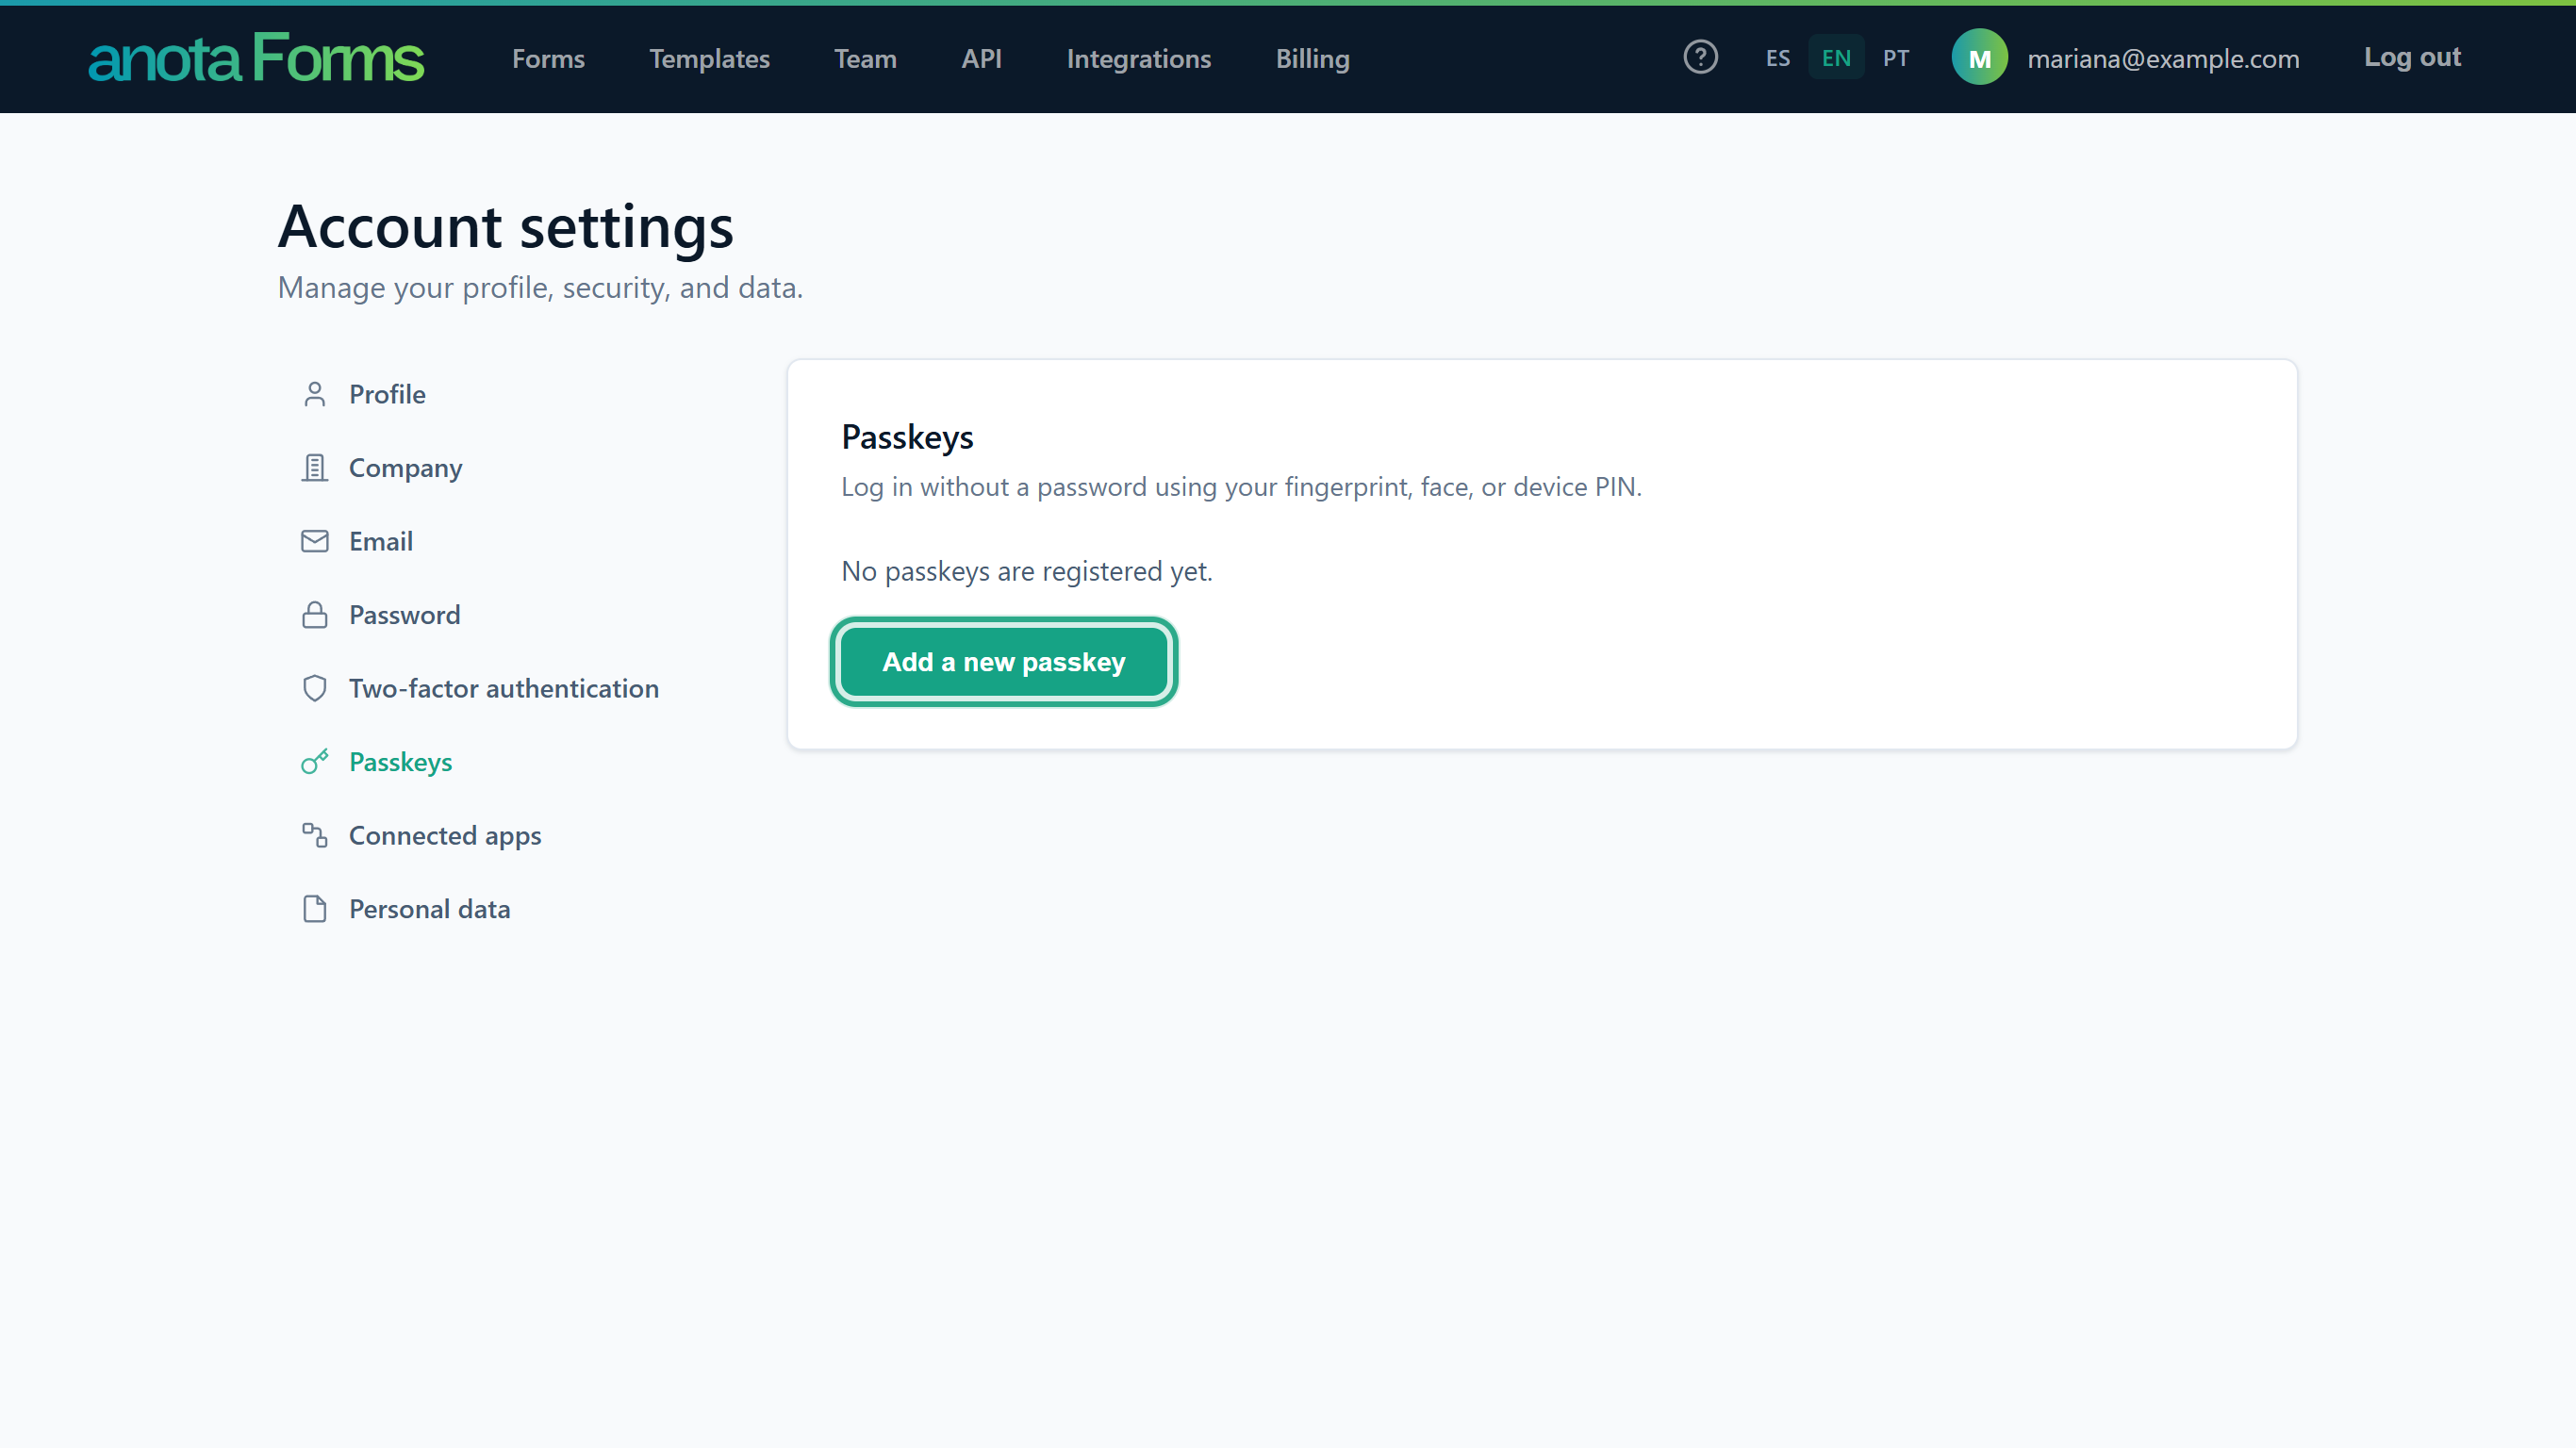 anota doesn't ask for your password; the device check takes its place.
Complete the check your device or browser asks for. anota then asks you to name the passkey (Enter a name for your passkey). Type a name that tells you which device it is on, for example "Work laptop", in Passkey name, and click Continue.
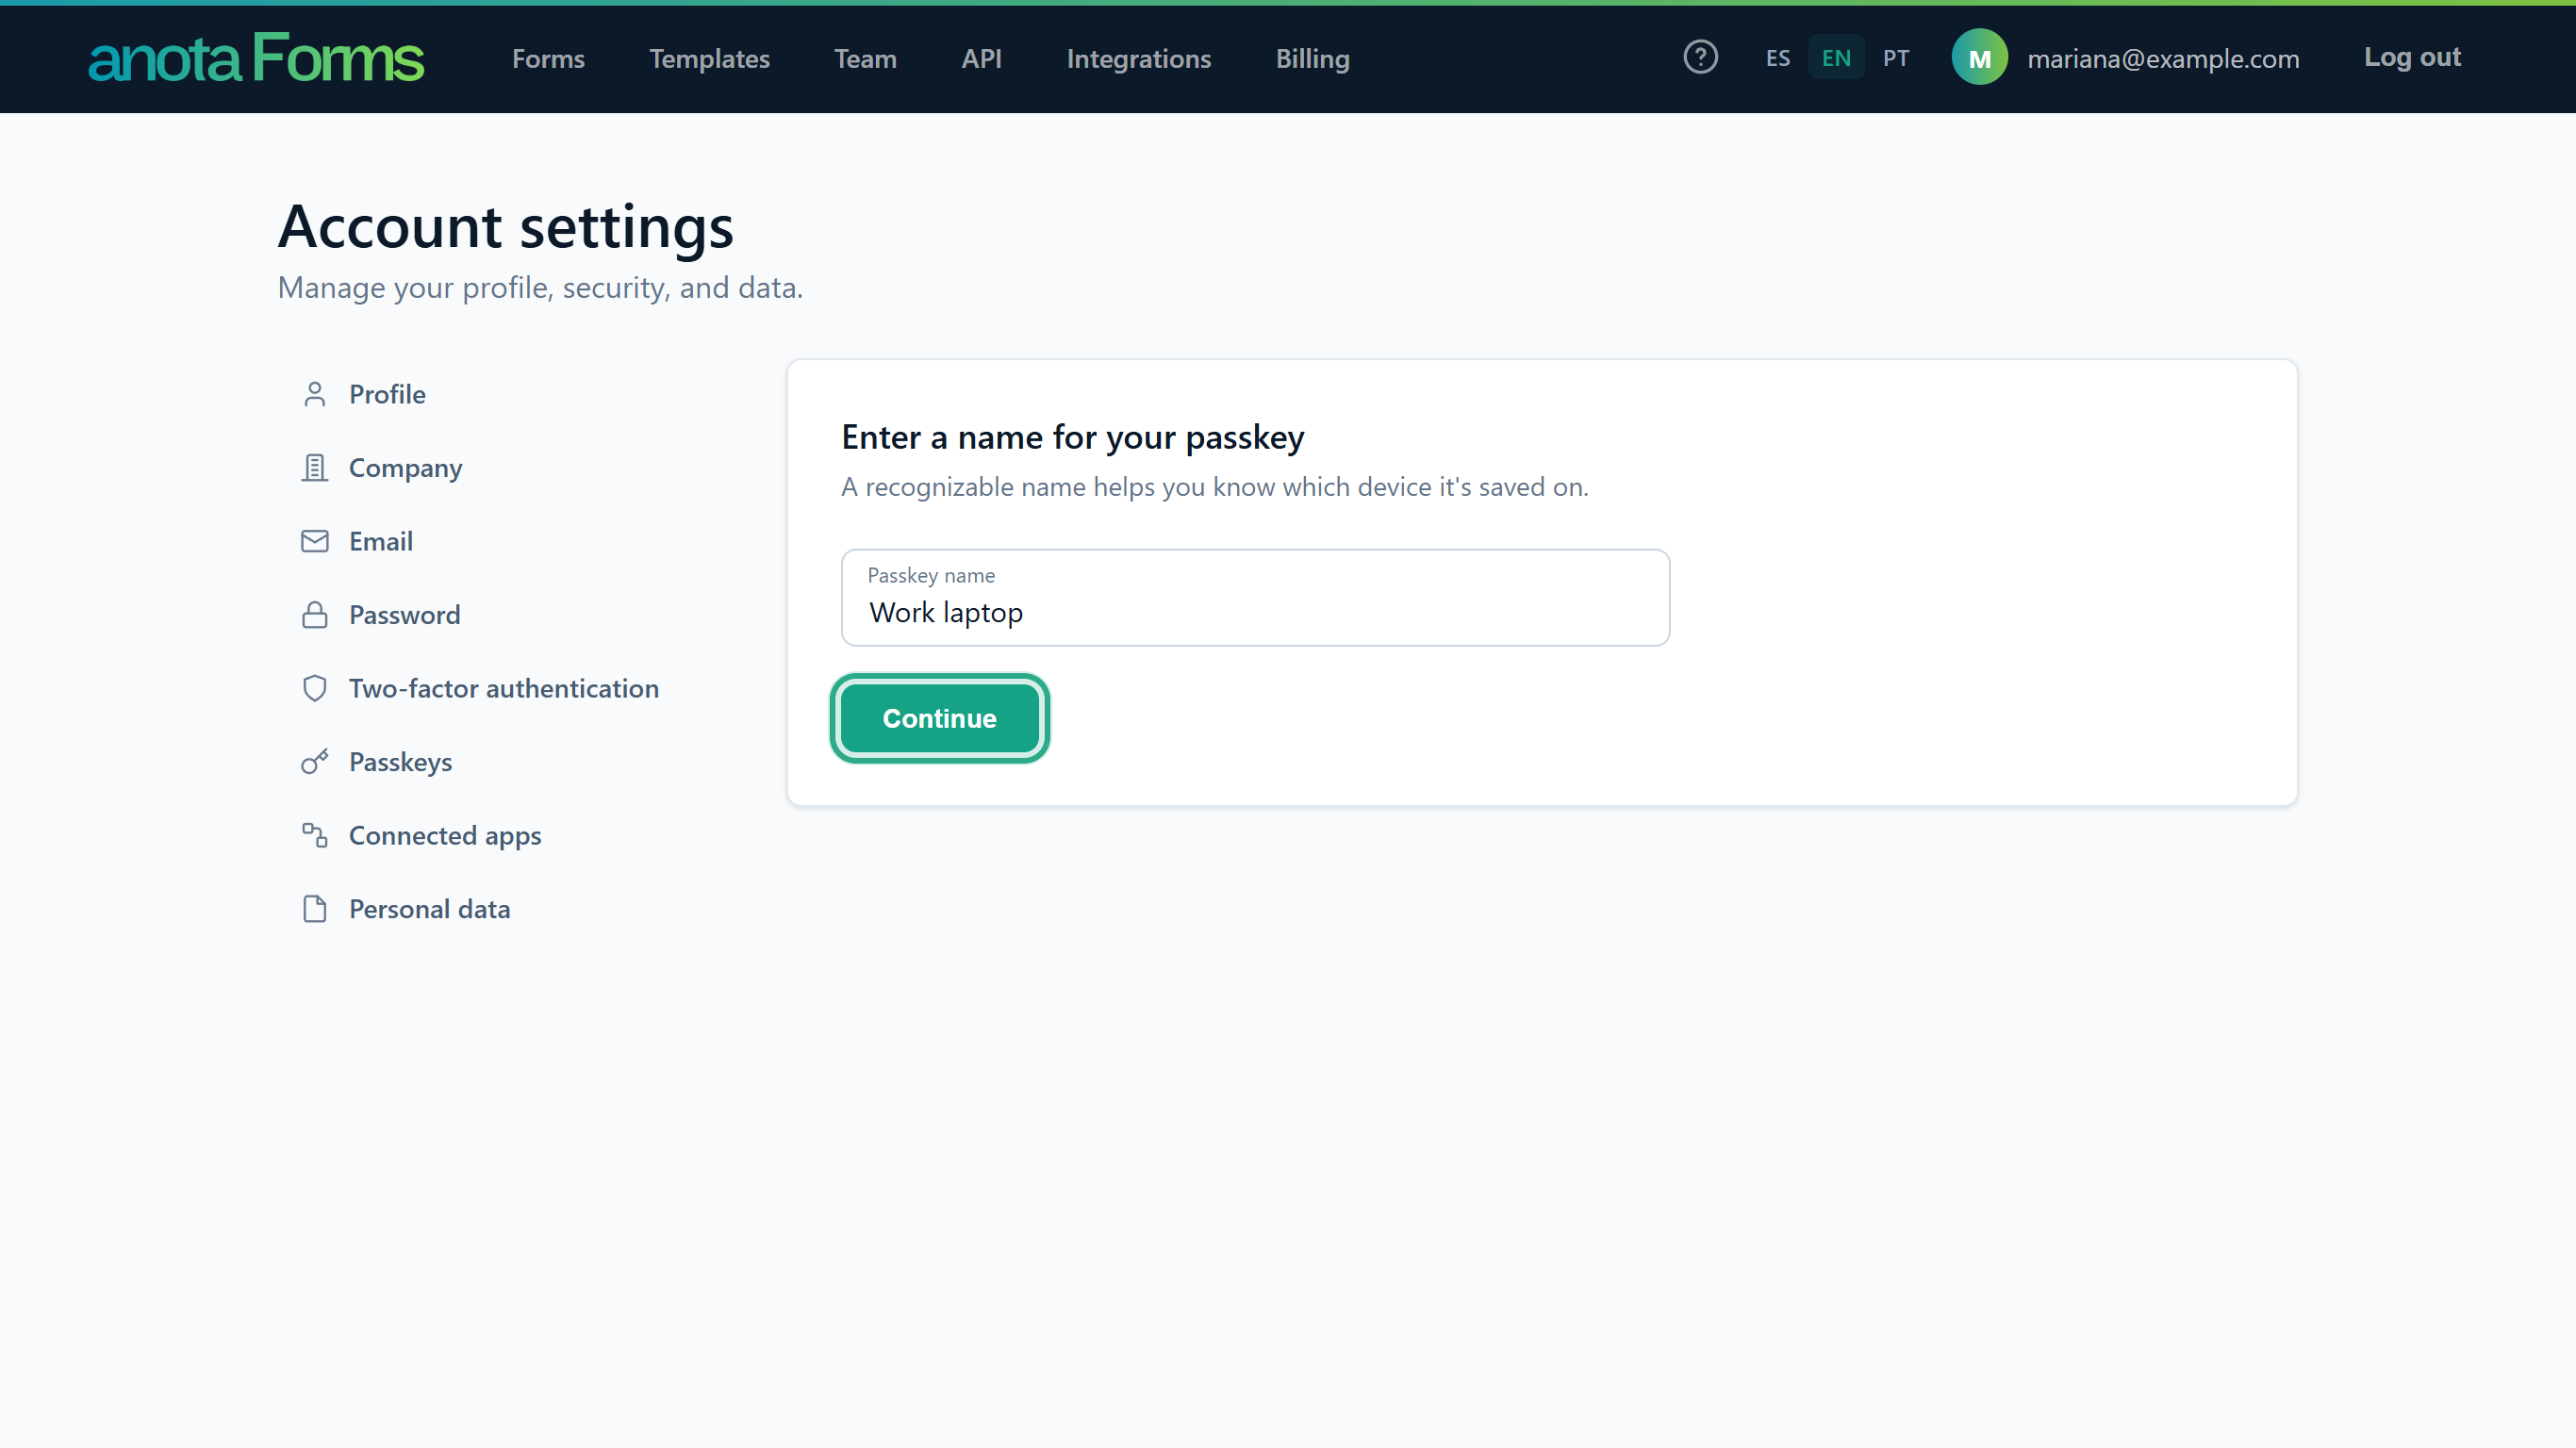 The name can have up to 200 characters.
anota shows Passkey updated successfully. and the passkey is listed with Rename and Delete buttons.
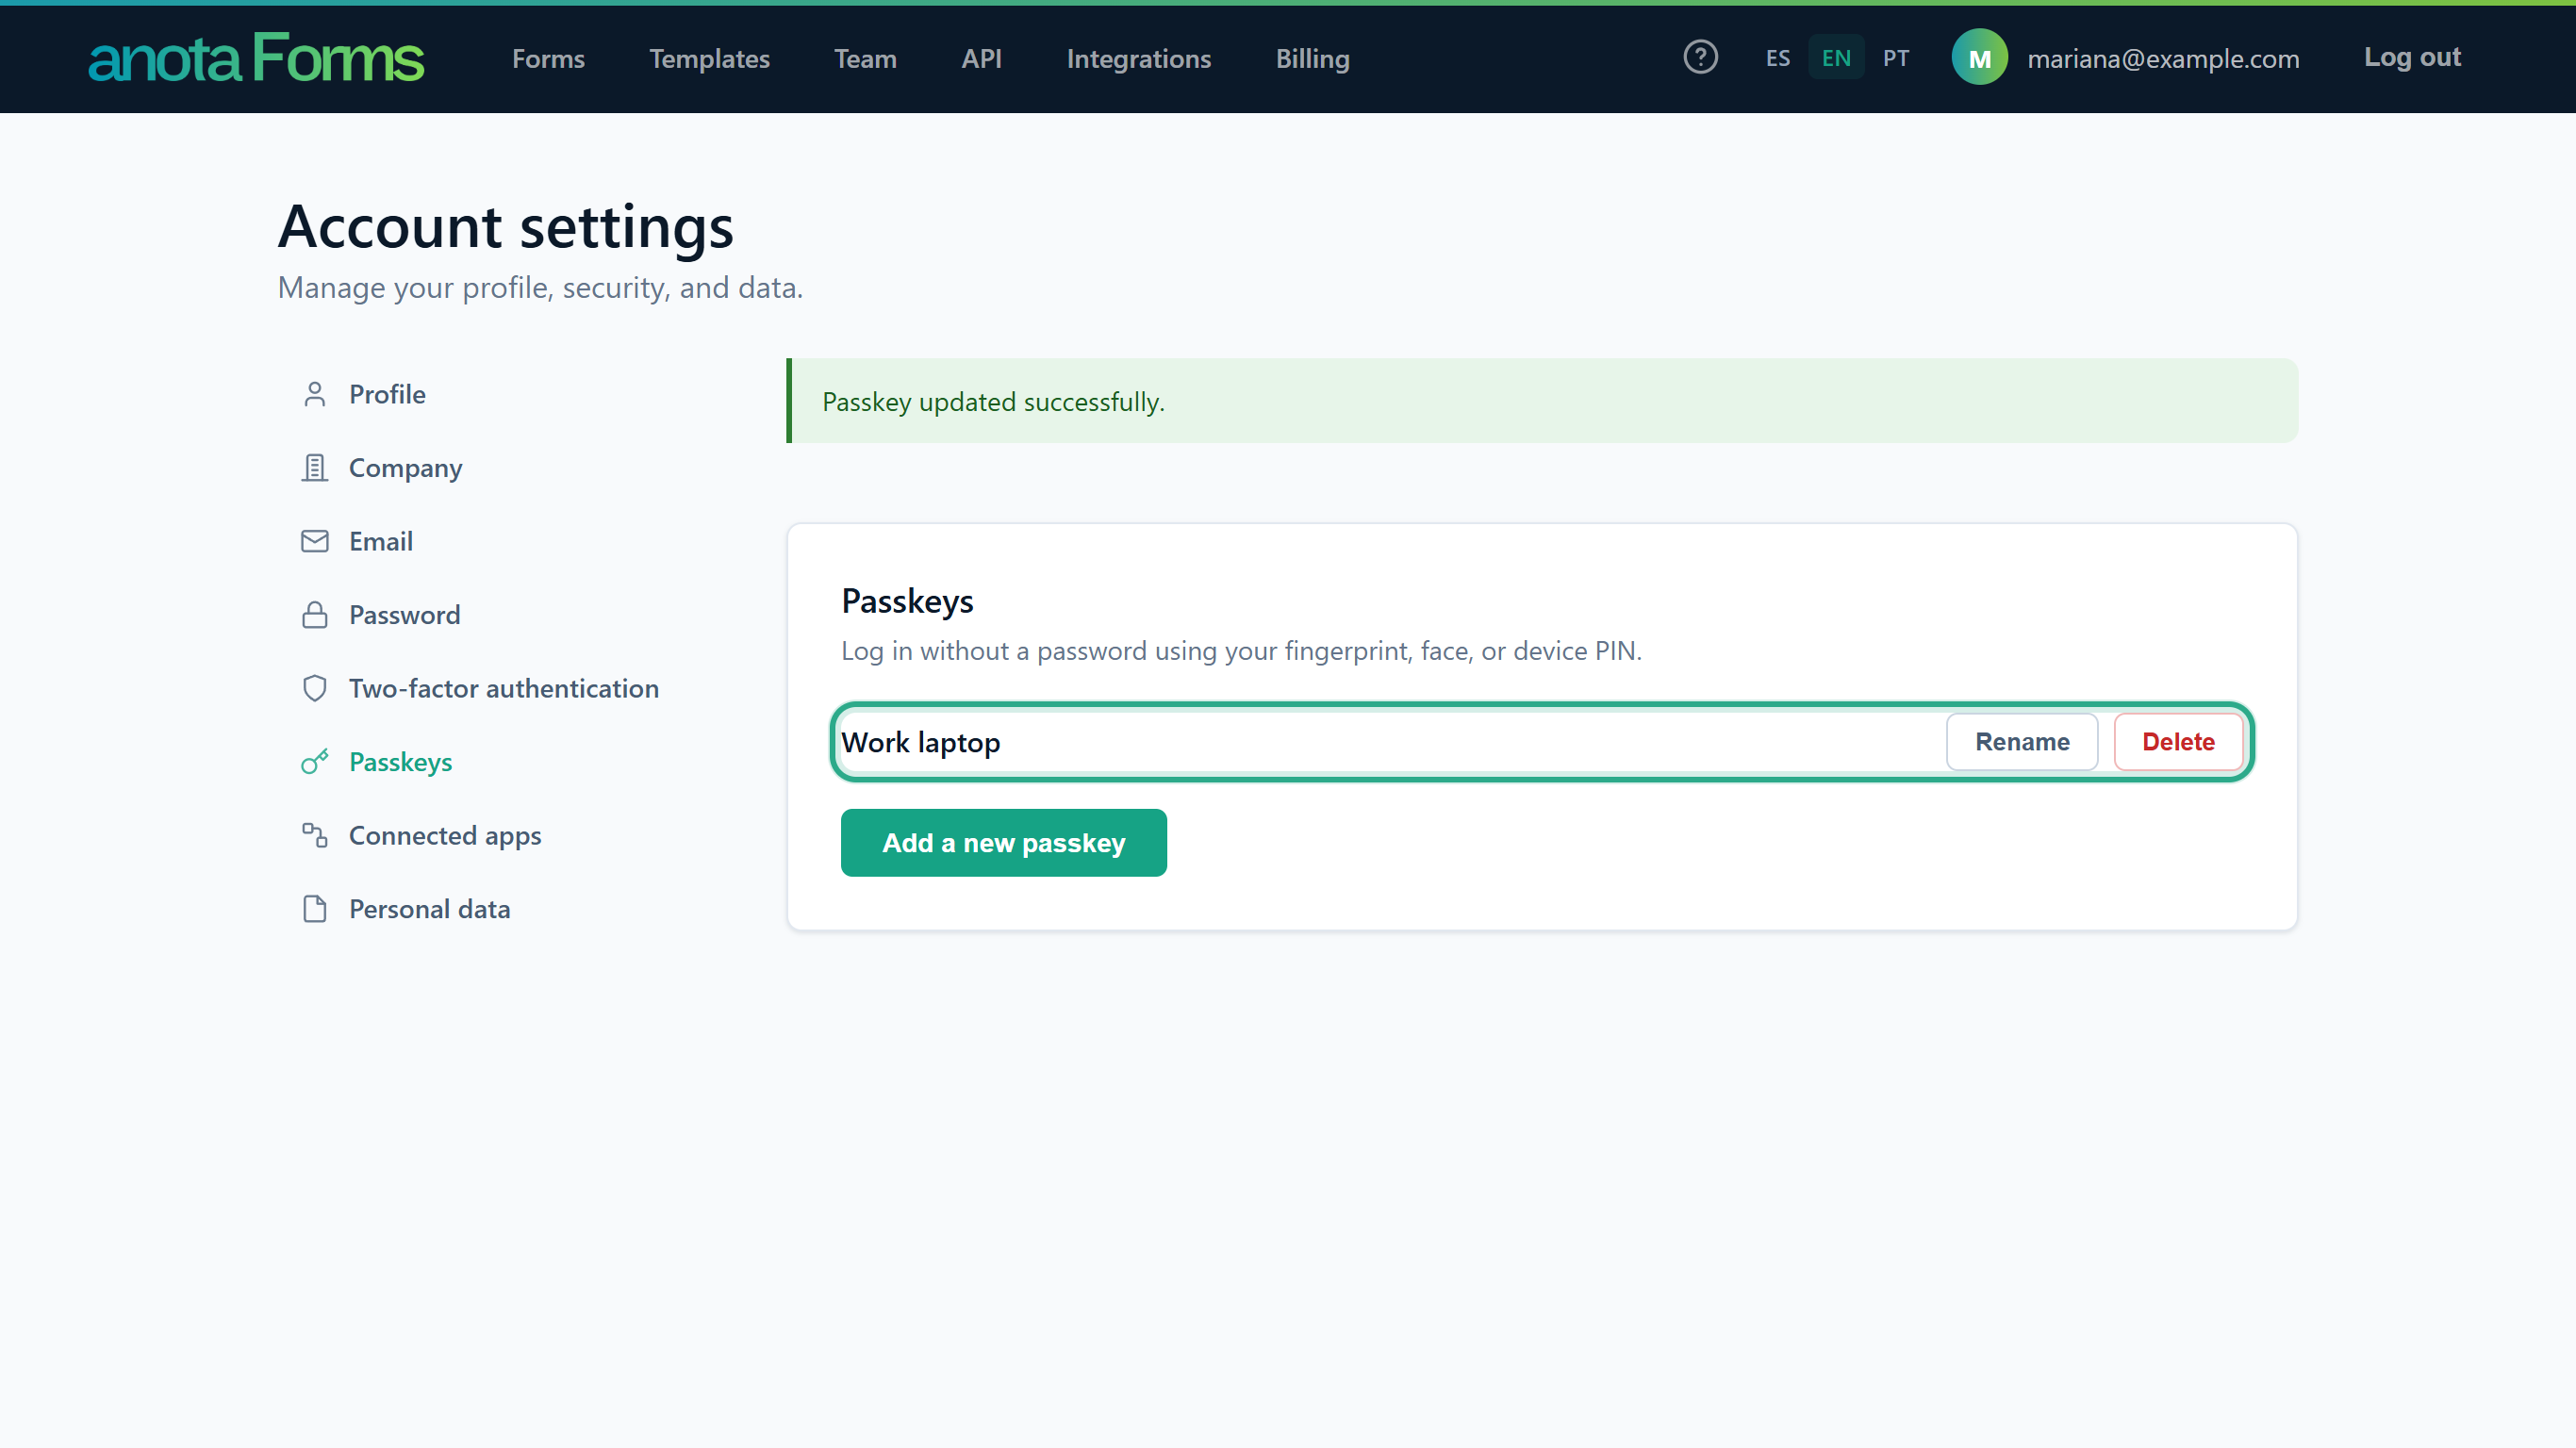 You can register several passkeys, for example one per device, up to 100.
Result
You can log in with this passkey instead of your password. If you cancel the device check, anota shows "Error: No passkey was provided by the authenticator."
Task 9 — Log in with a passkey
Step-by-step
On the log-in page, click Log in with a passkey and complete the check on your device. Your browser may also offer your passkey as soon as you click the Email box.
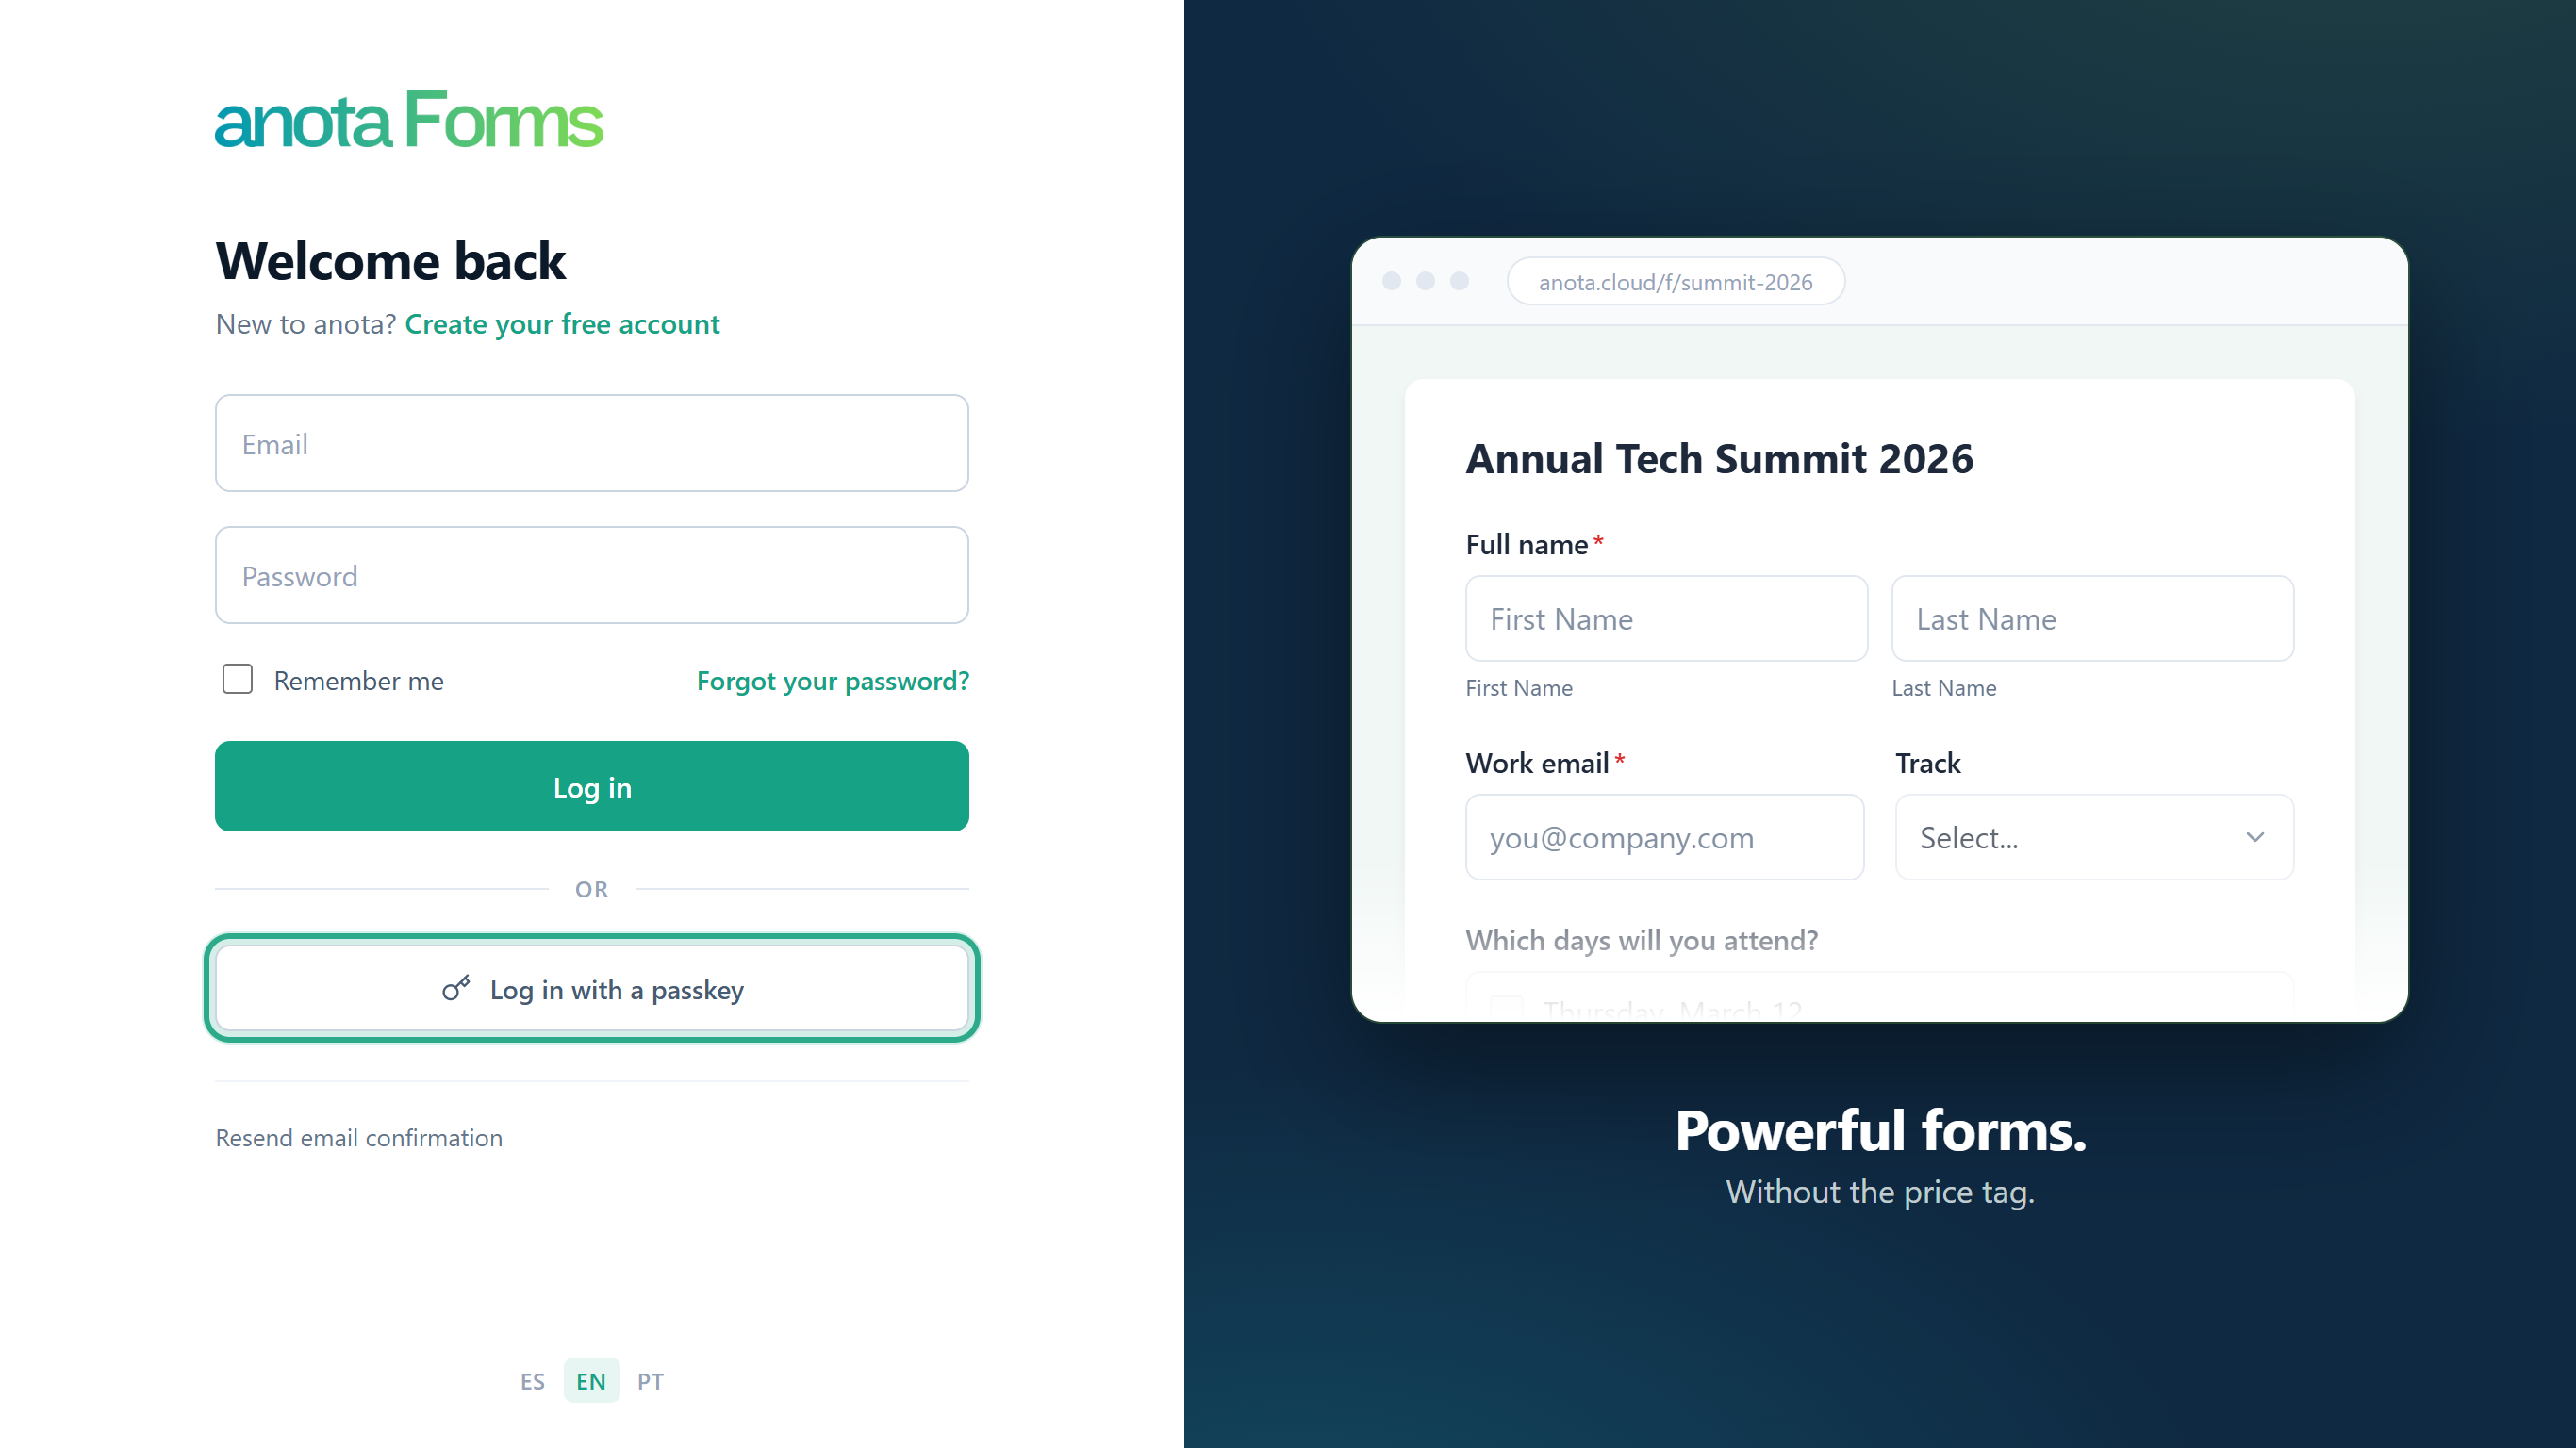 You don't need to type your email or password.
Result
You land on My forms.
Task 10 — Rename a passkey
Step-by-step
In Passkeys, click Rename next to the passkey.
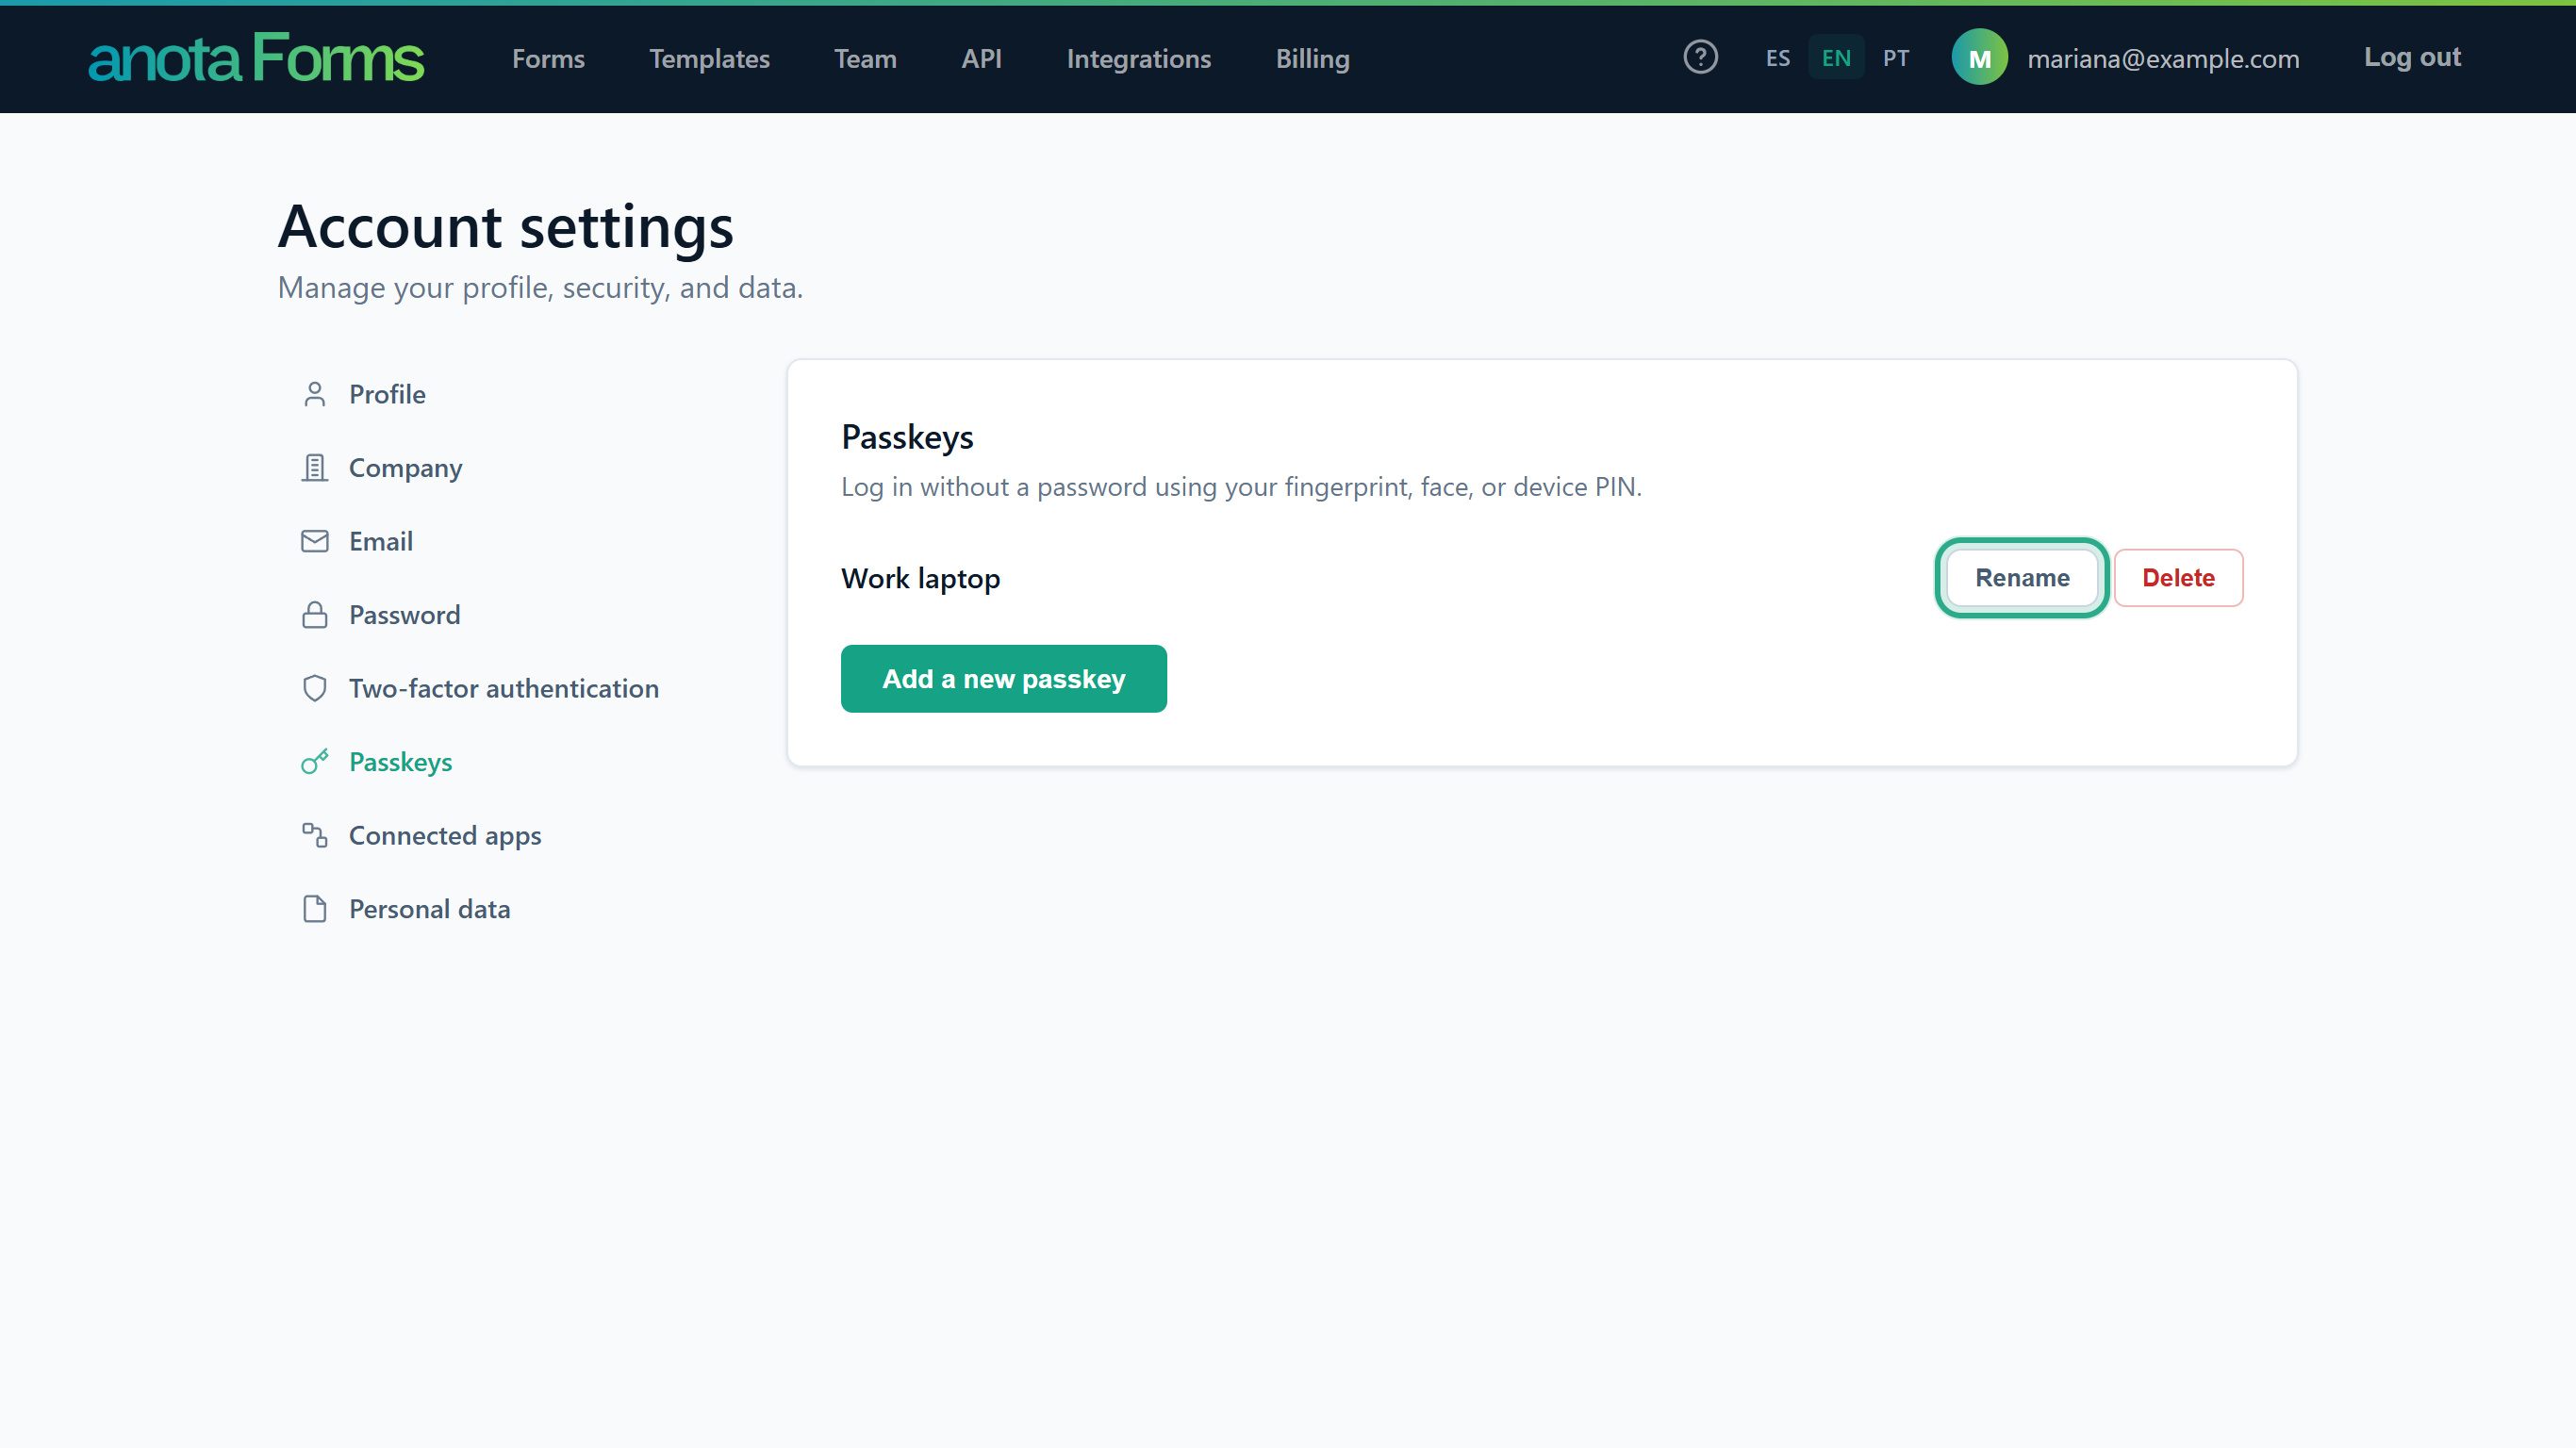 Passkeys without a name are listed as Unnamed passkey.
The card reads Enter a new name for your "Work laptop" passkey. Type the new name in Passkey name (here "Front counter laptop") and click Continue.
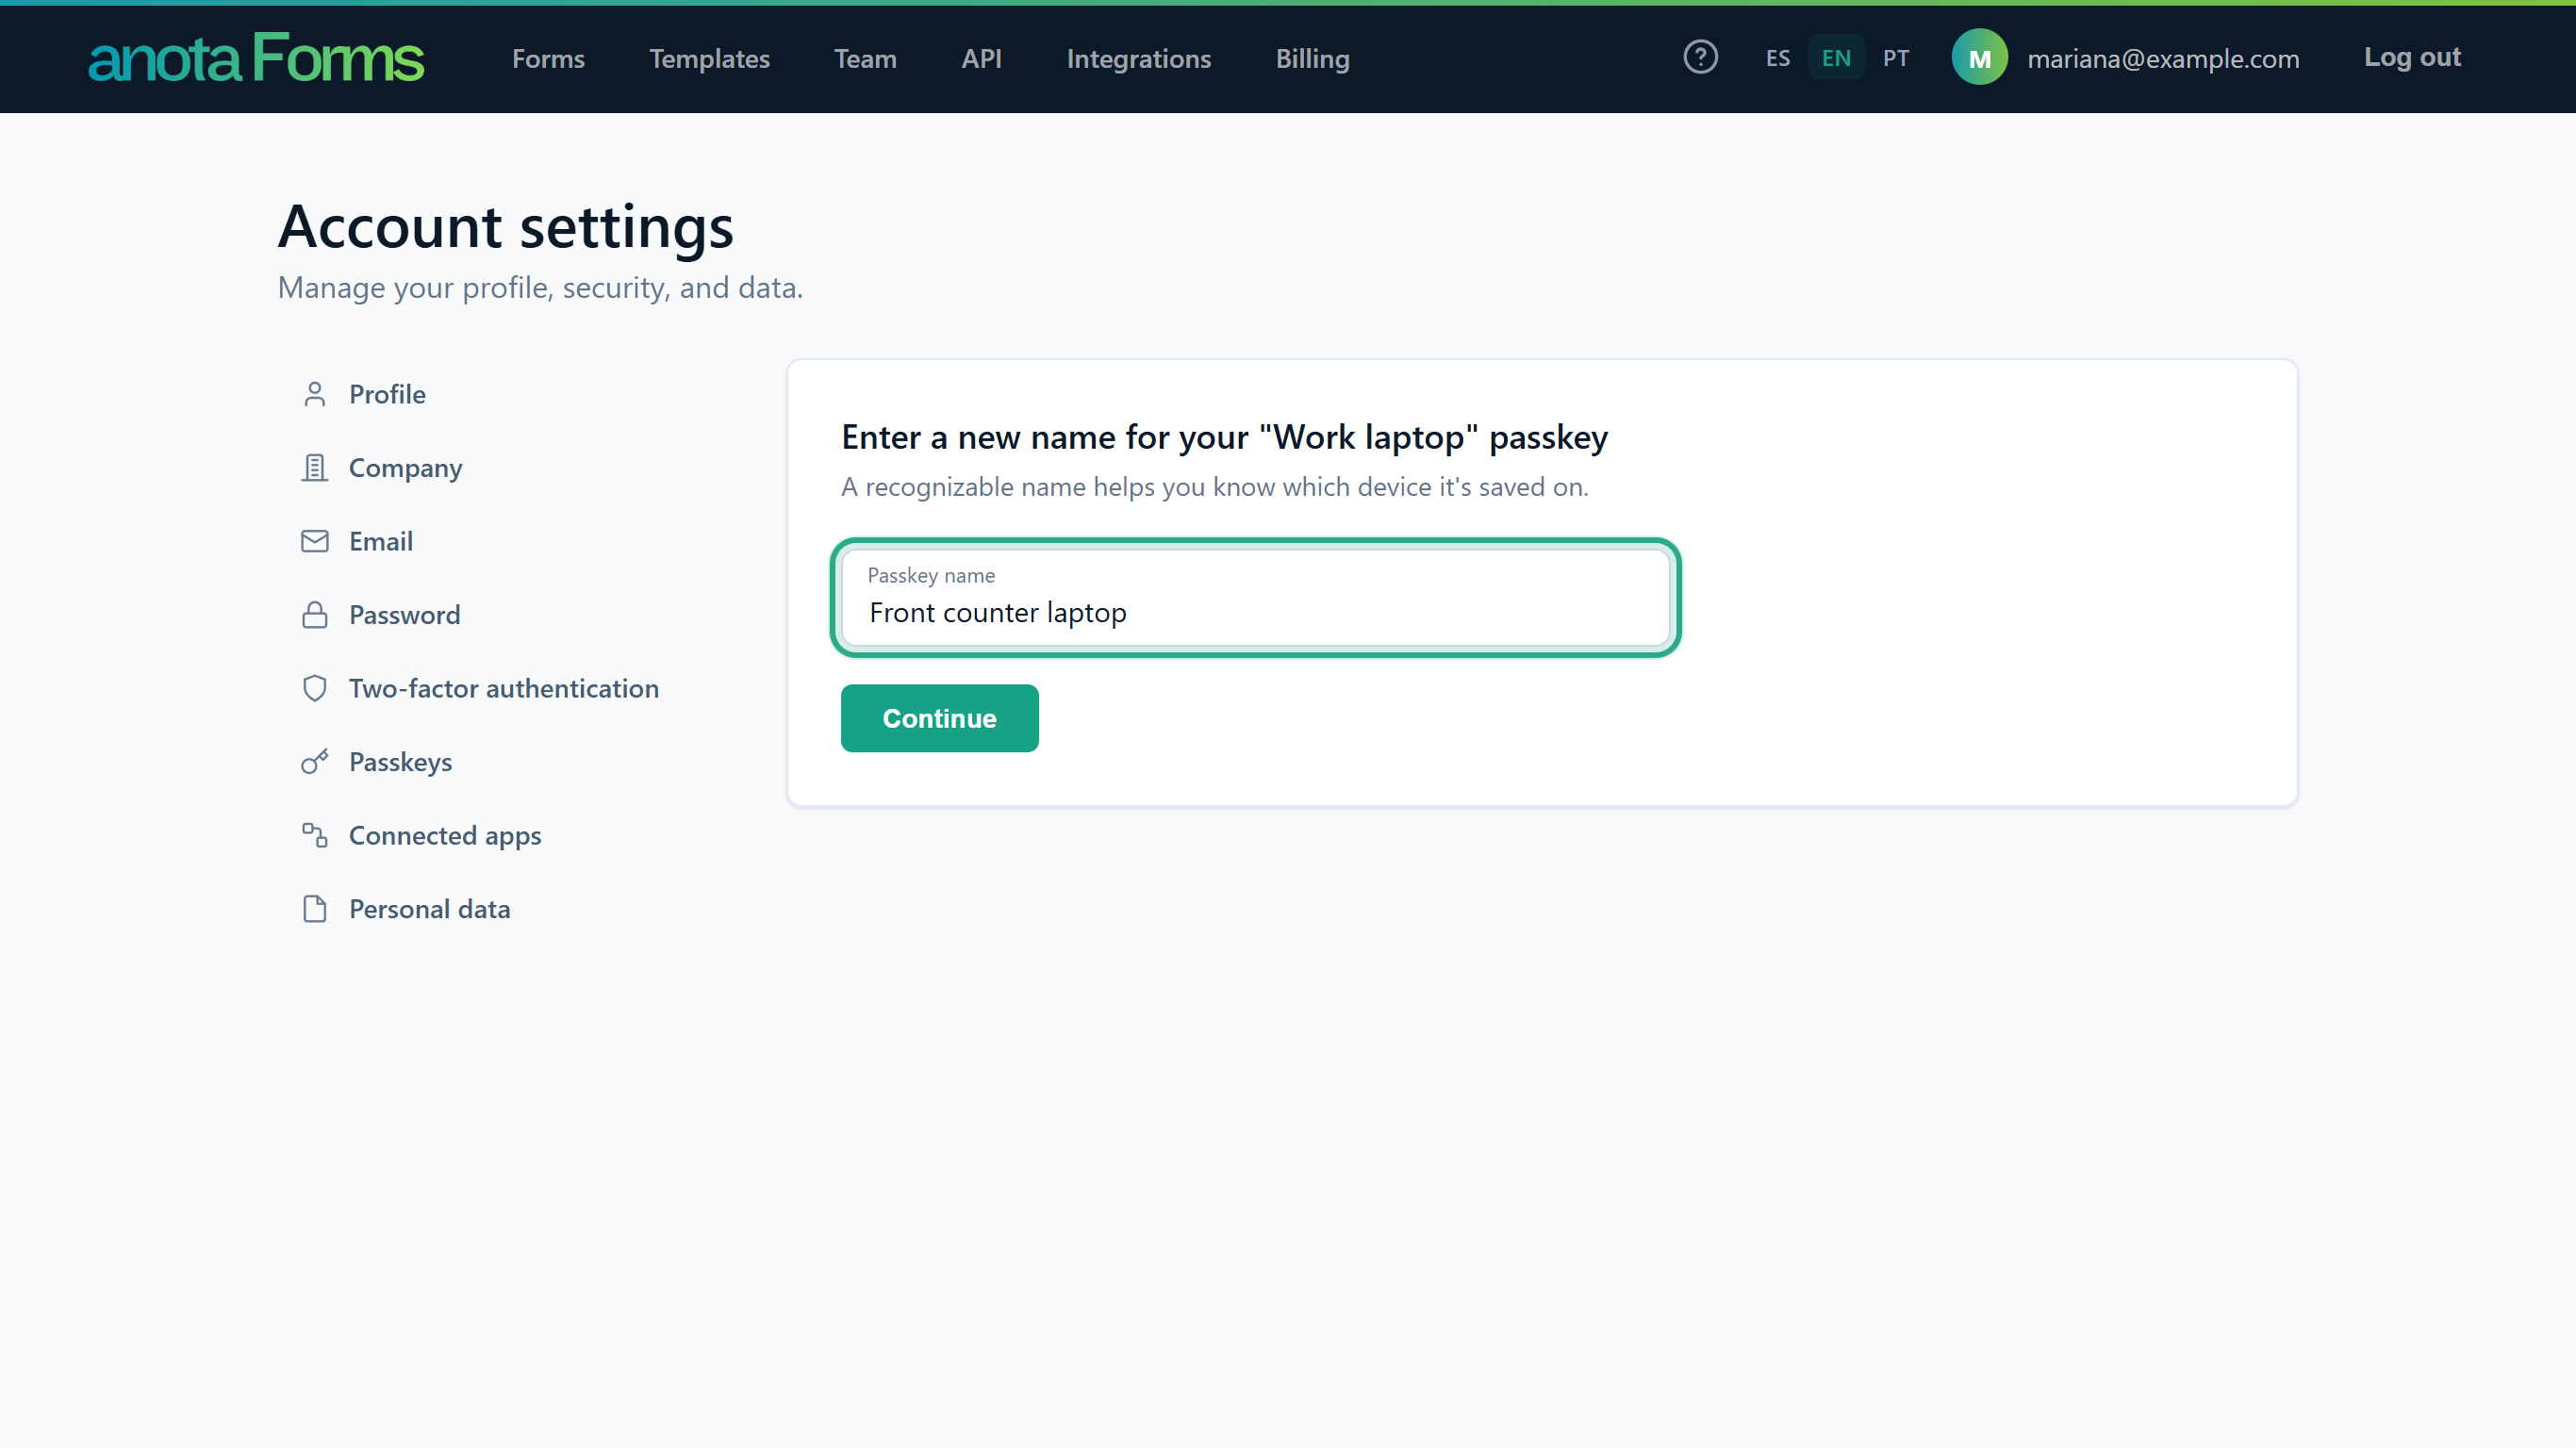 The name is required.
anota shows Passkey updated successfully. and the list shows the new name.
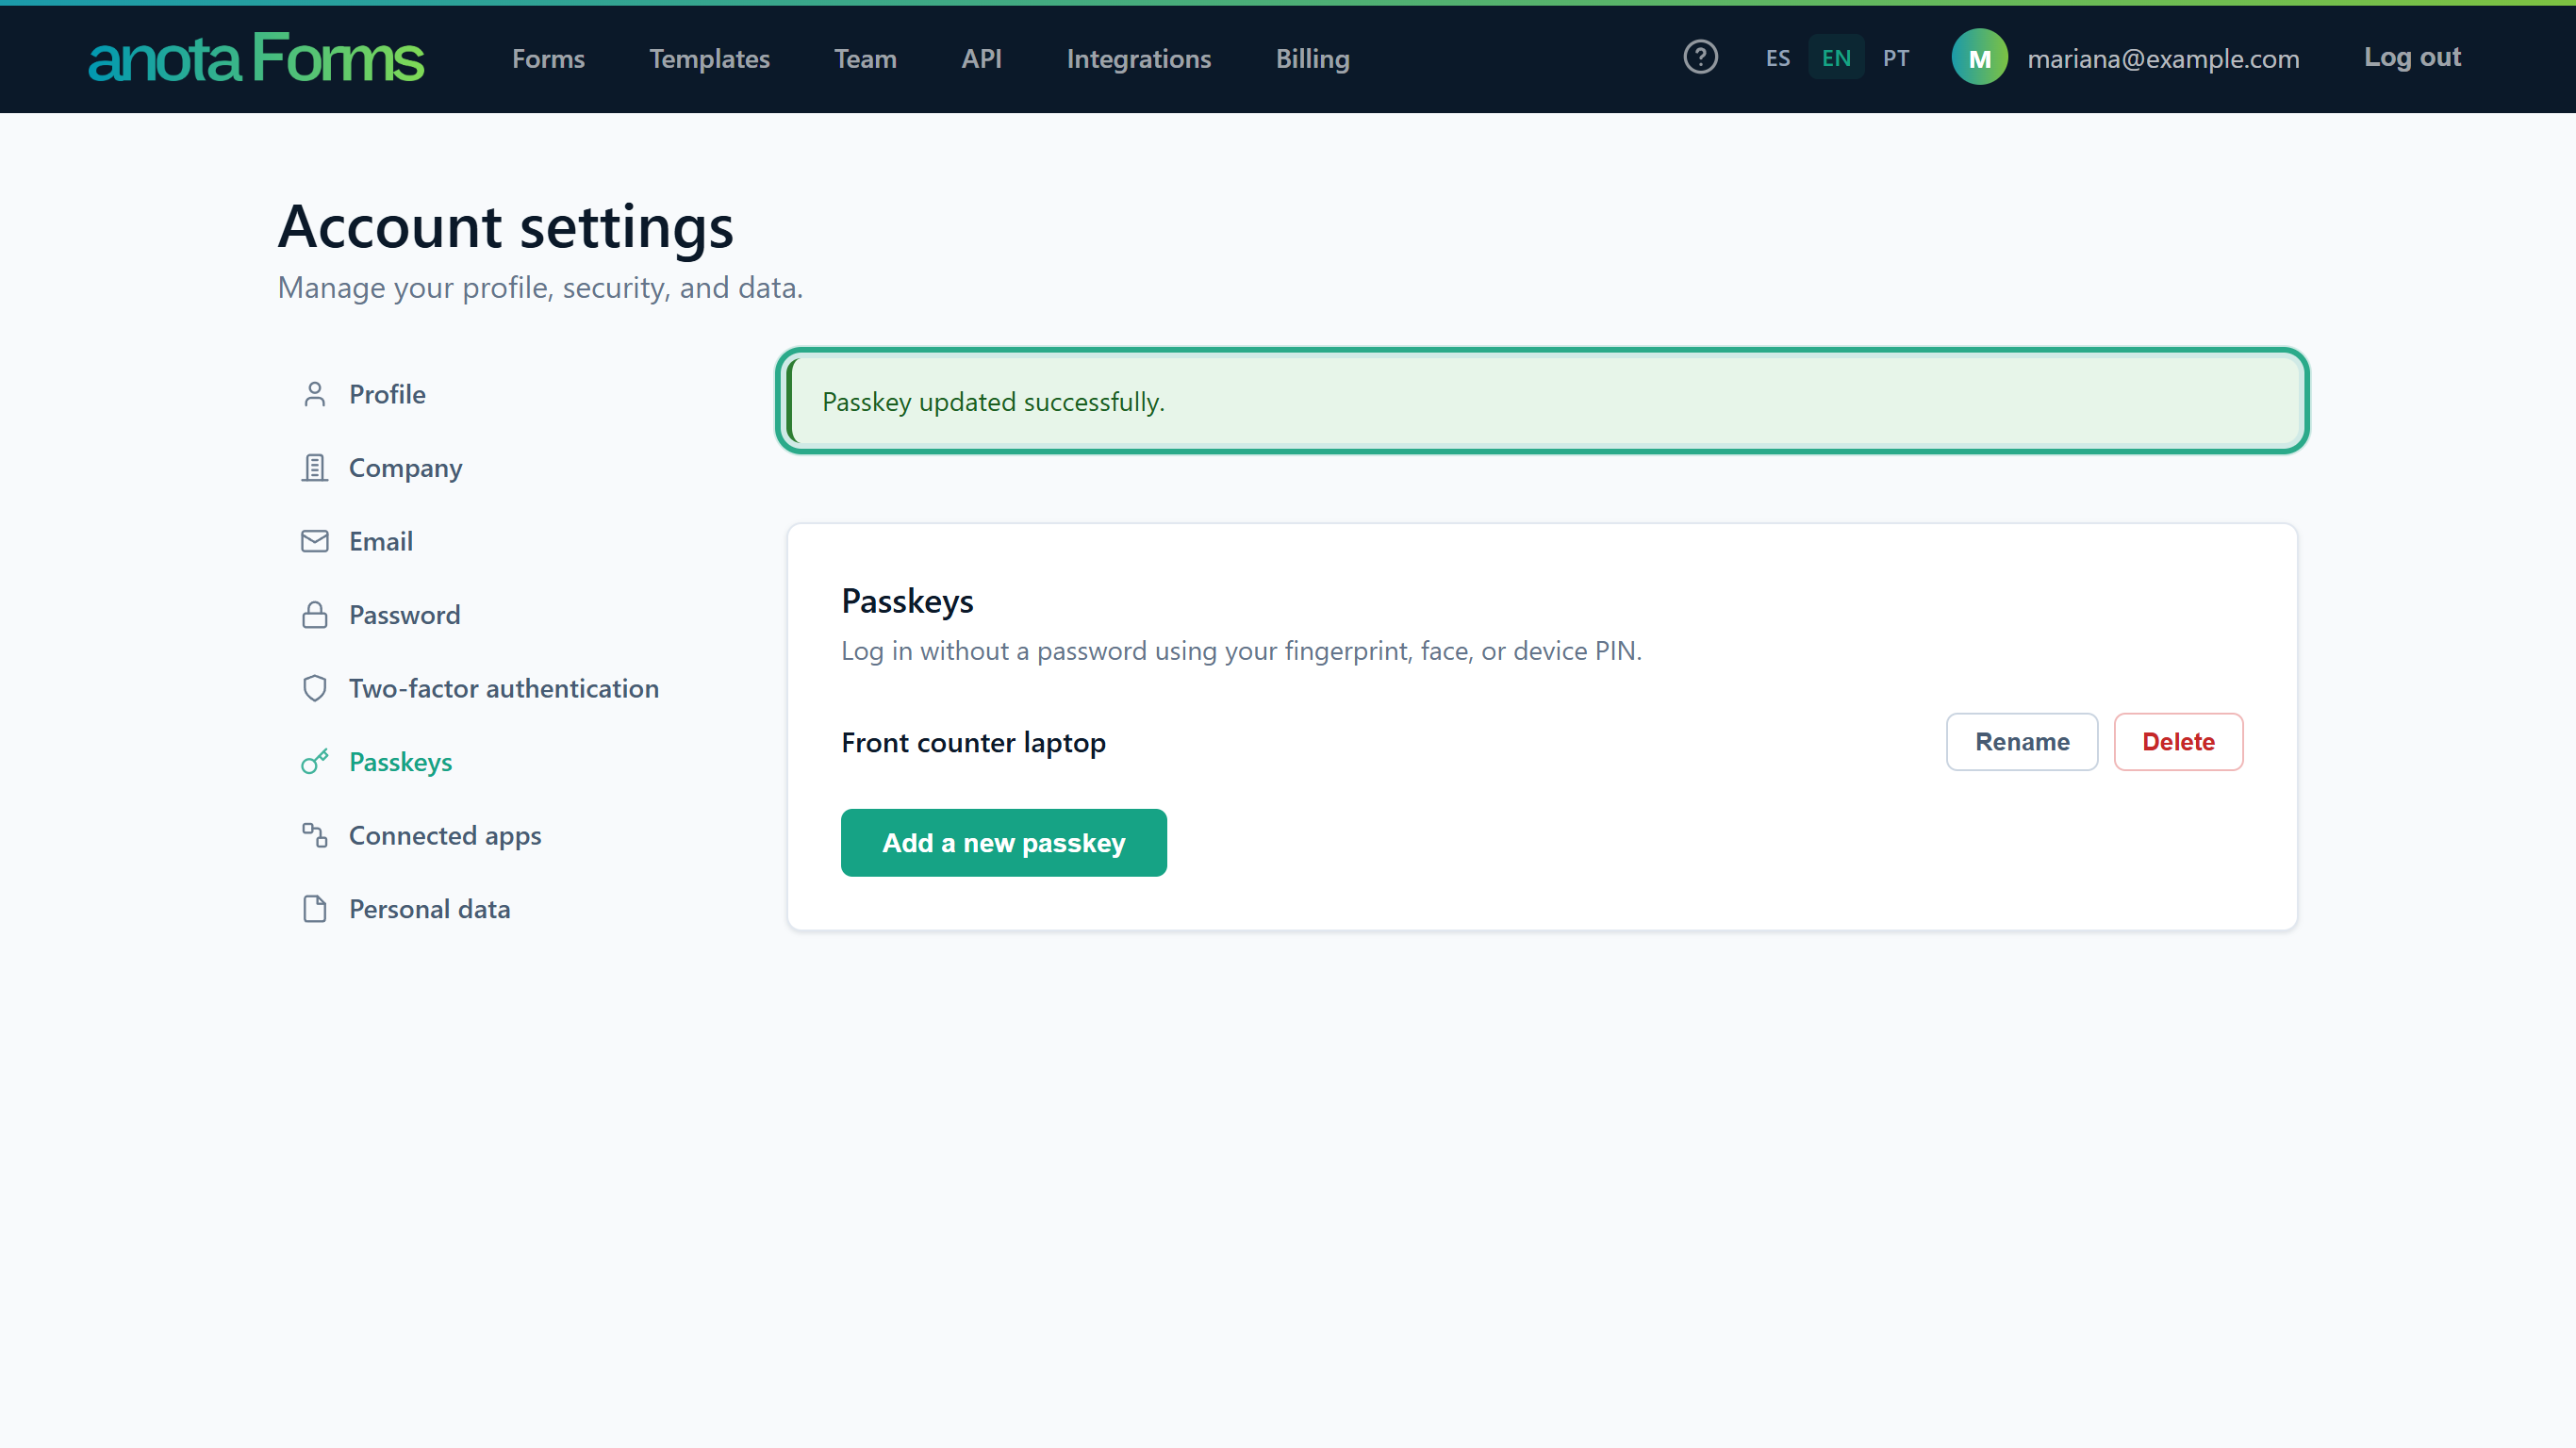 Renaming doesn't change how the passkey works.
Result
The passkey has its new name.
Task 11 — Delete a passkey
Step-by-step
In Passkeys, click Delete next to the passkey.
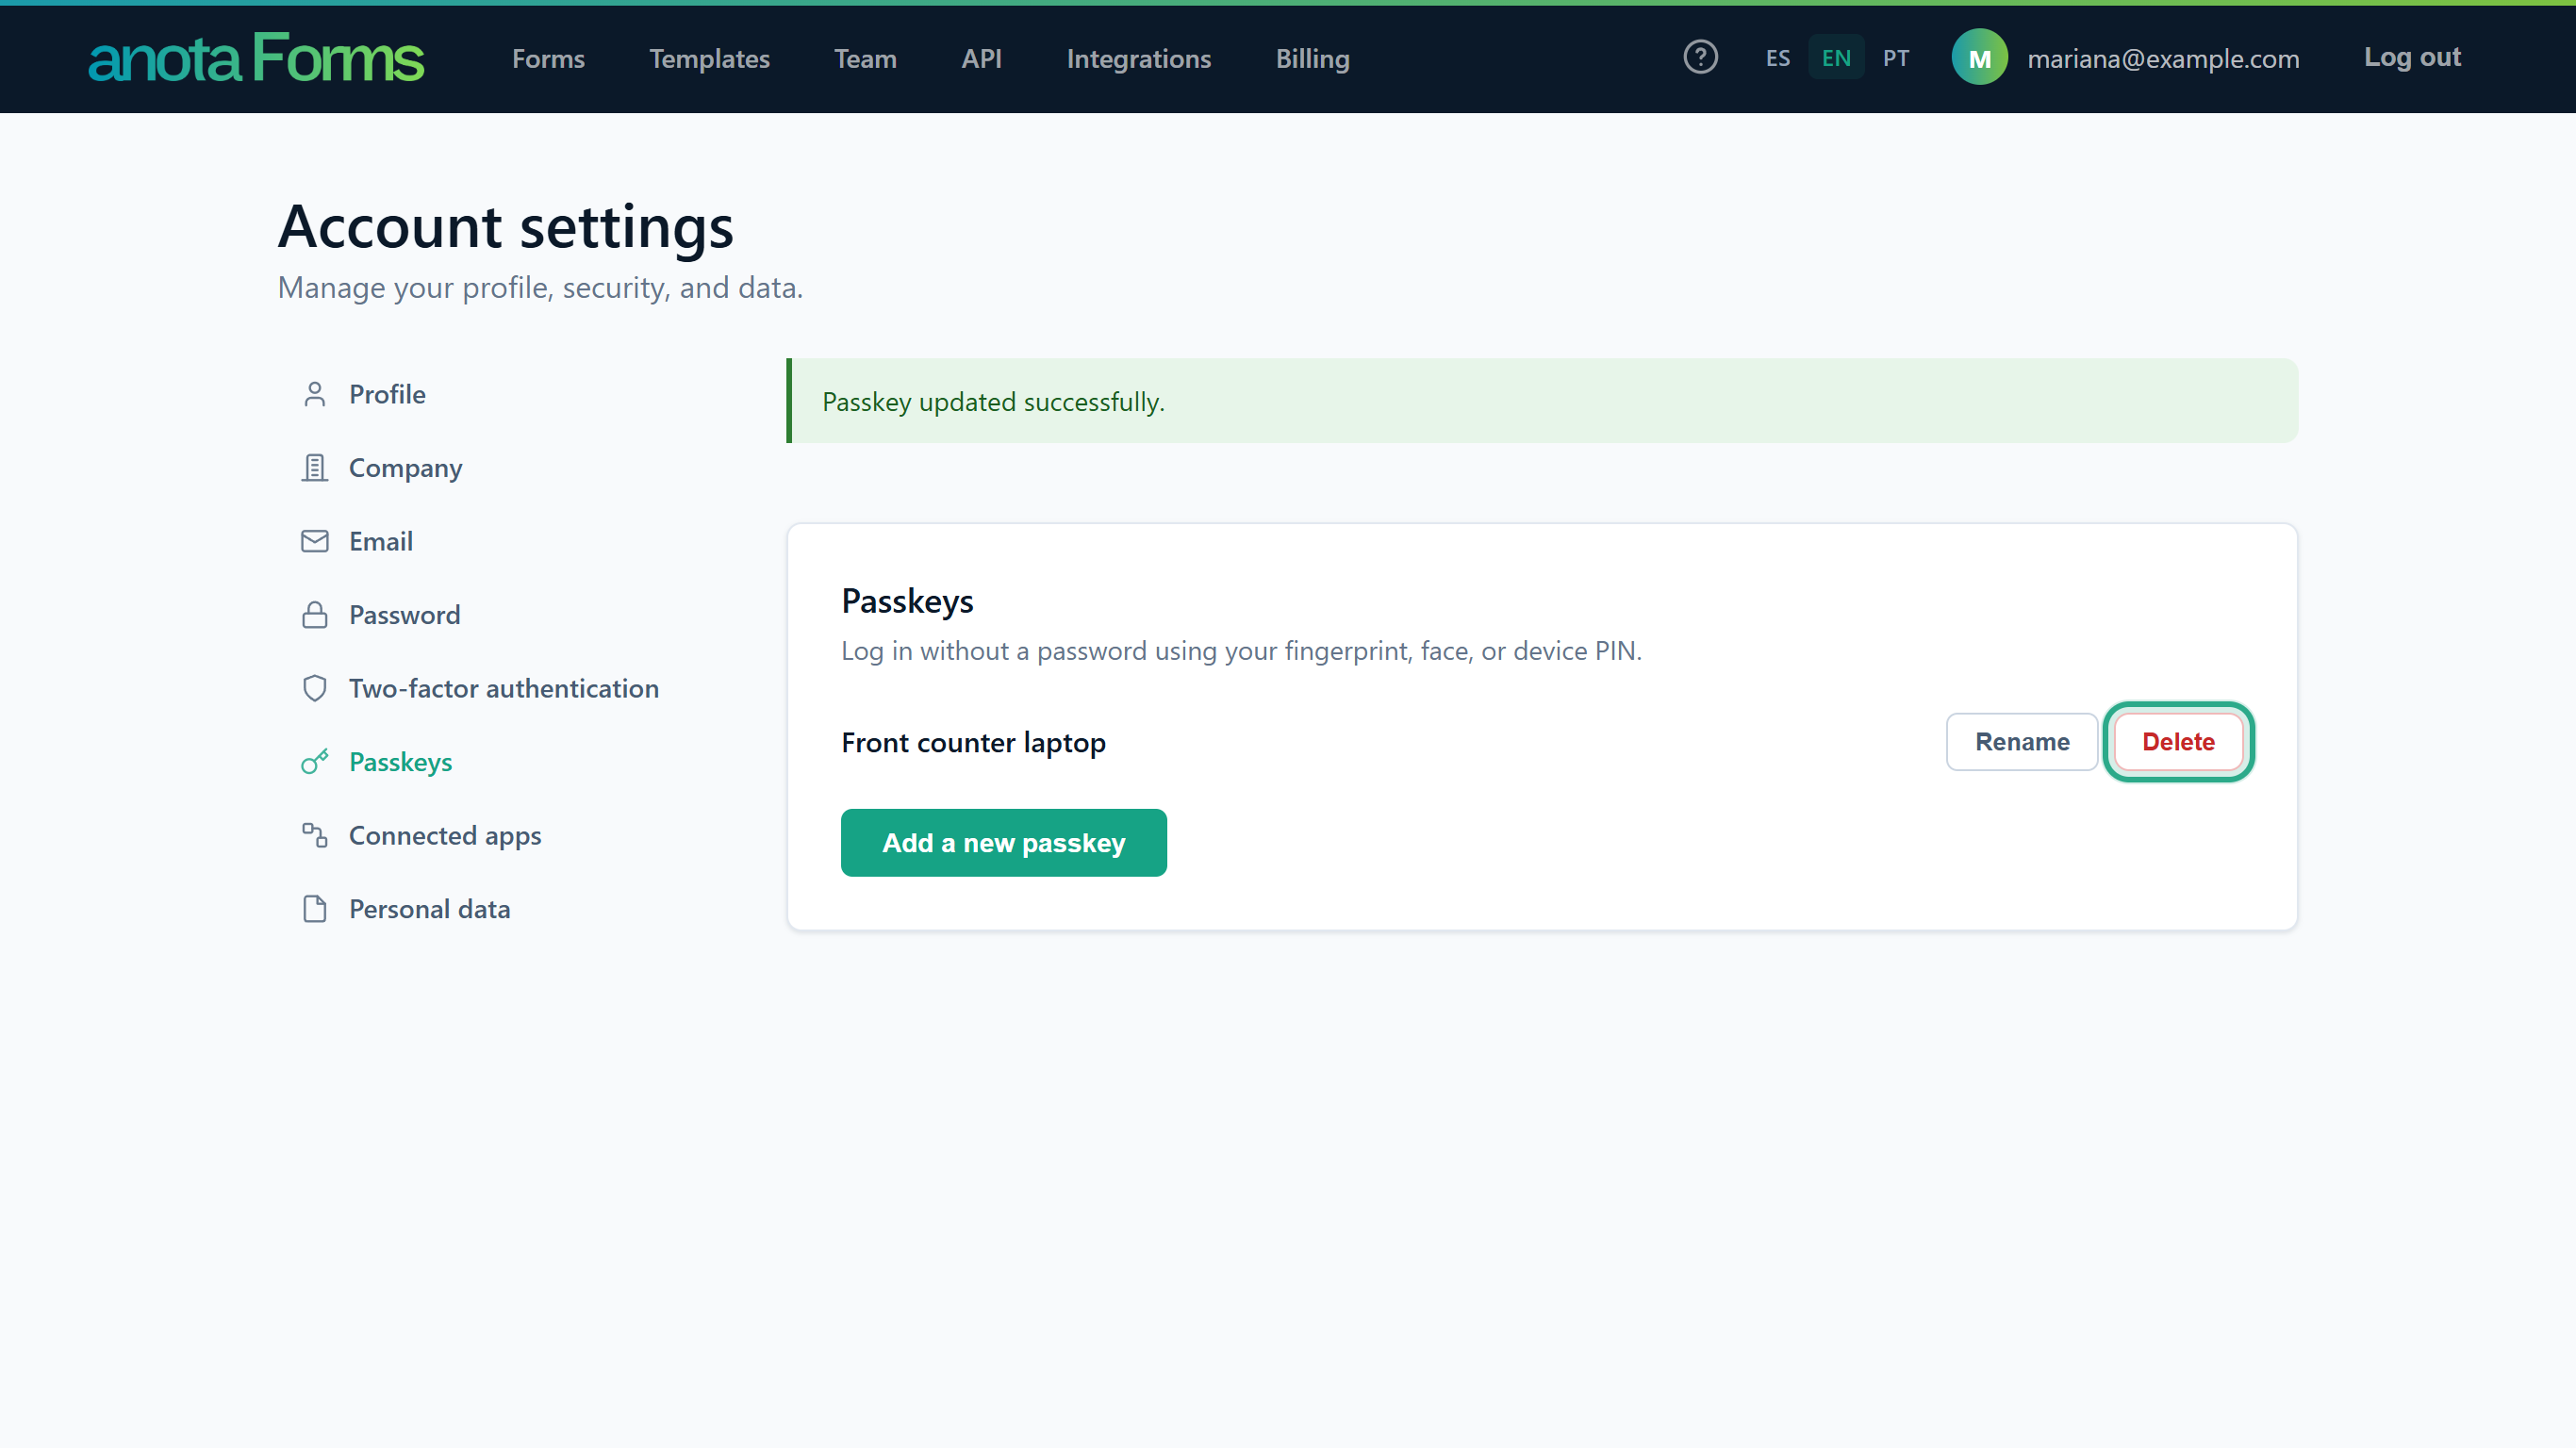 There is no confirmation step and no password is needed.
anota shows Passkey deleted successfully. and the passkey is gone from the list.
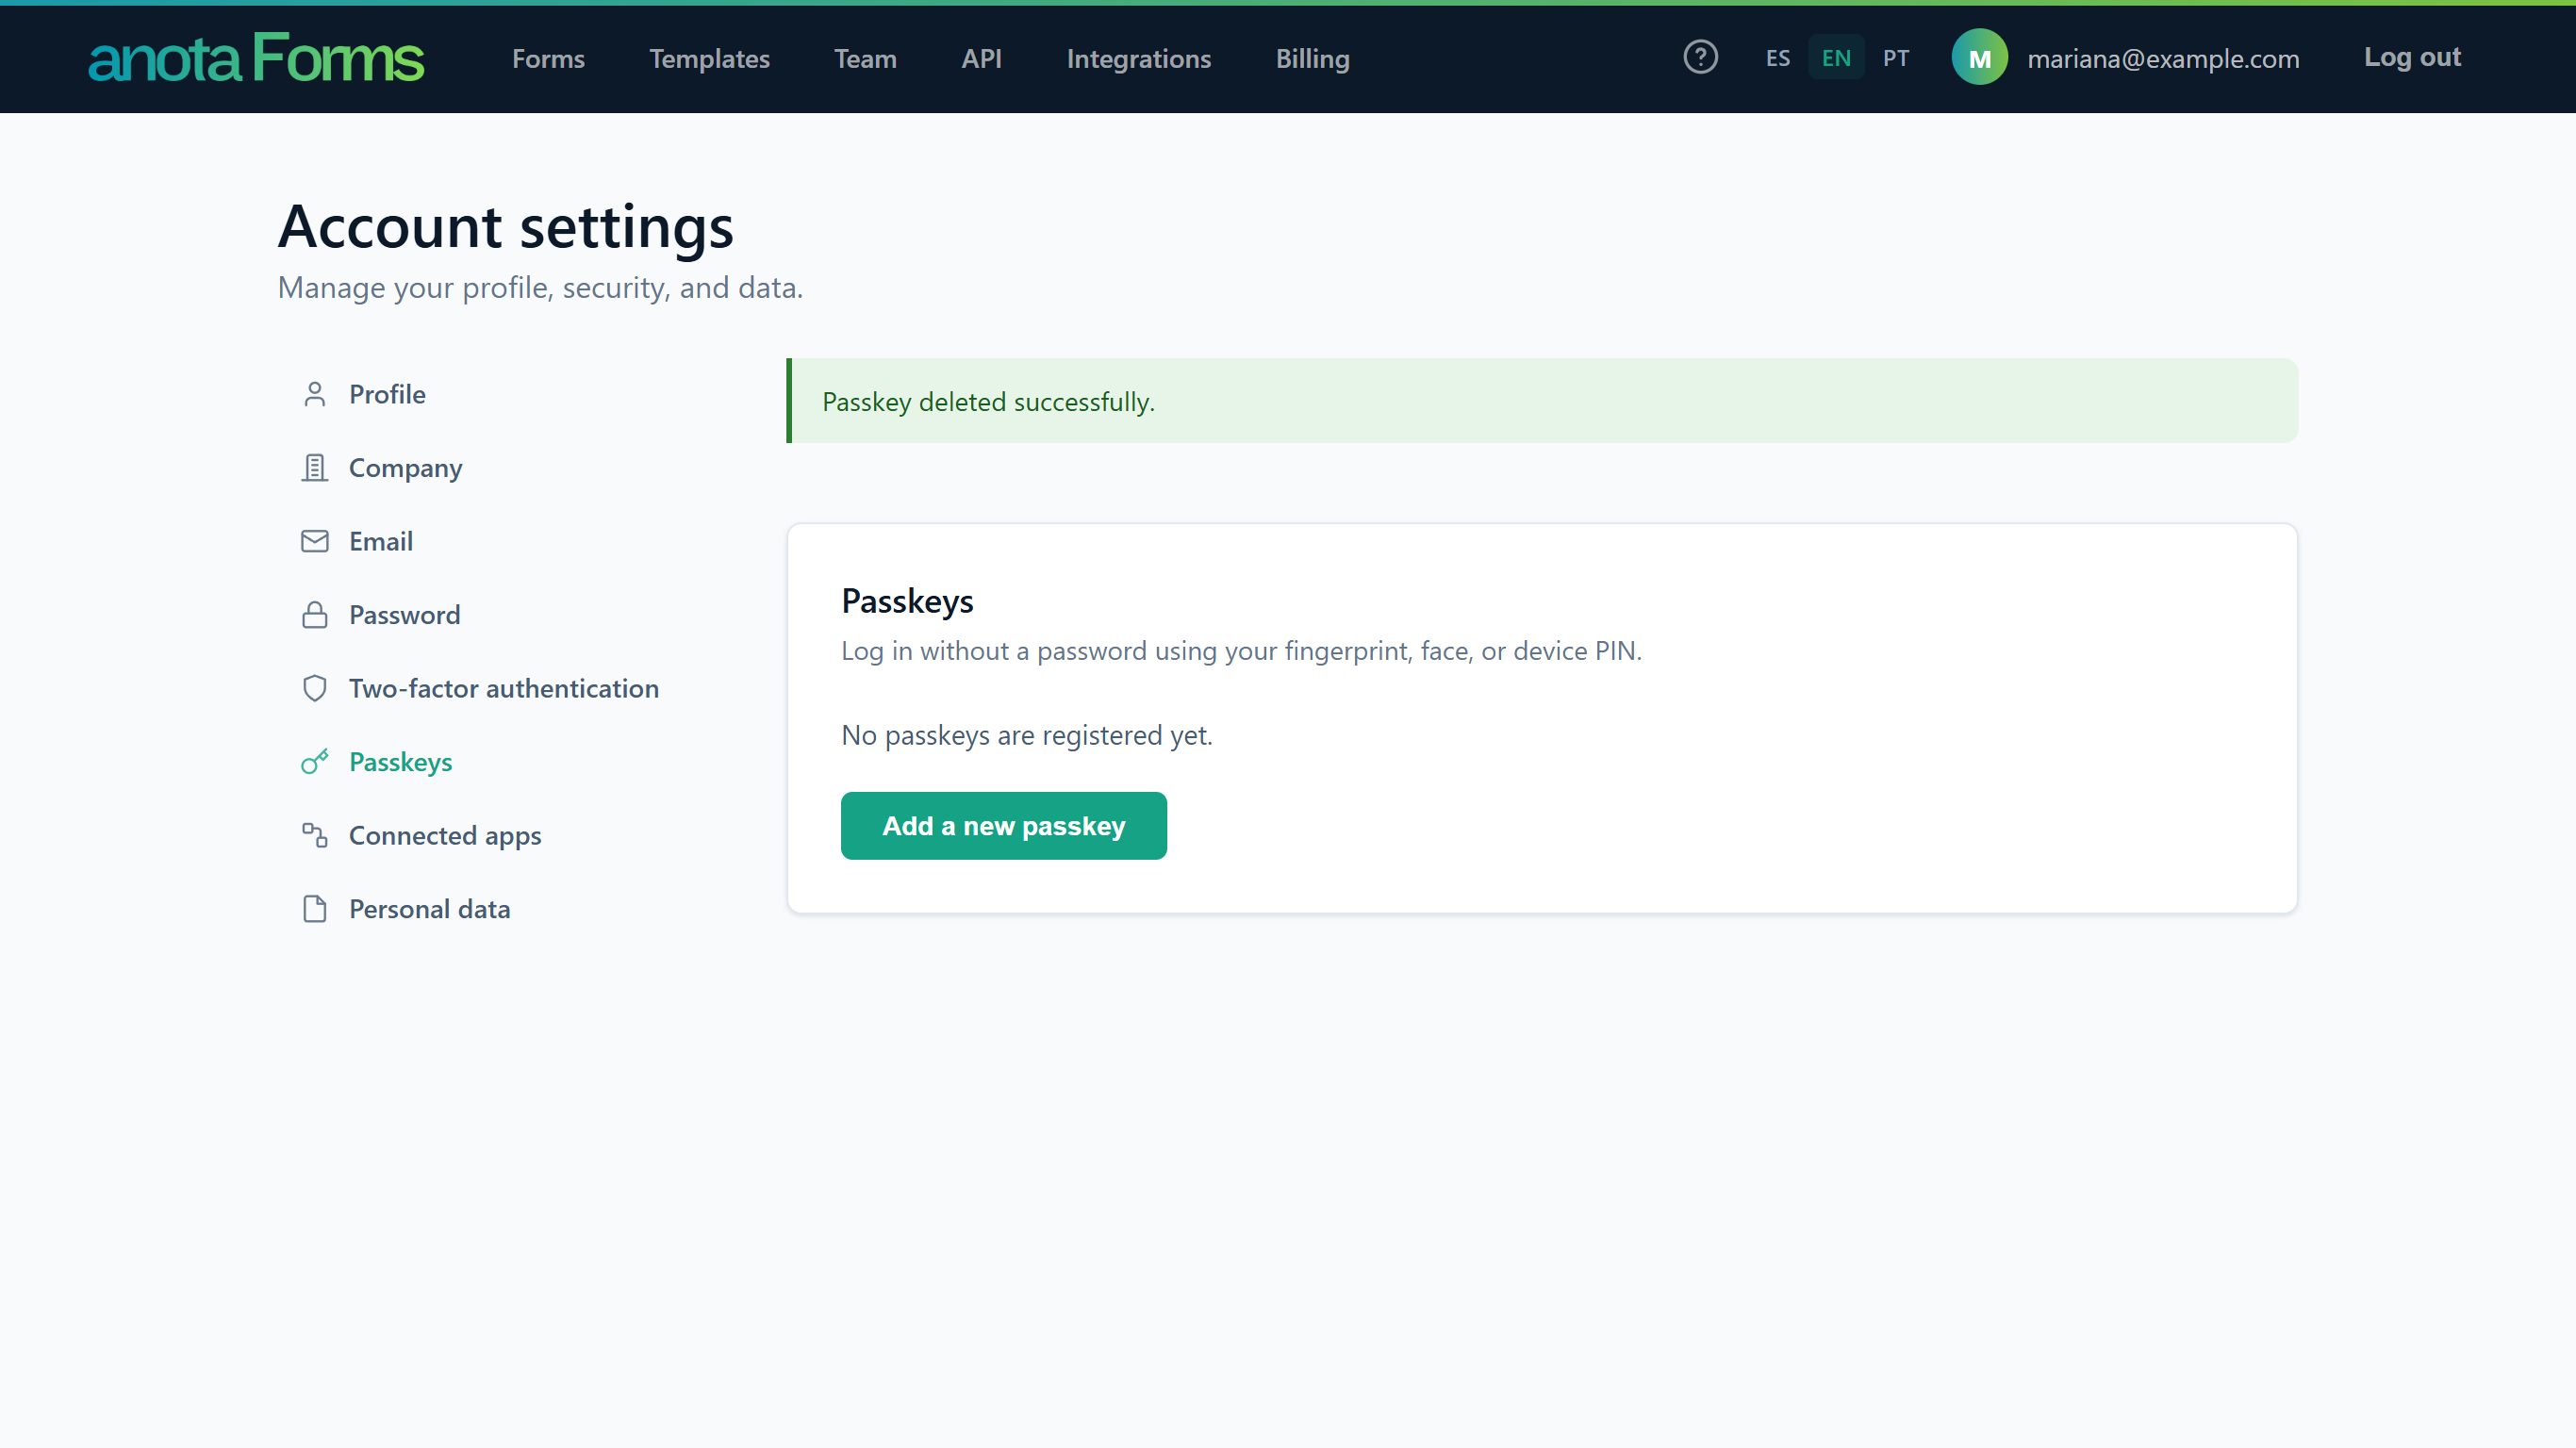 The passkey may still be saved on your device; remove it there too if you like. It no longer works for anota.
Result
That passkey can no longer be used to log in. Your password and any other passkeys keep working.
Field reference
| Field | Screen | Required | Description |
|---|---|---|---|
| Verification code | Configure authenticator app | Yes | The 6-digit code from your authenticator app (6 or 7 characters accepted). |
| Authenticator code | Two-factor authentication (log-in) | Yes | The code from your authenticator app at log-in. |
| Remember this machine | Two-factor authentication (log-in) | No | Skips the code on this browser in future log-ins. |
| Recovery code | Recovery code verification | Yes | One of your saved single-use codes. |
| Passkey name | Enter a name for your passkey / Rename | Yes | Up to 200 characters. |
Troubleshooting
| Symptom | Likely cause | Resolution |
|---|---|---|
| Two-factor authentication shows "Privacy and cookie policy have not been accepted." | The privacy and cookie policy was not accepted in this browser. | Accept anota's privacy and cookie policy, then open the section again. |
| "Error: Verification code is invalid." or "Error: Invalid authenticator code." | The code expired, or your phone's clock is off. | Enter the latest code; make sure your phone sets its time automatically. |
| I lost the phone with my authenticator app. | You can't generate codes. | Log in with a recovery code (Task 4), then reset the authenticator app (Task 7). |
| I ran out of recovery codes. | Each code works once. | Generate a new set (Task 5). |
| The browser doesn't ask for my code any more. | You ticked Remember this machine there. | Click Forget this browser (Task 3). |
| I can't add a new passkey. | You already have 100 passkeys ("You have reached the maximum number of allowed passkeys. Please delete one before adding a new one."). | Delete one you no longer use. |
| I lost a device that had a passkey. | The passkey is still registered on your account. | Log in another way (password or another passkey) and delete that passkey under Passkeys. If it was your only way in, use Forgot your password? on the log-in page. |
Related features
Was this page helpful?