 P4 Software
/
logisticaHQ-en
P4 Software
/
logisticaHQ-en
P4 Software
/
logisticaHQ-en
P4 Software
/
logisticaHQ-en
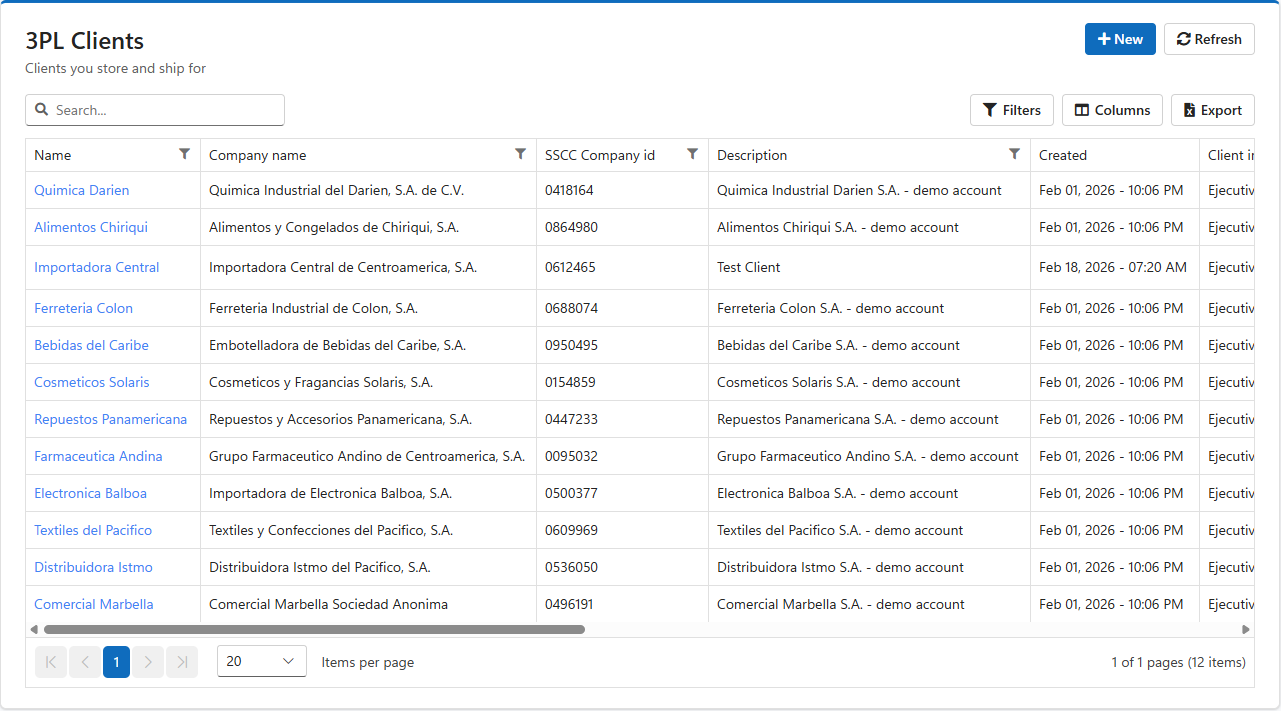
A client is a company whose goods you store and ship: the customer of a third-party logistics (3PL) warehouse. Each client's products, orders, purchase orders, returns, pallets and invoices belong to that client, and its documents can carry its own name, logo and wording. As soon as one client exists, LogisticaHQ works in 3PL mode: every new product must belong to a client, and screens let you choose the client.
A company that stores only its own goods creates no clients.
Open Setup > 3PL > Clients.
Many client settings have a company-wide equivalent in Configuration, and some also exist on the customer or the vendor. The most specific one wins:
Settings that offer Inherit / Yes / No use Inherit to follow the company-wide setting.
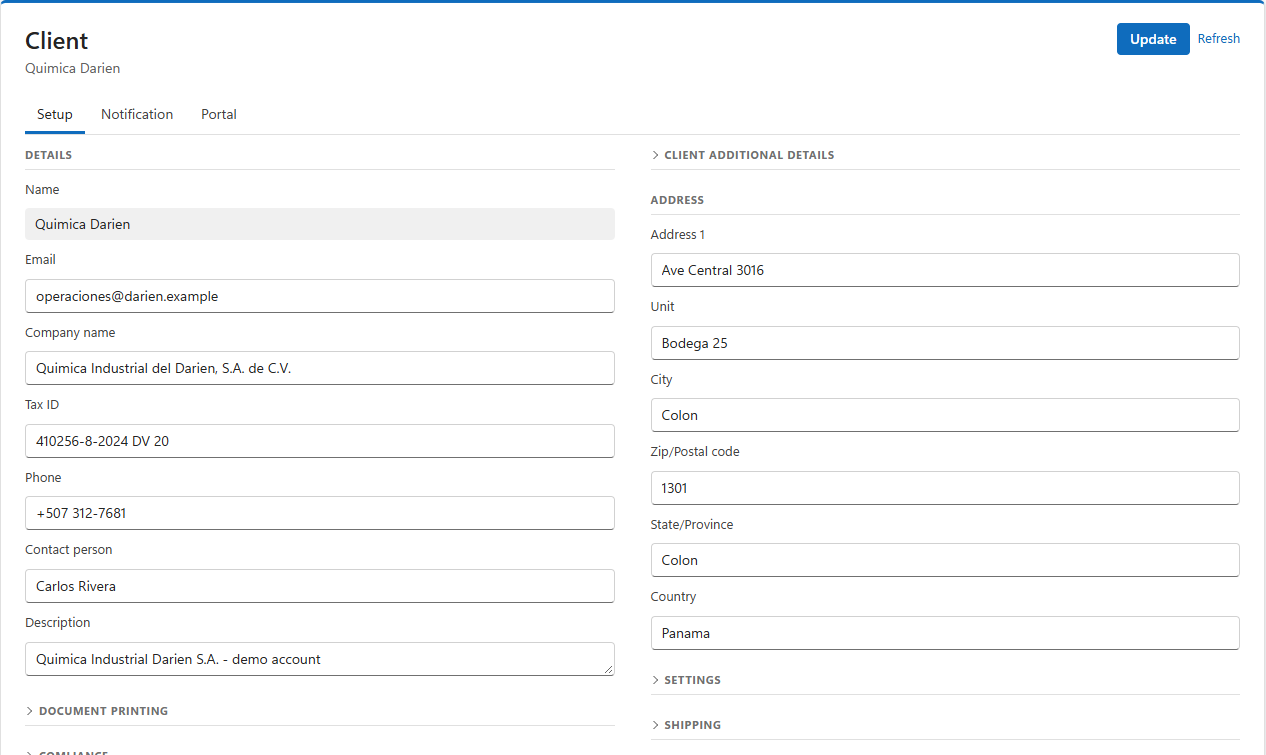
| Field | Use |
| Name | The short name, fixed at creation. |
The client's email. It is the shipper email on commercial invoices, and can be used in notification addresses as @ClientEmail. | |
| Company name | The legal name printed as the company on this client's packing slips, invoices, receiving slips and return slips, and the bill-to name on their 3PL invoices. |
| Tax ID | The shipper tax ID on commercial invoices. |
| Phone, Contact person | Printed on documents and commercial invoices. |
| Description | A note for people. |
The address printed on the client's documents and used as the bill-to address of their 3PL invoices. Each line falls back to your company's address when empty.
| Field | Use |
| Company Logo | Upload image... (PNG or JPEG) sets the logo on the client's documents; Remove takes it off. A customer's or vendor's own logo takes priority on their documents. |
| Packslip disclaimer | Text printed at the foot of the client's packing slips. It is also printed on their customer return slips. |
| Proforma Invoice disclaimer | Text printed on proforma invoices. |
| Receiving slip disclaimer | Text printed on receiving slips. |
| Custom packslip, Custom Commercial invoice, Custom Proforma invoice, Custom RMA, Custom Receiving slip | Upload... a report design of the client's own for that document, made by your LogisticaHQ partner. Without one, the standard document is used. |
| RMA disclaimer | Not used at present: return slips print the Packslip disclaimer. |
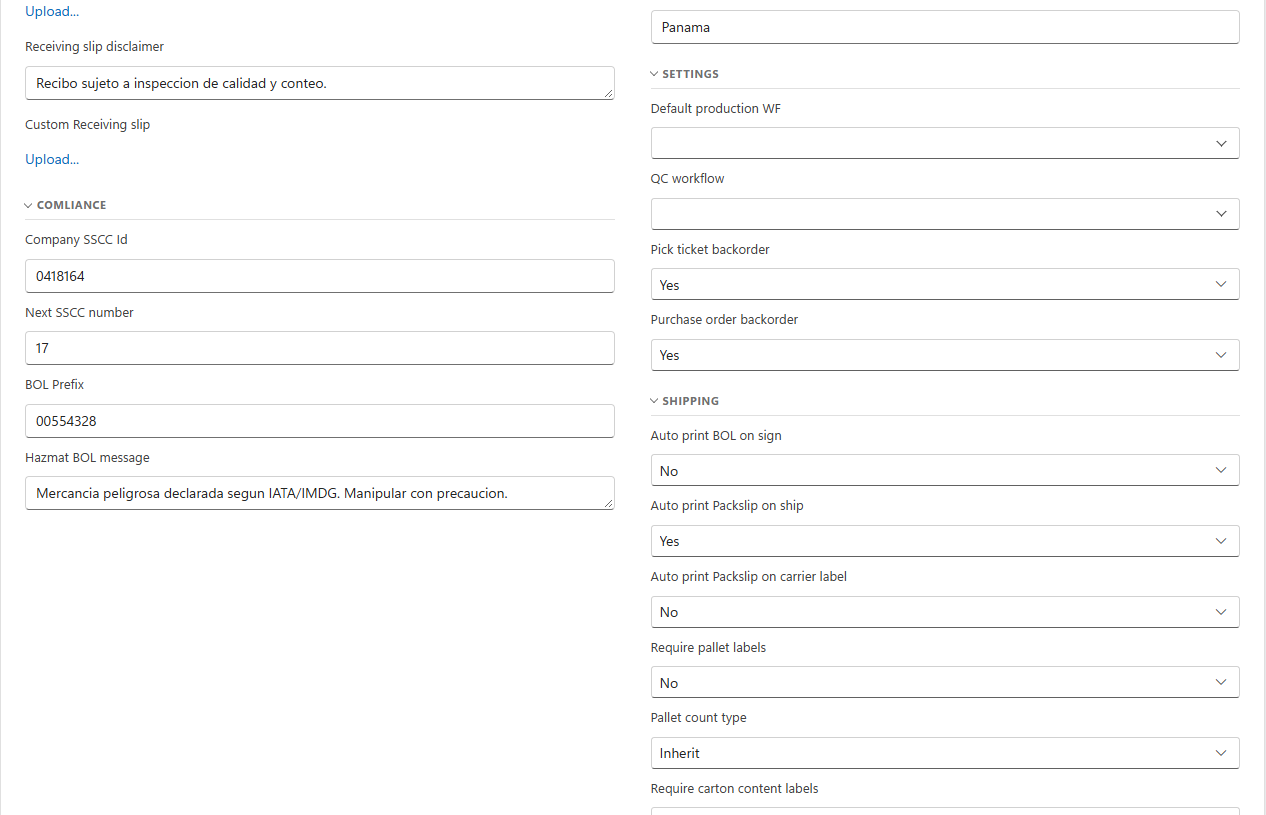
| Field | Use |
| Company SSCC Id | The client's GS1 company prefix (7 to 10 digits), used in the SSCC-18 barcodes on their carton and pallet labels. Retailers check that the SSCC carries the right company prefix, so enter the client's real GS1 prefix. A random number is filled in when left empty. |
| Next SSCC number | The serial number the client's next SSCC will use. It advances by itself; change it only to continue a sequence from another system. |
| BOL Prefix | The number (7 to 10 digits, leading zeros allowed) that starts the client's bill of lading numbers. Filled in automatically when left empty. |
| Hazmat BOL message | The hazardous-goods statement printed on the client's bills of lading. Empty uses the company-wide message. |
Client info 1 to 10 are free fields for anything you want to record about the client, such as an account manager or a contract number. They can be shown as columns and filtered in the client list.
| Setting | Use |
| QC workflow | The quality control inspection every picked tote of this client goes through before shipping. A customer's own workflow takes priority. Empty means no inspection. |
| Pick ticket backorder | Whether an order closed short creates a backorder for the rest. Customer, then client, then company setting. |
| Purchase order backorder | Whether a purchase order closed short creates a backorder PO. Vendor, then client, then company setting. |
| Default production WF | Not saved at present; set the workflow on each production order. |
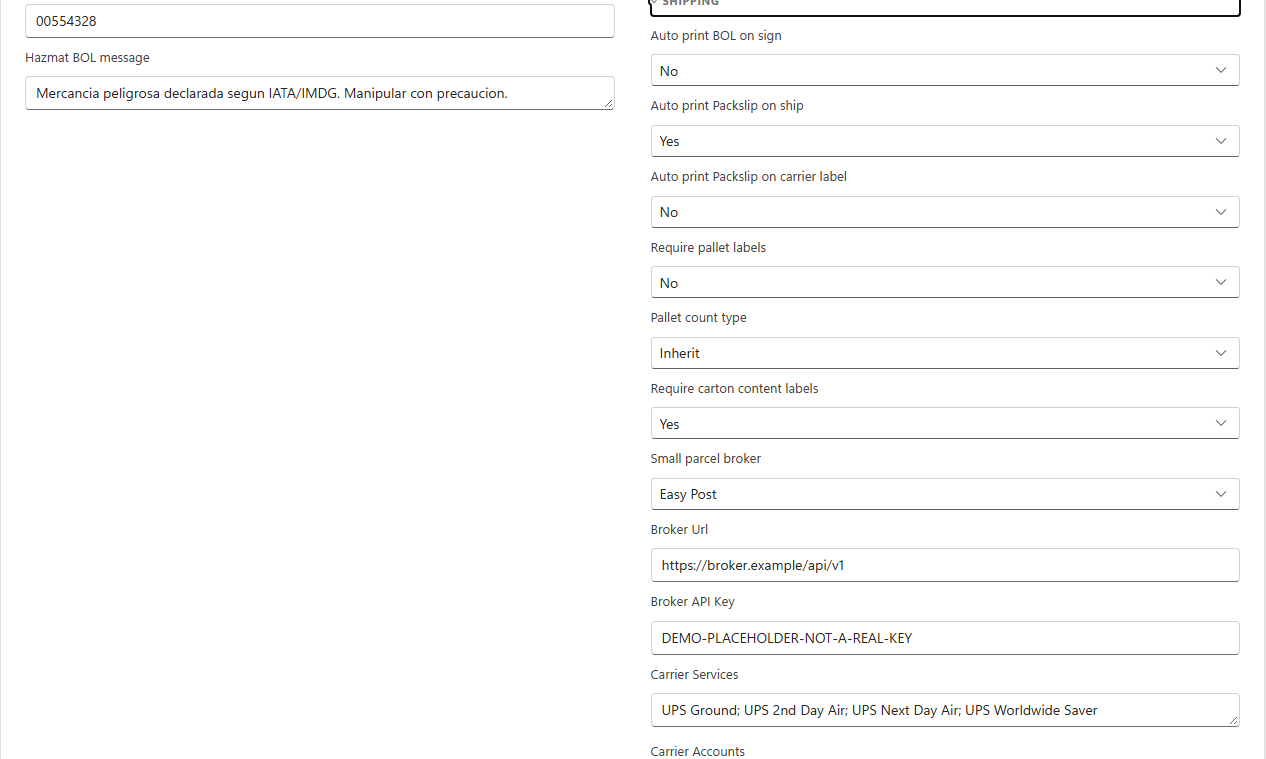
| Setting | Use |
| Auto print Packslip on ship | Print the packing slip automatically when an order, truck load or master truck load ships. |
| Auto print Packslip on carrier label | Print the packing slip automatically when a small-parcel carrier label is created. |
| Require pallet labels | Refuse to ship an order while any of its pallets has no pallet label (SSCC). |
| Pallet count type | How pallet labels count "pallet 2 of 5": per pick ticket, per PO number or per truck load. |
| Require carton content labels | Print a content label for each carton when orders are waved. |
| Small parcel broker | The shipping broker used to rate and buy this client's small-parcel labels (EasyPost or Malvern). Default uses the company's broker. |
| Broker API Key | The client's own broker account key: labels are then bought on, and billed to, the client's account. |
| Carrier Services | The carrier services offered for this client's shipments. |
| Auto print BOL on sign, Broker Url, Carrier Accounts | Not used at present. |
Each Inherit / Yes / No setting follows the customer first when the customer has its own value.
LogisticaHQ can email the client a document automatically: the receiving slip when a purchase order closes, the return slip when a customer return closes, the packing slip when an order closes or ships, and the bill of lading when a truck load ships. The document is attached as a PDF.
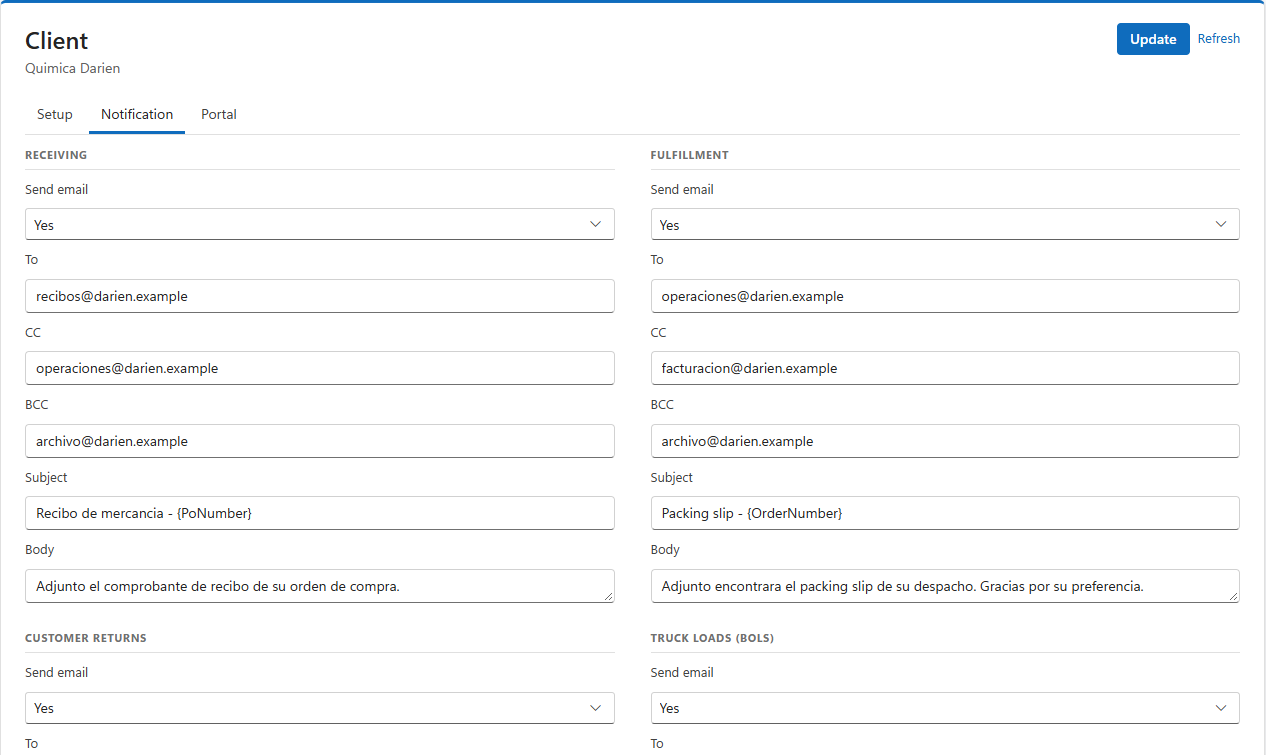
@ClientEmail, @CustomerEmail and, for receiving, @VendorEmail put in that party's email.@PurchaseOrderNumber, @ReceiveDate, @VendorName, @ClientName@CustomerReturnNumber, @ReceiveDate, @CustomerName, @ClientName@CloseDate, @CustomerName, @ClientName, and in the body @TrackUrl (the tracking link)@TruckLoadNumber, @BillOfLadingNumber, @ShipDate, @CustomerName, @ClientName@ followed by its name, for example @PoNumber or @ShipToName.No email is sent when the To address is empty. @ClientName is the client's company name.
The client portal lets the client's own people see their stock, orders, purchase orders, invoices and reports, and place orders, without access to the rest of your system.
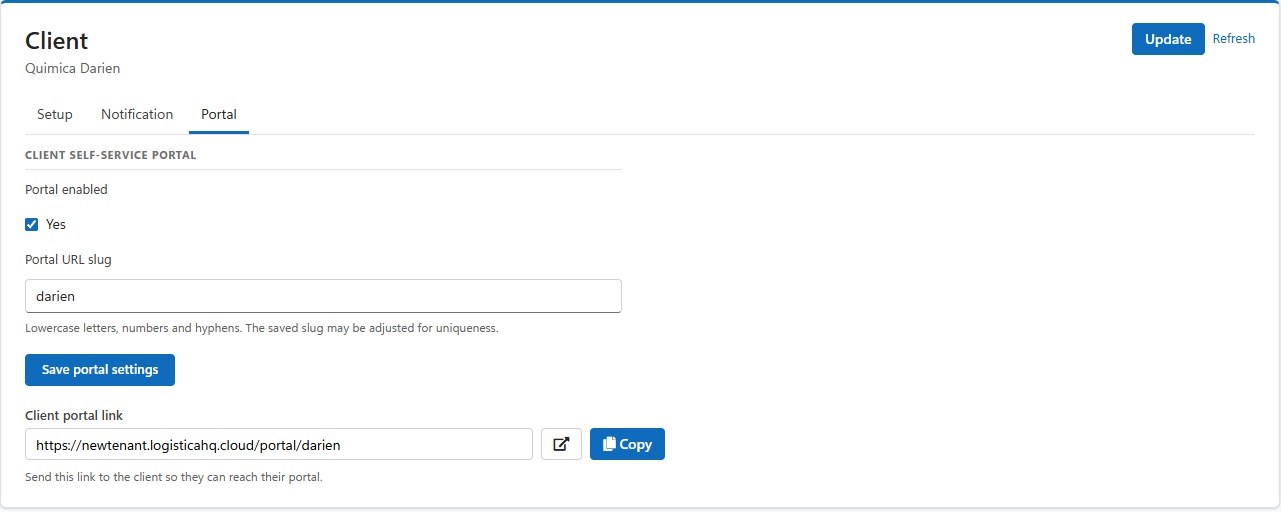
Portal users can sign in only to the portal. Untick Portal enabled to close the portal for the client at once.
Click the delete button in the client's row and confirm. This cannot be undone.
Was this page helpful?