 P4 Software
/
logisticaHQ-en
P4 Software
/
logisticaHQ-en
P4 Software
/
logisticaHQ-en
P4 Software
/
logisticaHQ-en
Every item you receive, store, pick or ship in LogisticaHQ is a product. This page takes you from an empty form to a product that is ready to receive: its identity, its tracking rules, its dimensions and its barcode label.
Time needed: about 3 minutes per product. To load hundreds of products at once, ask your LogisticaHQ partner about a bulk import.
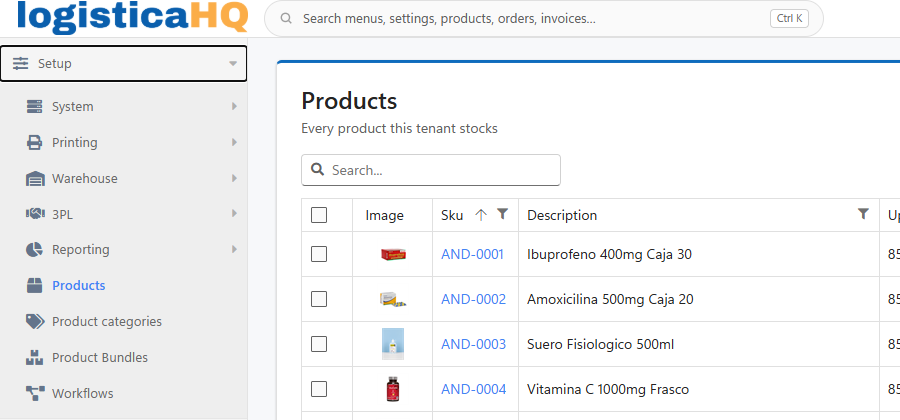
COL-0101. Long SKUs and descriptions slow people down on the floor and may not fit on a barcode label.In the left menu, open Setup > Products. The list shows every product in your warehouse, with its image, SKU, description, UPC and category.
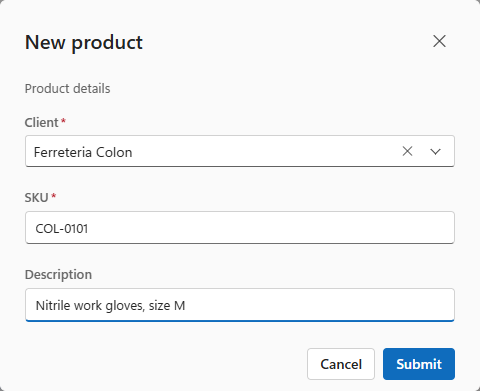
LogisticaHQ creates the product and opens its details screen.
The details screen has two columns. On the left, Details holds the product's codes and classification. On the right, Attributes sets how the warehouse tracks it, which Step 4 covers.
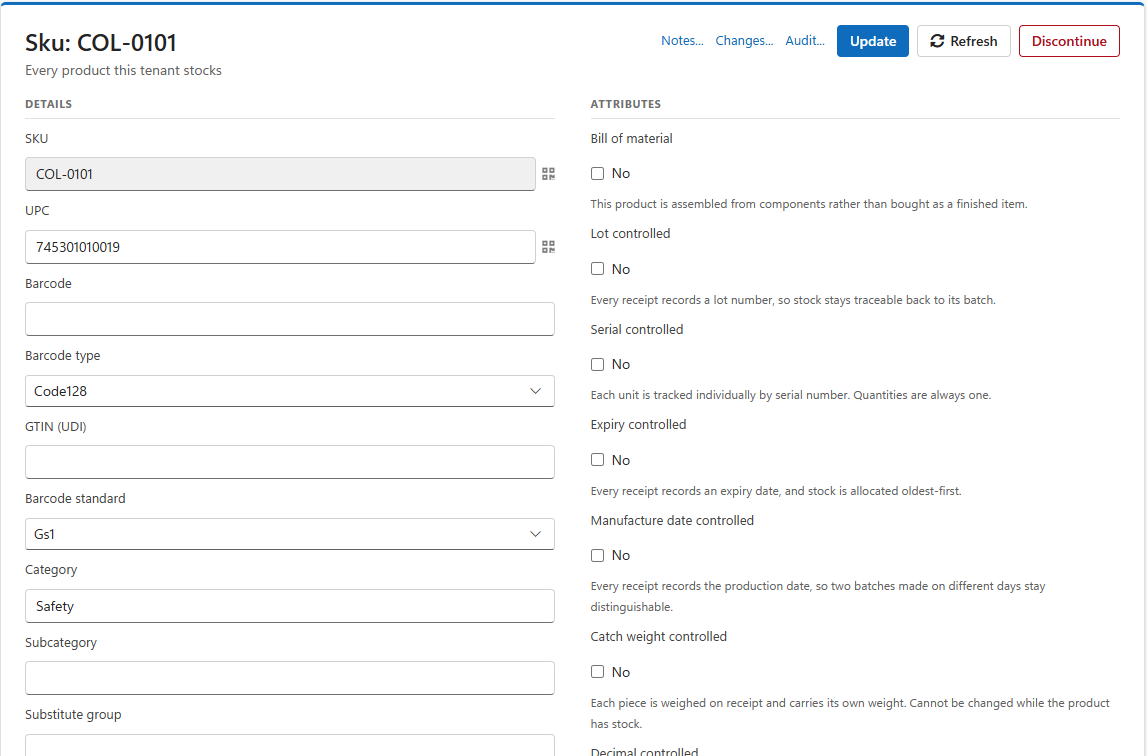
Fill in what applies:
| Field | What to enter |
| UPC | The manufacturer's barcode number, if the product has one. |
| Barcode, Barcode type, Barcode standard | Your own barcode, if you print one, and how it is encoded. Code128 and GS1 suit most labels. |
| GTIN (UDI) | The global trade item number, required for medical devices that carry a UDI. |
| Category, Subcategory | How you group products in reports and lists, for example Safety. Type a new category to create it. A subcategory can be chosen once a category is set. |
| Substitute group | Products that can replace each other when one is out of stock. |
Attributes are the most important decision in product setup. They decide what the warehouse must capture every time the product moves: a lot number, a serial number, an expiry date, a weight, a pack size. LogisticaHQ then enforces that capture on every receipt, move, count and pick, and uses it to allocate stock, trace a recall and bill storage.
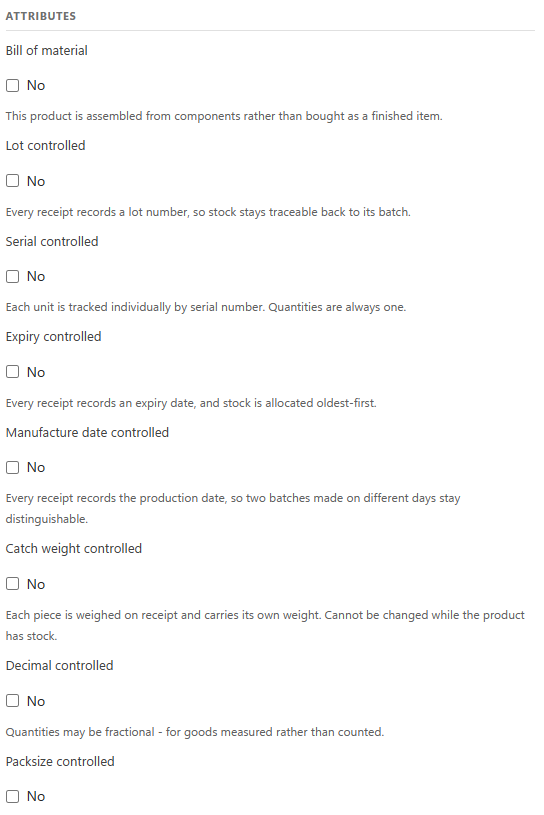
Decide before the first receipt. LogisticaHQ protects the tracking of stock that already exists with two locks:
- Stock on hand. While the product has any stock, LogisticaHQ refuses every change to lot, serial, expiry, manufacture date, packsize, catch weight or unit of measure control, and tells you how much stock is in the way and in how many locations. Move or consume the stock first. This lock cannot be switched off, because stock received without a lot, serial or date could never be traced by it afterwards.
- Open orders. The same changes are also refused while the product is on an open purchase order, pick ticket or production order, unless the setting Allow attribute change (Setup > System > Configuration, group Business - Products) is turned on.
Some attributes rule each other out, and the screen hides the options that no longer apply as you tick:
| If you tick | These disappear | Why |
| Serial controlled | Decimal controlled, Packsize controlled | A serial number identifies exactly one whole unit. |
| Packsize controlled | Serial controlled, Decimal controlled | Packs are counted in whole units. |
| Decimal controlled | Serial controlled, Packsize controlled, Bill of material | Measured goods are not counted in units. |
| Bill of material | Decimal controlled | Assemblies are built in whole units. |
Lot, expiry, manufacture date and catch weight combine freely with each other and with the rest. A pharmaceutical, for example, is commonly both lot and expiry controlled.
Every receipt records a lot (batch) number, and the stock keeps that lot for its whole life in the warehouse: in every bin, on every license plate, on every pick and shipment. Use it when a supplier or regulator can recall a batch, or when your customers need to know which batch they received.
When you tick it, Lot pattern appears. Leave it empty to accept any lot number, or enter a pattern the scanned lot must match, so a mis-scan (a serial number or a date scanned into the lot prompt) is refused at the handheld instead of being stored:
_ stands for exactly one character, and % for any number of characters.L26% accepts L260915 but refuses 260915. LOT-____,BATCH% accepts LOT-0042 or BATCH77.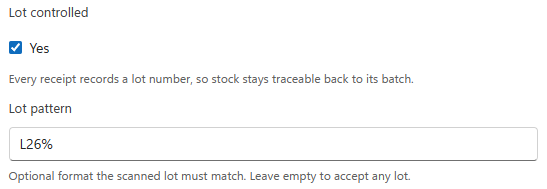
More in Lot Control.
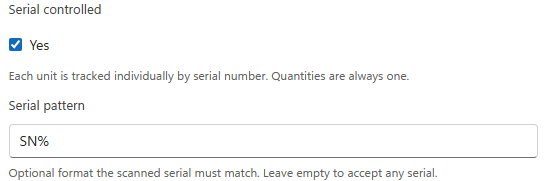
Every unit carries its own serial number, captured at receiving and confirmed again at picking, so you always know exactly which unit went to which customer. Quantities of a serial-controlled product are always one per serial. Use it for equipment, electronics and medical devices that are tracked unit by unit or carry a warranty.
When you tick it, Serial pattern appears. It works exactly like the lot pattern: leave it empty to accept any serial, or enter a pattern such as SN% to refuse anything that is not a serial number.
More in Serial Control.
Every receipt records an expiry date, and stock is allocated first-expiry, first-out, so the oldest stock leaves first. Use it for food, pharmaceuticals, chemicals and anything with a shelf life.
When you tick it, two allowances appear:
180 refuses gloves that expire within six months.90 never ships gloves with under three months left. When left empty, LogisticaHQ uses the customer's outbound allowance, and if the customer has none, the tenant-wide setting.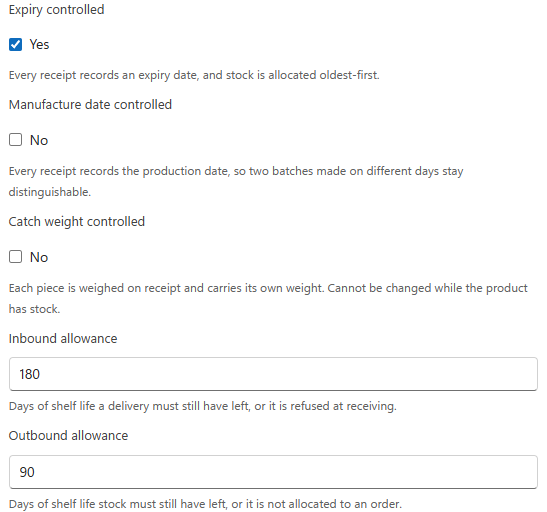
More in Expiry Product.
Every receipt records the date the goods were produced. Two batches made on different days stay separate in stock, even when they share a lot number or have no lot at all. Use it when customers or regulations ask for the production date, for example with food and beverages.
Each piece is weighed at receiving and keeps its own actual weight, instead of every unit being assumed to weigh the same. The handheld reads the weight from the box's GS1-128 barcode, or asks for it when the label has none. Use it for goods sold by weight but handled by the piece, such as boxed meat, cheese or produce, where each box weighs slightly differently and the invoice must show the real weight.
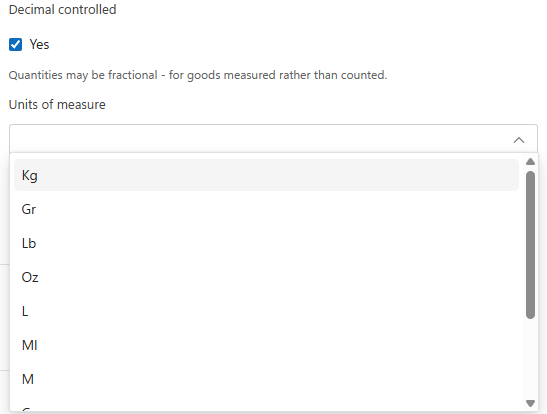
Quantities may be fractional, for goods measured rather than counted: cable by the metre, liquids by the litre, grain by the kilogram. When you tick it, Units of measure appears. Choose the unit every quantity of this product is expressed in, such as M, L or Kg. A decimal-controlled product must have a unit of measure to be saved.
A decimal-controlled product has no Dimensions section, because it is measured by its unit rather than boxed.
More in Decimal controlled.
Stock is handled in packs, and each pack size holds a fixed number of units: for example eaches, inner boxes of 12 and cases of 144. Receivers scan the pack, pickers pick whole packs, and each pack size can carry its own barcode, dimensions and weight.
When you tick it and save, a Packsizes section appears below the attributes. LogisticaHQ creates the Each (x1) pack size for you, carrying the product's UPC as its barcode and the product's dimensions. It is the product itself and cannot be removed. Click Add to create each larger pack:
| Field | What to enter |
| Name | How people call the pack, for example Box of 12. |
| Eaches | How many units the pack holds. It cannot be changed once stock exists in that pack size. |
| Barcode, Barcode type | The barcode printed on the pack (Code128, EAN13, UPCA or ITF14). |
| Length, Width, Height, Weight | The pack's own measurements, in the product's units, used for cartonization and freight. |
| Cartonization | PreBoxed if the pack ships as it is, in its own box. |
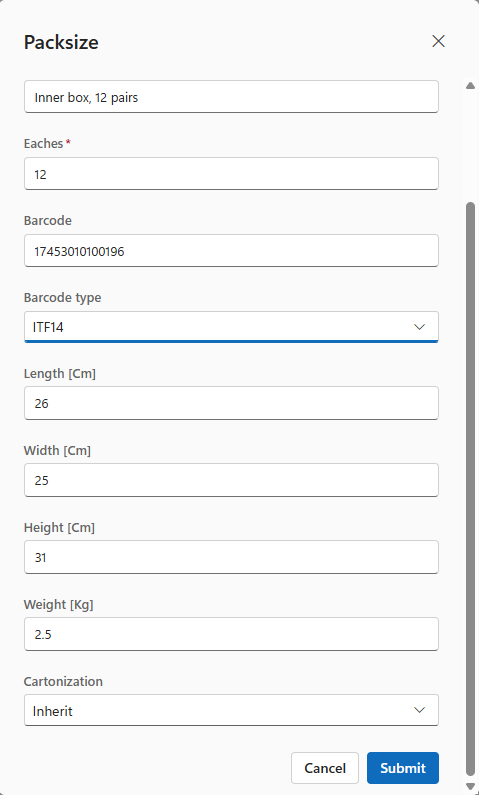
Each row has a Print action for the pack's barcode label. More in Packsize.
The product is assembled in the warehouse from other products, rather than bought as a finished item: a gift set, a kit, a pre-packed bundle. When you tick it, BOM Workflow appears, where you choose the production workflow that builds it, and a Bill of material section lists its components. Click Add and choose each component and the quantity one finished product uses. Components must belong to the same client.
More in BOM - Bill of Materials.
Open the Dimensions section. Dimensions drive cartonization, storage billing by volume and freight quotes, so enter them for every product you ship.
Set the unit first. Spacial UoM starts at M (metres). Choose Cm, Mm, In or Ft before you type the measurements. A 24 cm product entered under metres becomes 24 m long, and no carton will ever fit it.
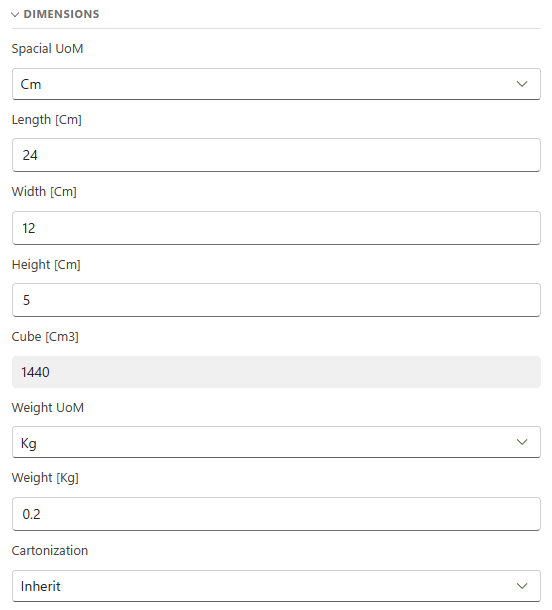
Click Update at the top of the screen. The product is ready to receive.
Further down the screen you will find Min/Max (replenishment levels), Freight details (NMFC and freight class for truck shipments) and Product additional details. At the bottom, the Inventory, Pick tickets and Purchase orders tabs show the product's stock and orders once it has activity.
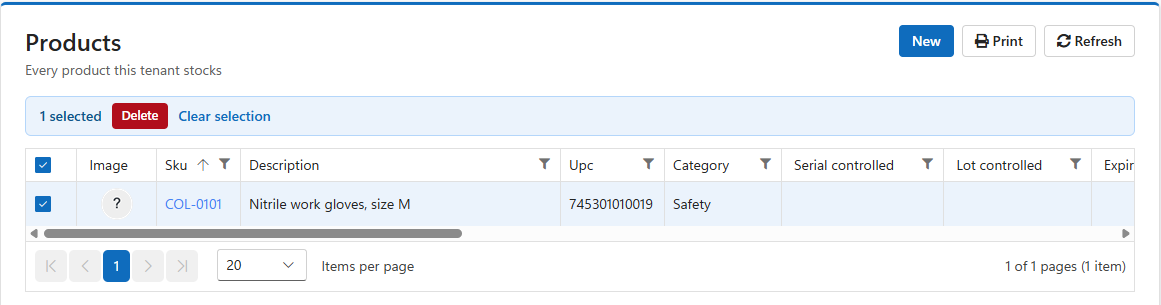
Labels print on the printer set up for product labels. See Printers and Labels.
A few tenant-wide settings shape how every product behaves. You find them in Setup > System > Configuration, group Business - Products:
| Setting | Default | What it does |
| Allow attribute change | No | Lets tracking attributes change while the product is on open orders. Stock on hand still blocks the change. |
| Allow expired product | No | Allows expired stock to be received and adjusted. Use with care: expired goods can then enter your inventory. |
| Expiry format | yyyyMMdd | The date format expiry dates are read and printed in. |
| Decimal error margin | 1.5 | The tolerance, in the product's unit, accepted when handling decimal-controlled products. |
| Print packsize labels on consolidate | Yes | Prints new pack labels when pack sizes are consolidated. |
| Report and capture length unit | M | The default length unit for reports and for dimension capture on the handheld. This is why a new product's dimensions start in metres. |
| Report and capture weight unit | Kg | The default weight unit for reports and weight capture. |
| Default barcode standard | Gs1 | How barcodes are read when a product does not set its own standard. GS1 lets one scan fill GTIN, lot, expiry and serial. |
| Handheld UDI autofill / confirm | Yes / No | Whether the handheld fills lot, expiry and serial prompts from a GS1 or UDI barcode, and whether the operator must confirm them. |
| Trim white spaces from lots / serials | Yes / Yes | Removes stray spaces from scanned lot and serial numbers. |
Was this page helpful?