 P4 Software
/
logisticaHQ-en
P4 Software
/
logisticaHQ-en
P4 Software
/
logisticaHQ-en
P4 Software
/
logisticaHQ-en
Creating 3PL Billing profiles is an extremely arduous Task in most Warehouse management Systems, however in LogisticaHQ it is wizard based to simplify the process.
By creating different billing profiles, you can invoice the 3PL client correctly the first time! there can be various profiles for the same Task, in the event you invoice 3PL Clients differently based on volume or type of Products.
All storage fees are calculated by the hour, we have found through our experience and research this works best for the 3PL Provider as well as the 3PL Client.
, set the charge type in this case set it to Picking.
On the screen above chose each, this will invoice the 3PL client .002 cents for each unit picked. As the image above shows there are assorted options to choose from depending on the agreement you have with your client.
If you chose weight or Cube as your billing calculation method, it is critical you setup the dimensions correctly in the Products screen.
On the screen above enter .002 for the rate, in the additional charges field this is for discounts, taxes or miscellaneous charges.
On the screen above select Cumulative this will consolidate all the Picking across various orders into one line on the invoice. Then click finish this will create the billing code, this code will now appear in the 3PL client setup screen and allow you to assign the profile to the client.
There is a detailed excel workbook that is sent via Email with the PDF invoice, this excel workbook contains detailed information for each line charge, no matter what your selection in step #5 is.
Step #5 is for not having thousands of lines on the actual invoice.
This page walks through setting up billing for one client, from the system settings to a recurring monthly invoice. The examples use a Panamanian client billed monthly, with ITBMS at 7%.
When an invoice is created, LogisticaHQ can save a snapshot of the client's storage movements and service activity for the period. Storage rules, and Service rules that read those snapshots, need this capture. Both capture settings are off by default. While they are off, only Flat rules and Service rules that read other tables produce lines, and no error is shown.
Capture happens when an invoice is created. Turning a setting on later does not fill in invoices that already exist. Generate a new invoice for the period instead.
Two optional settings are also useful:
The same group, Business - Multi Client, holds three more settings:
| Setting | Default | Use |
| Invoice Number Prefix | INV- | The text before the seven-digit invoice number, for example INV-0000027. |
| Invoice Email Subject | Invoice @InvoiceNumber has been generated for Billing cycle @Start to @End | The subject of invoice emails. |
| Invoice Email Body | Invoice has been generated for Billing cycle @Start to @End, followed by @InvoiceNumber and "Thank you!" | The body of invoice emails. |
The placeholders you can use in the subject and body are listed in Managing 3PL Invoices.
Open Setup > 3PL > Clients and open the client. Check these fields:
The profile screen has four sections:
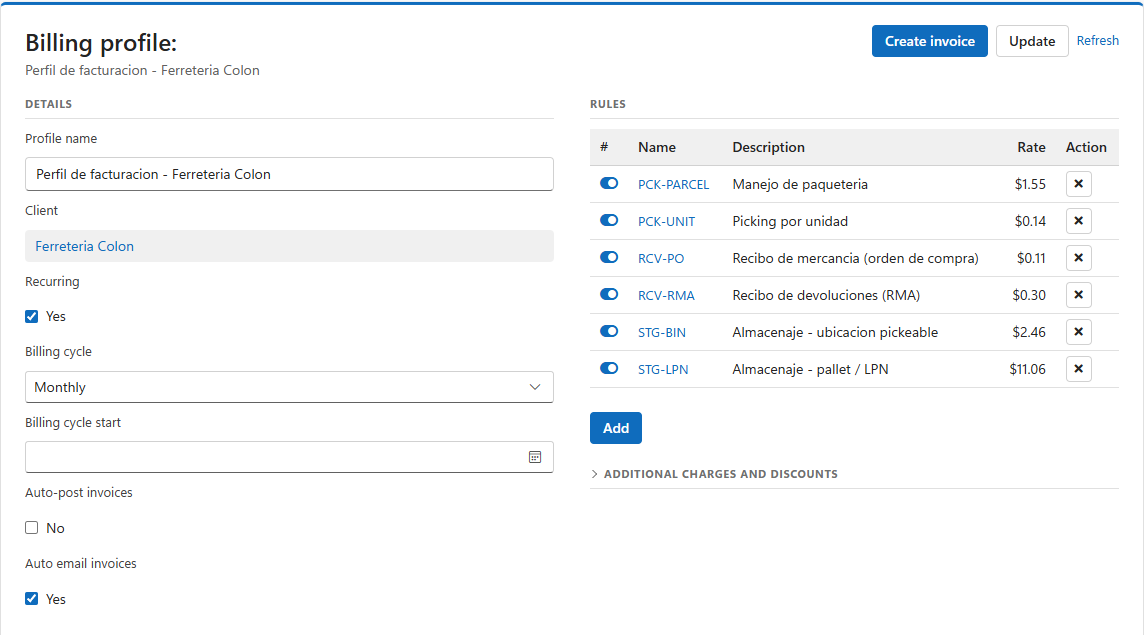
Click Update to save the details and the charges.
To bill another client with the same rates, use Clone... on the profile's row in the list. Choose the new client and name. The profile is copied with all its rules.
Add the charges before the rules, so the rules can name them.
ITBMS and the Percentage 7.A charge applies only to lines that name it:
AdditionalCharges column.Names are matched without regard to upper or lower case. A name that is not on the invoice's list of charges is ignored.
For a discount, add a charge with a negative percentage, for example "Volume discount" at -5.
Worked example. An invoice has these lines:
The totals are:
| Sub total | $1,200.00 |
| Charges/Discounts (ITBMS 7% of $1,000.00) | $70.00 |
| Total | $1,270.00 |
The charges are copied from the profile into each invoice when the invoice is created. If you change a charge on the profile later, existing invoices keep their own copy. You can edit that copy on a Draft invoice.
In the Rules section, click Add. The Billing rule dialog opens. Enter a Name and a Description, then choose the Type. The other fields depend on the type.
Tips:
| Name | 010 Account management |
| Description | Monthly account management |
| Type | Flat |
| Rate | 350.00 |
| Additional Charges | ITBMS |
Every invoice gets one line of 1 × $350.00. The rule's name is the Item and its description is the Description. A Flat rule cannot have a rate of 0.
| Name | 020 Pallet storage |
| Type | Storage |
| Zone | Leave empty for all zones, or pick the zones to bill. |
| Product tracking | All |
| Calculation method | Lpn |
| Rate | 0.60 (per pallet per day) |
| Additional Charges | ITBMS |
| Break invoice lines | Cumulative (one line) or By Lpn (one line per pallet) |
Suppose the client kept 3 pallets for all 30 days of September. That is 90 pallet-days, and the line is 90 × $0.60 = $54.00. With By Lpn, the invoice shows one line per pallet, each with the pallet code as its description.
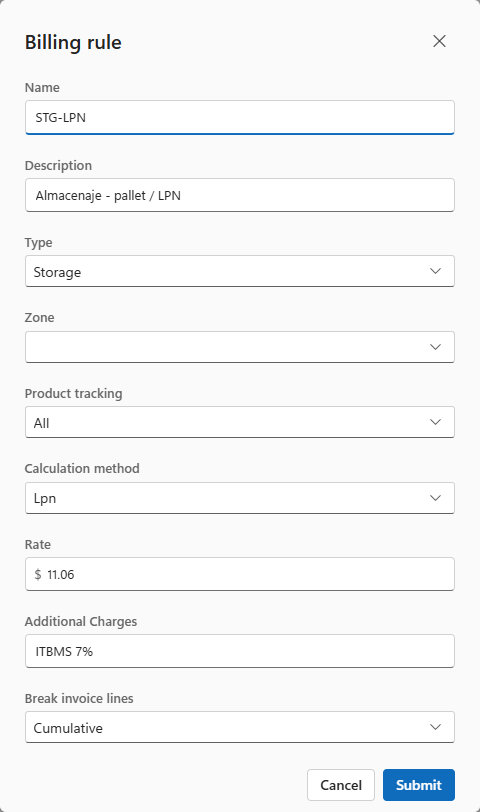
Other common Storage setups:
Storage rules need Generate Storage Records turned on (Step 1). A Storage rule cannot have a rate of 0.
A Service rule runs a SQL query and turns each returned row into an invoice line. Use Service rules for all handling charges.
| Name | 030 Picking per unit |
| Type | Service |
| Rate | 0.30 (per unit picked) |
| Sql | The query, for example the one below. |
A Service rule's Rate is a money field that the query reads as @Rate, so the price is kept on the rule and changed there, not inside the SQL. The query returns the rate, the quantity and the charge names:
SELECT
    'PICK-UNIT'                                        AS Item,
    'Units picked'                                     AS Description,
    @Rate                                              AS Rate,
    CAST(ISNULL(SUM(r.Quantity), 0) AS decimal(18,4))  AS Quantity,
    'ITBMS'                                            AS AdditionalCharges
FROM ClientInvoices ci
JOIN BillingServiceRecords r ON r.ClientInvoiceId = ci.Id
WHERE ci.Id = @Id
  AND r.SubType = 'Pick';
If the client picked 4,200 units in the period, the line is 4,200 × $0.30 = $1,260.00, with ITBMS applied.
Rules for writing these queries:
@Id, the Id of the invoice being built, and @Rate, the rule's Rate.ClientInvoices on that Id.@Rate for the price. A query can still return a fixed number instead, or several prices in one query.The 3PL Billing Query Library explains these rules and has 45 ready-to-adapt queries.
Editing a Service rule opens a full-screen editor:
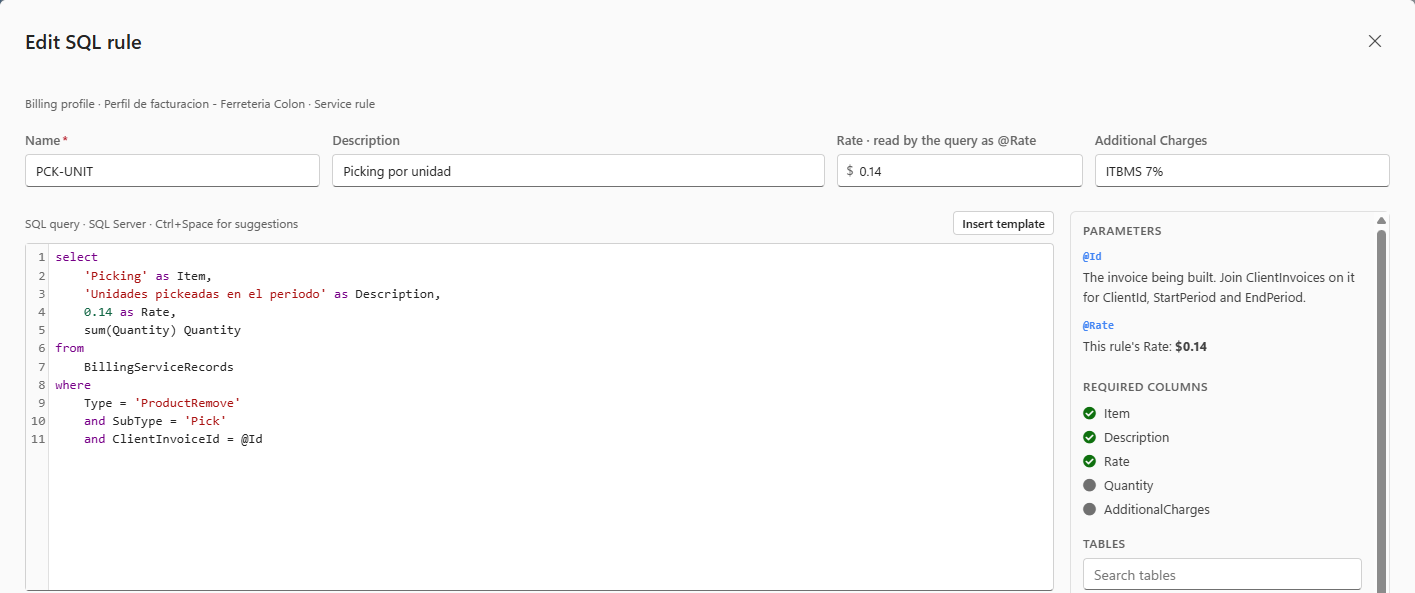
@Id and the Rate as it stands in the editor as @Rate. It shows the lines the invoice would get and their total. A test only reads data: nothing is saved.Click Save rule when the result is right.
To have LogisticaHQ create invoices by itself:
A scheduled background job checks recurring profiles periodically. When a whole cycle has ended after the Billing cycle start, the job does the following:
Only the scheduled job applies auto-post and auto-email. Invoices you create yourself from the screens are always Drafts and are never emailed automatically.
Contact support if scheduled invoice emails are not received.
Was this page helpful?